Think of an Apple developer certificate as your digital passport for the entire Apple ecosystem. It’s a special cryptographic key that proves to Apple that you are who you say you are. You absolutely need one before you can even think about testing your app on a real iPhone or iPad, let alone submitting it to the App Store.
What’s the Big Deal with Apple Developer Certificates?
Before we jump into creating certificates, it’s super important to understand why they exist in the first place. Apple’s security model is built on a “chain of trust,” and your certificate is the very first link. It ties your personal or company identity—which Apple has verified—directly to the code you write.
This digital signature is non-negotiable. It’s what allows you to build, test, and distribute apps for iOS, macOS, watchOS, and all the rest. This whole system is what keeps users safe from malware and ensures that the apps they download haven’t been tampered with.
It all boils down to three key pieces working in harmony:
- Certificates: This is what confirms your identity.
- App IDs: A unique string that identifies one of your specific apps.
- Provisioning Profiles: The glue that holds it all together. It links your certificates and App IDs to particular devices for testing or to the App Store for the final release.
Once you start creating certificates, you’ll manage them from your dashboard in the Apple Developer portal, which looks something like this:

From here, you can see all your active and expired certificates, what they’re for, and when they expire. It’s your central hub for all things code signing.
Why You Can’t Afford to Ignore Certificate Management
Keeping your certificates in order is a fundamental part of being an Apple developer. With requirements constantly evolving—like the mandate to use Xcode 16 or later for app submissions in 2025—letting a certificate expire can bring your development to a grinding halt.
And the stakes are high. A whopping 38% of developers face at least one App Store rejection every year, and a lot of those come down to simple compliance or certificate problems. This is made even tougher when you consider that 33% of developers say they struggle with getting the hardware access needed to stay current.
To help you get started, here’s a quick summary of the most common certificate types and the specific jobs they’re designed for. Picking the right one from the get-go saves a lot of headaches.
Common Certificate Types and Their Purpose
| Certificate Type | Primary Purpose | When You’ll Use It |
|---|---|---|
| Apple Development | Code Signing for Development | Testing your app on your personal, registered devices during the development phase. |
| Apple Distribution | Code Signing for Release | Preparing your app for submission to the App Store or for Ad Hoc/Enterprise distribution. |
| Developer ID Application | App Notarization | Distributing a macOS app outside of the Mac App Store. |
| Apple Push Notification service | Enabling Push Notifications | When you need to send push notifications to your app from your server. |
This table should give you a clear idea of which certificate you’ll need depending on what stage of the development cycle you’re in.
While this guide zeroes in on the certificates for native Apple apps, it’s good to know that other approaches, like mobile web applications, have their own unique development and deployment processes. For a more comprehensive look at certificates, check out our guide on the essentials of an Apple developer certificate: https://codepushgo.com/blog/certificate-apple-developer/
Generating Your Certificate Manually
While Xcode’s automatic signing is a lifesaver most of the time, there are moments when you need to roll up your sleeves and handle certificates manually. Knowing this process gives you way more control and makes troubleshooting a whole lot easier when things inevitably go wrong.
The manual approach involves creating a special request file on your Mac, sending it over to Apple, and then installing the certificate they give you back. It all starts on your local machine, not in a browser.
Creating a Certificate Signing Request
First things first, you need to generate a Certificate Signing Request (CSR). You’ll do this using the Keychain Access app that comes with every Mac. This CSR file essentially packages up your public key and some personal details into a format Apple can understand.
Think of it like applying for a passport. The CSR is your application form, and Apple is the authority that verifies it and issues your official developer “passport”—the certificate.
Pro Tip: When you’re in Keychain Access creating the CSR, always choose the “Save to disk” option. This gives you the
.certSigningRequestfile you’ll need for the Apple Developer portal. Don’t pick the other options that try to email it or send it directly.
The whole journey of getting and using your certificate is a straightforward three-part process.
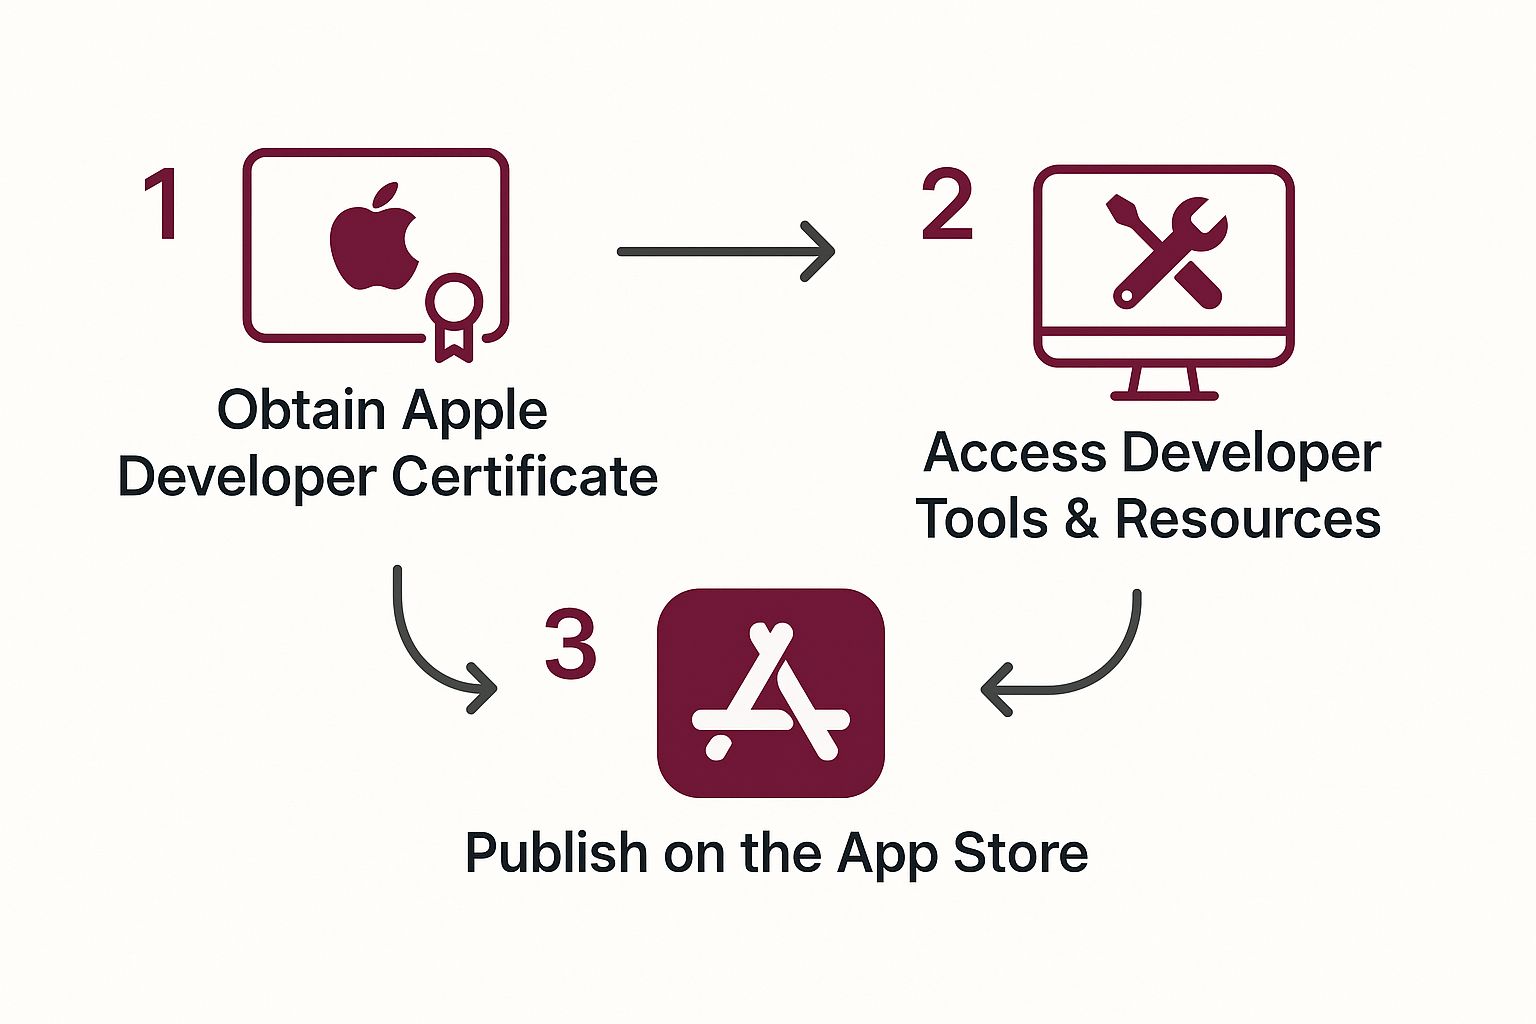
As you can see, getting the certificate is the first critical step. It’s what unlocks everything else, from development tools all the way to App Store publication.
Uploading the CSR and Downloading Your Certificate
Alright, with your CSR file ready to go, log into the Apple Developer portal and navigate to the “Certificates, IDs & Profiles” section.
You’ll want to create a new certificate here. Make sure you pick the right type—like Apple Development for testing on your devices or Apple Distribution for App Store submission. Apple will then ask you to upload that .certSigningRequest file you just made.
Once you upload it, Apple’s system processes it almost instantly and generates your certificate. It will be available for download as a .cer file. This file is essential, but it doesn’t work alone. To see how it all fits together, you can learn more about the role of an Apple Developer provisioning profile in our other guide.
The final step is to download that .cer file and simply double-click it. Keychain Access will take over, installing it and pairing it with the private key that was created back when you made the CSR. And that’s it! Your Mac is now fully equipped to sign your code.
Let Xcode Handle the Heavy Lifting
Honestly, for most of your day-to-day development work, you don’t need to get your hands dirty with manual Apple developer certificate creation. Xcode has a built-in automated system that takes care of the whole certificate and profile dance for you. It’s a lifesaver that cuts down on setup headaches and saves a ton of time.
When you check that little box for “Automatically manage signing,” you’re essentially giving Xcode the keys to your Apple Developer account. It then goes to work, generating, downloading, and installing all the development certificates and provisioning profiles you need. It’s by far the quickest way to get your app from your Mac onto a real device for testing.
This integrated approach makes the whole build process feel seamless, which is a massive win for solo developers and small teams. You just log in once, and Xcode handles the rest.
Setting Up Automatic Signing in Xcode
Getting this feature up and running is pretty simple. The first thing you need to do is link your Apple Developer account inside Xcode’s preferences.
- Open Xcode and go to
Xcode > Settings...(it might bePreferences...on older versions). - Click on the Accounts tab.
- Hit the + button at the bottom left and choose Apple ID.
- Just sign in with your Apple Developer Program credentials.
With your account added, jump over to your project’s settings. Click on your main app target and then navigate to the Signing & Capabilities tab.
This is where the magic happens. You’ll see the main checkbox right away.
Just check the box for “Automatically manage signing” and pick your team from the dropdown menu that appears. Xcode will instantly get to work, syncing everything with the developer portal. If you’re curious about what’s actually happening under the hood, our guide on https://codepushgo.com/blog/what-is-code-signing/ explains the entire process.
A Quick Word of Caution: While this automatic feature is incredibly convenient, it can sometimes hide what’s really going on. If you’re on a bigger team or using a CI/CD server for automated builds, a manual setup is often better. It gives you more direct control and makes it much easier to track down problems when they pop up.
For most people, though, starting with automatic signing is the way to go. It lets you focus on what really matters—building your app—instead of getting bogged down in administrative tasks. You can always switch over to a manual setup later if your project grows more complex.
Taking Care of Certificate Renewal and Revocation
Apple developer certificates aren’t a “set it and forget it” kind of thing—they come with an expiration date. Letting one lapse can throw a real wrench in your development cycle, abruptly halting new test builds and bringing your team’s progress to a standstill. It’s a headache you definitely want to avoid.
The best approach is to be proactive. Plan on renewing your certificate before it actually expires. The process is the same as when you first created it: just head back to the Apple Developer portal and generate a new distribution or development certificate. After you’ve installed it in your Keychain, the crucial next step is to update your provisioning profiles to link to this new, valid certificate.
When You Actually Need to Revoke a Certificate
Revoking a certificate is a much bigger deal and should be reserved for just a couple of specific scenarios. You should only pull this trigger if the certificate’s private key has been compromised (a major security risk) or if a developer who had access to it leaves your team.
Keep in mind, revoking a certificate is permanent and has an immediate domino effect:
- Invalidated Profiles: All provisioning profiles tied to that certificate are instantly rendered invalid.
- Broken Builds: Your team will be blocked from signing any new builds with those profiles.
Once a certificate is revoked, you have to start over by creating a brand new one, regenerating all the affected provisioning profiles, and then making sure every developer on the team gets the updated files.
A classic rookie mistake is revoking a certificate just because it’s nearing its expiration date. Don’t do it! Always opt to renew in that situation. It’ll save you and your team a ton of unnecessary work and potential downtime.
Mastering certificates and profiles is a fundamental step on the path to shipping your app. To understand how this fits into the complete workflow, check out our guide on how to publish an app in the App Store, which walks you through the entire submission process.
Solving Common Code Signing Errors
Every developer, sooner or later, runs into a cryptic code signing error. It’s practically a rite of passage. These messages can feel frustratingly vague, but they almost always boil down to a simple mismatch between your certificate, private key, and provisioning profile. Knowing where to look can turn hours of guesswork into a quick fix.
One of the most common errors you’ll see is “No valid signing identities found.” This is Xcode’s way of telling you it can’t find the private key that goes with the certificate you’re trying to use.
Your first stop should always be the Keychain Access app on your Mac. Look for your certificate in the list. Is there a little disclosure triangle next to it? If so, click it. You should see your private key nested right underneath. If you don’t, or if you see duplicate certificates, you’ve found your problem.

Pinpointing Profile and Certificate Mismatches
Another classic is “Provisioning profile doesn’t include signing certificate.” This one is refreshingly direct. The profile you’ve chosen in your build settings was created with a different certificate than the one you’re currently trying to sign your app with. Simple as that.
To sort this out, you have a few paths forward:
- The easiest fix is often right in Xcode. Go to your project’s “Signing & Capabilities” tab and see if there’s another valid provisioning profile you can select from the dropdown.
- If not, you’ll need to pop over to the Apple Developer portal. Find the profile that’s causing trouble, edit it, and make sure to add your current signing certificate to it.
- When in doubt, just start fresh. Sometimes it’s faster to just blow away the old profile and generate a new one from scratch using the right certificate.
My golden rule for troubleshooting: Isolate the problem. Before you start tearing your own setup apart, ask a few questions. Does the build fail on a coworker’s machine? Does it fail on a fresh clone of the repository? This quickly tells you if the issue is with your local environment or the project’s configuration itself.
Fixing these errors really is a process of elimination, much like debugging your own code. It’s a skill you build over time, and it’s a core part of the entire development lifecycle. To get ahead of these problems, check out our guide on software testing strategies, which can help you catch issues long before they get to the code signing stage.
And never forget the oldest trick in the book: Xcode caches everything. A quick clean of the build folder (Shift + Command + K) or a full restart of Xcode can sometimes magically resolve an issue that seemed completely unsolvable just moments before.
Got Questions About Developer Certificates? Let’s Clear Things Up.
Diving into Apple Developer certificates can feel like untangling a web of keys, profiles, and permissions. It’s a common stumbling block for new and even seasoned developers. Let’s break down some of the most frequent questions that pop up.
A big one right off the bat is, “Why do I need separate certificates for development and distribution?” It really boils down to security and control. Think of your development certificate as a hall pass for your test devices—it lets you build and run your app in a safe, controlled sandbox. The distribution certificate, on the other hand, is the official seal. It’s what you use to cryptographically sign the final version of your app before sending it off to the App Store.
Do Certificates Really Impact a Developer’s Career?
Absolutely, though maybe not in the way you’re thinking. While the signing certificates are purely technical, Apple also has an ecosystem of educational certifications that can give your career a serious boost.
Earning a certification like ‘App Development with Swift Associate’ proves you have a solid grasp of essential tools like Xcode. In a competitive market, that kind of validation matters. The demand for skilled iOS developers is high, with median salaries in major US industries ranging from $119,000 to $145,000. And with a projected 17% increase in the need for software developers through 2030, specializing in Apple’s ecosystem is a smart bet. You can dig deeper into the earning potential for iOS developers on Coursera.org.
Another topic that causes a lot of headaches is managing private keys.
What happens if I lose the private key that goes with my certificate?
If you lose that private key, the certificate is instantly useless. You simply can’t sign code with it anymore. The only way forward is to log into the Developer Portal, revoke the old certificate, and start the process over by creating a new Certificate Signing Request (CSR) on your Mac.
This is a perfect example of why exporting your developer identity from Keychain as a backup is a practice that can save you a world of hurt.
Finally, let’s talk about expiration versus revocation. When a certificate expires, that’s just a normal event—you just renew it and move on. Revoking a certificate is a much more serious, irreversible step. You should only revoke a certificate if you suspect the private key has been compromised. Otherwise, always stick to renewing.
At CodePushGo, we help you bypass the app store review delays entirely for your React Native apps. Push updates directly to your users, fix bugs in minutes, and keep your release cycle moving at top speed. Get started with CodePushGo.


