Certificates in iOS are your digital passport. They’re how you prove to Apple that you’re a trusted developer, allowing you to sign your code and verify that your app is authentic and hasn’t been messed with. Without these certificates, you can’t install apps on test devices, get them into the App Store, or really do much of anything.
Untangling iOS Code Signing Essentials
Before you even think about generating a certificate, you need to wrap your head around the whole code signing ecosystem. I like to think of it as Apple’s digital bouncer. Its job is to keep users safe from sketchy software by making sure every single app comes from a known developer and is exactly as it was when they signed it. This whole system is built on trust.
If you don’t get how all the pieces fit together, you’re going to see those dreaded “code sign error” messages in Xcode more often than you’d like. Trust me, spending a little time understanding the fundamentals now will save you a massive headache down the road.
The Core Components of Code Signing
The certificates get all the attention, but they’re really just one part of a bigger puzzle. You’ll be juggling three key assets inside your Apple Developer account.
-
Development vs. Distribution Certificates: You’ve got two main flavors. A development certificate is for signing builds you want to run on your own test devices. When you’re ready to ship, you’ll use a distribution certificate to sign the final app for the App Store or for in-house enterprise use.
-
Provisioning Profiles: This is the magic ingredient that ties everything together. A provisioning profile is a file that links your certificates, your App ID (the app’s unique fingerprint), and the specific device UDIDs that are allowed to run the app. If the profile is wrong, your app isn’t going anywhere.
-
Certificate Signing Request (CSR): This is where it all begins. You’ll generate a CSR on your Mac using Keychain Access. It’s basically an encrypted block of text with your details. You send this file to Apple, and they use it to create your official certificate.
This is the main dashboard in the Apple Developer account where all the magic happens. You’ll be spending a lot of time here managing your certificates, identifiers, and profiles.
Getting comfortable in this portal is a must for any iOS developer. For a deeper dive into the mechanics, our guide on https://codepushgo.com/de/blog/what-is-code-signing/ is a great resource. You can also see how similar identity principles are used in enterprise setups with things like SAML for authentication and provisioning.
To help keep it all straight, here’s a quick reference table breaking down these key components.
Key Components of iOS Code Signing
| Component | Purpose | Where It Lives |
|---|---|---|
| Certificate | Verifies your identity as a developer. Used to sign the app binary. | Apple Developer Portal & your Mac’s Keychain |
| App ID | A unique identifier for your app (e.g., com.company.appname). | Apple Developer Portal |
| Device ID (UDID) | A unique identifier for a physical iPhone or iPad. | On the device itself (you’ll need to retrieve it) |
| Provisioning Profile | The file that links the Certificate, App ID, and Device IDs together. | Apple Developer Portal & bundled inside your app |
Think of these as the four pillars of code signing. If one is missing or misconfigured, the whole structure comes tumbling down.
Understanding this relationship is non-negotiable. An app might fail to build on a new teammate’s machine simply because their device isn’t listed in the provisioning profile, even if the certificate is correct.
Getting this stuff right is absolutely critical for a smooth submission process. It’s no surprise that 38% of iOS developers have had at least one App Store rejection in the past year, many due to simple configuration issues like these. Mastering how certificates in iOS work isn’t just a technical requirement—it’s a foundational skill for success.
Alright, let’s get our hands dirty and create the first essential piece of the puzzle: your development certificate. Think of this as your official developer ID card, the one that tells Apple you’re a trusted creator. It all starts with something called a Certificate Signing Request (CSR).
This CSR is basically an encrypted application form that you create right on your Mac. It’s not just a piece of digital paperwork; it holds your public key and some identifying info that Apple uses to stamp its approval and issue your unique certificate.
The whole dance begins in an app you already have: Keychain Access. This is your Mac’s secure vault for passwords, keys, and certificates. Getting this initial step right is non-negotiable because the private key generated here never leaves your machine. It’s the secret half of your digital identity.
This little flow chart breaks down the whole three-part journey, from creating the request on your Mac to getting the final certificate back from Apple.
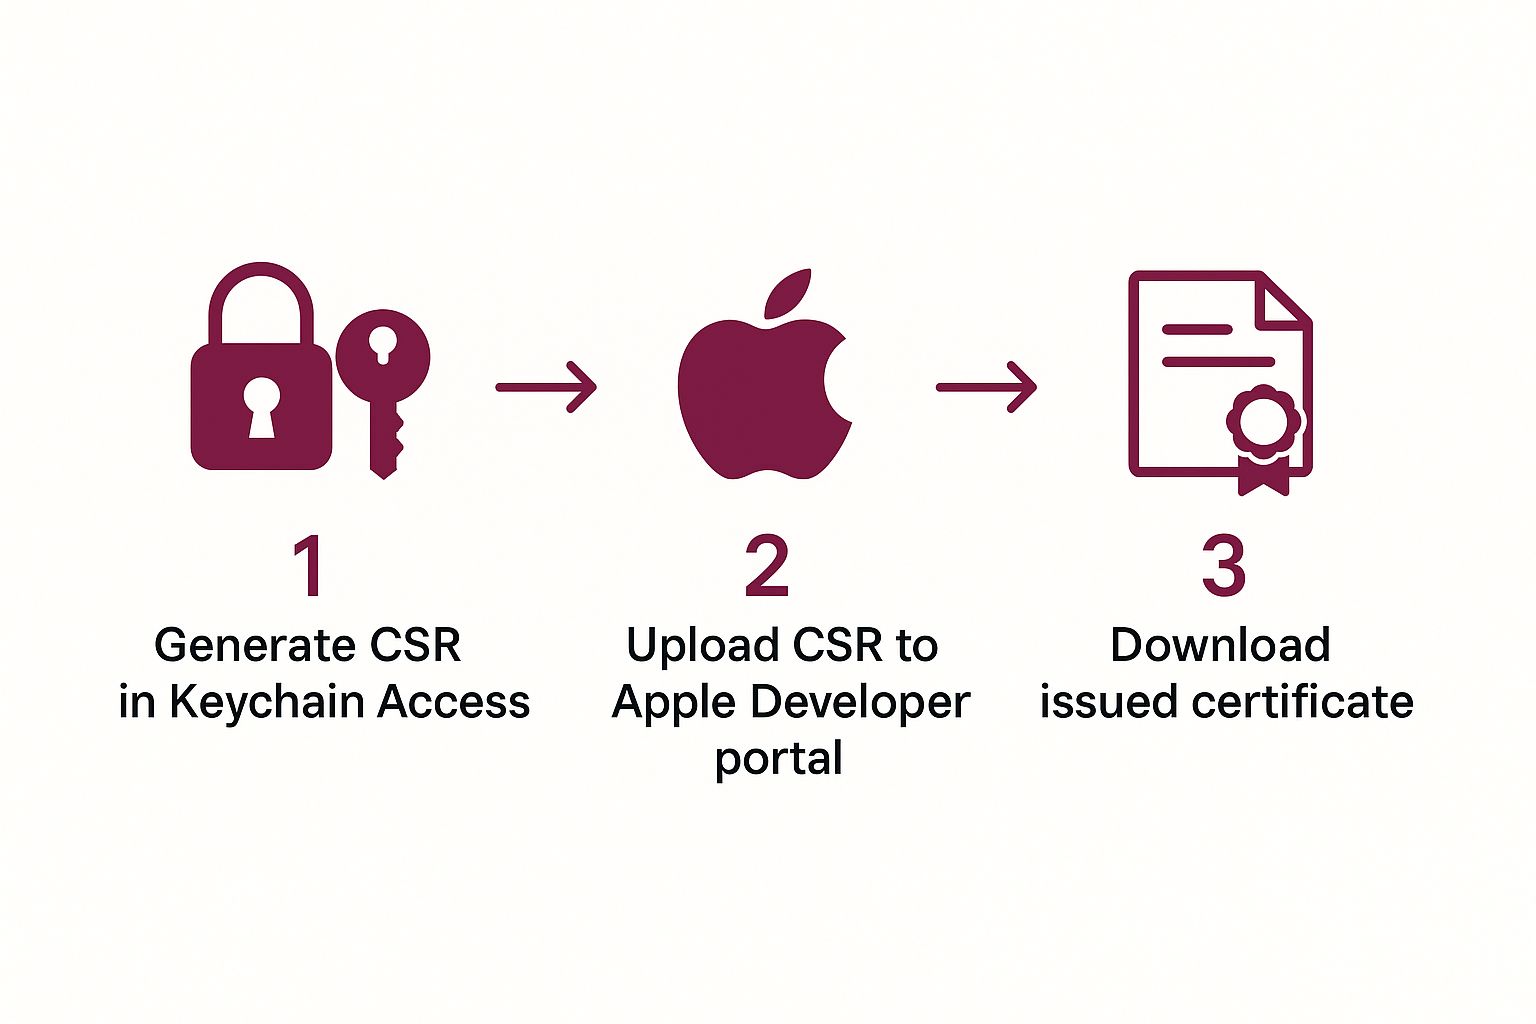
As you can see, your Mac and the Apple Developer Portal have a little back-and-forth, making sure your private key and the final certificate are securely linked together.
Generating the Certificate Signing Request
First things first, pop open Keychain Access on your Mac. In the top menu bar, you’ll want to navigate to Keychain Access > Certificate Assistant > Request a Certificate From a Certificate Authority.... A window will appear, asking for a few bits of information.
- User Email Address: Make sure this is the exact email you use for your Apple Developer account.
- Common Name: Just use your full name, the same one that’s on your developer account.
- CA Email Address: Leave this field empty. No need to touch it.
- Request is: Be sure to select the “Saved to disk” option.
This will spit out a file with a .certSigningRequest extension. Save it somewhere handy—your desktop is a fine spot for now—because you’re going to need it in just a moment.
Pro Tip: I’ve seen it happen a thousand times: a tiny typo or using the wrong email here causes a headache later. Double-check that the email you enter is identical to your developer account email. It’s a simple check that can save you from frustrating validation errors down the line.
Uploading to the Apple Developer Portal
With your CSR file in hand, it’s time to head over to the Apple Developer Portal. Once you’re logged in, find the “Certificates, Identifiers & Profiles” section and hit that blue ”+” button to start the process of adding a new certificate.
You’ll see a few options. Under the “Software” heading, pick “Apple Development” and click continue.
The next screen is where your CSR comes into play. You’ll be prompted to upload the file you just created. Choose the .certSigningRequest file from your Mac, upload it, and click “Continue”. Apple’s system works its magic almost instantly, and just like that, you’ll be presented with a download link for your shiny new development certificate. This file will end in .cer. If you want to dive even deeper into the portal’s certificate management, we’ve covered it extensively in our guide to the Apple Developer certificate process.
Installing and Verifying Your Certificate
We’re in the home stretch now. Find that .cer file you just downloaded from Apple. The last step is beautifully simple: just double-click it.
That one action does everything. It automatically opens Keychain Access, installs the certificate, and—most importantly—pairs it with the private key that was created at the very beginning of this process. It brings the whole thing full circle.
Want to be sure it worked? Open Keychain Access and look for the certificate you just added (it should be under your name). You’ll see a small dropdown arrow next to it. If you expand it, you should see your private key nested right underneath. This key-certificate pair is now ready for Xcode to find and use, giving you the power to sign your app and run it on your own devices.
Mastering Provisioning Profiles for Device Testing
Getting a valid development certificate is a great first step, but it’s only half the battle. By itself, that certificate won’t let you run your app on an actual iPhone. The missing piece of the puzzle is the provisioning profile—a critical file that digitally connects your developer identity, your specific app, and your physical test devices.
Here’s a simple way to think about it: your certificate is like your driver’s license, proving you are who you say you are. The provisioning profile is the car’s registration. It lists you as an authorized driver and specifies exactly which car (your app) you can drive on which roads (your test devices). If any piece of that “registration” is off, you’re not going anywhere.
This is the core concept behind Apple’s system for ensuring only trusted code runs on specific, pre-approved hardware during development.
Putting the Pieces Together
Before you can generate a provisioning profile, you need to have three key components lined up in your Apple Developer account. The profile’s entire job is to bundle them together.
- The App ID: This is your application’s unique signature, something like
com.yourcompany.yourapp. It tells the system precisely which app is being granted permissions. - The Certificate(s): The profile needs to know which developer identities are allowed to sign this app. For development, this will be one or more development certificates from your team members.
- The Device UDID(s): This is simply a list of the Unique Device Identifiers for every iPhone, iPad, or other Apple device you intend to use for testing.
With these three things in place, you can generate a .mobileprovision file straight from the developer portal. Xcode then checks this file to make sure the build you’re trying to push to a connected device is completely legitimate.
The link between these components is absolute. Add a new developer? Their certificate must be added to the profile. Get a new test phone? Its UDID has to be registered and included. Forgetting this is probably the single most common reason for build failures.
As the demand for iOS apps continues to soar, mastering these fundamentals is more important than ever. The global market for iOS developer services is on track to reach $11,582.3 million by 2025, a significant leap from $8,044 million in 2021. This growth, highlighted by Cognitive Market Research, shows just how valuable these core skills are.
Moving From Development to Ad-Hoc Testing
A standard development profile is perfect for your internal team, but what about when you need to share builds with people outside your organization, like clients or a dedicated QA team? That’s where an Ad-Hoc profile comes into play. It works almost exactly the same way but is tied to a distribution certificate instead of a development one.
- Development Profile: Lets your core team build and debug directly from Xcode onto their connected devices.
- Ad-Hoc Profile: Lets you create
.ipafiles that can be installed on a limited number of registered devices, completely bypassing the App Store. It’s perfect for beta testing.
For both profile types, you have to manually collect and register each device’s UDID in the developer portal ahead of time. Getting this right is crucial for a smooth workflow. You can dive deeper into the specifics in our guide to the Apple Developer provisioning profile. Keeping these profiles properly synced in Xcode will save you from countless headaches during on-device testing.
Preparing for Launch with Distribution Certificates
After countless hours of coding, testing, and refining, your app is finally ready for its audience. This is where your code signing strategy has to mature. Development certificates are great for your internal team, but getting your app out into the wild requires a distribution certificate. This is your official seal of approval, the key that unlocks the door to the App Store or your enterprise deployment.
Think of it like graduating from a learner’s permit to a full commercial license. Creating a distribution certificate feels familiar—you’ll still generate a Certificate Signing Request (CSR)—but its role is entirely different. It’s built for signing production releases, carrying a much heavier weight of trust and security.
App Store vs. Enterprise Certificates
Head over to the Apple Developer Portal and click to create a new certificate. Under the “Software” heading, you’ll spot the options for distribution. The two main ones you’ll deal with are:
- Apple Distribution: The modern, all-in-one certificate. This is what you’ll use for new submissions to the App Store, creating Ad-Hoc builds for external testers, and even for in-house enterprise distribution.
- iOS Distribution (App Store and Ad Hoc): This is the older, more traditional certificate type. You’ll still see it around, and it’s specifically for App Store releases and beta testing.
For any new project starting today, “Apple Distribution” is the clear choice. It represents the final, polished build you’ll archive in Xcode and push to App Store Connect. Its strict validation process is what guarantees the code you ship is authentic and hasn’t been tampered with.
The All-Important Distribution Provisioning Profile
Just like in development, the certificate can’t do the job alone. You need a matching distribution provisioning profile to tie your new certificate to your App ID. But here’s the key difference: a development profile is tied to a specific list of devices. An App Store distribution profile has a much simpler, but more critical, job.
It basically makes one simple declaration: “This app, with this App ID, signed by this distribution certificate, is officially cleared for public release on the App Store.”
You won’t find any device UDIDs here because it’s meant for everyone who downloads your app. When you create this .mobileprovision file in the portal, you’ll simply select “App Store” as the distribution method. Our deep dive on signing an iOS app covers how all these pieces fit together in more detail.
The Big Shift: The moment you switch to a distribution certificate and profile, you’re no longer building for a specific, known device. You’re now building a universal binary that’s ready for Apple’s review and a global audience.
Finalizing the Setup in Xcode
With your new distribution certificate and profile downloaded and safely installed in your Keychain, the last piece of the puzzle is in Xcode. Open your project and go straight to the “Signing & Capabilities” tab for your main target.
You’ll want to uncheck the “Automatically manage signing” box. This gives you full control.
From there, you can manually select your new distribution profile from the “Provisioning Profile” dropdown and your distribution certificate from the “Signing Certificate” list. Just make sure you’re applying this to your “Release” build configuration. Once that’s locked in, you’re ready to archive. This clean, manual approach is the best way to ensure Xcode grabs the right production assets and avoids those frustrating signing errors when you upload to App Store Connect.
Automating Code Signing with Fastlane Match
Anyone who has worked on an iOS team knows the pain of manual certificate management. Passing .p12 files through Slack, figuring out who has the latest provisioning profile, and spending half a day just getting a new developer’s machine set up… it’s a frustrating, error-prone mess. This is exactly why a modern, automated approach isn’t just a nice-to-have; it’s essential for any serious team.
This is where Fastlane Match comes in. Match is a brilliant open-source tool that completely flips the script on code signing. Instead of every developer juggling their own local copies of certificates and profiles, Match establishes a single, secure source of truth for your entire team by storing all signing assets in a private, encrypted Git repository.
Creating a Single Source of Truth
Let’s paint a picture. A new developer joins your team. Forget the old way of doing things. Now, they just run one command in their terminal. Match instantly fetches the correct development certificate and all the provisioning profiles they need, installing them automatically. Done. Your build server? Same deal. It becomes a simple, repeatable task that takes minutes, not hours of troubleshooting.
This approach puts a stop to the classic “well, it works on my machine” headache once and for all. When every developer and your CI/CD server pulls signing assets from the same central repository, you get perfect consistency. That consistency is the bedrock of reliable, repeatable builds.
Centralizing your certificates in iOS and profiles with Fastlane Match is how you build a scalable build pipeline that just works. Every build gets signed with the exact same credentials, every time, for everyone on the team.
Mastering modern tools like this has a real impact on your career, too. The Apple Certified iOS Developer Program, for instance, is well-regarded for a reason. Developers holding this certification often report a 20% increase in job opportunities and a 15% boost in salary prospects. With 72% of hiring managers preferring candidates with this kind of formal recognition, proving you’re proficient with professional-grade tooling gives you a serious edge.
How Match Actually Changes Your Workflow
The core concept behind Match is simple but incredibly effective. Whenever you need to create a new certificate or add a new device to a profile, you don’t do it manually on Apple’s developer portal—you let Match handle everything.
- It Generates: Match connects directly to the Apple Developer Portal for you to create or renew certificates and profiles.
- It Stores: It then encrypts these assets and commits them securely to your private Git repository.
- It Distributes: Team members and CI servers simply run a command to pull the latest assets, which are then decrypted and installed locally.
This flow is a massive upgrade. Think about certificate renewal. What used to be an hour-long, anxiety-inducing task becomes a quick, two-minute command. You not only save a ton of time but also boost security by keeping credentials encrypted and tightly controlled.
Manual vs Automated Certificate Management
Choosing between the old-school manual process and an automated tool like Match is a critical decision for any iOS team. Here’s a quick breakdown of how they stack up.
The manual approach might seem simpler for a solo developer just starting out, but it quickly becomes a major bottleneck as soon as a second person or a CI server is introduced. The process is fragile, insecure, and doesn’t scale.
| Aspect | Manual Management | Automated (Fastlane Match) |
|---|---|---|
| Setup | Each developer sets up their machine individually. | A single, shared repository is configured once. |
| Consistency | High risk of “works on my machine” issues. | Guaranteed consistency across all team members and CI. |
| Security | Private keys are shared insecurely (e.g., Slack, email). | All assets are encrypted in a private Git repository. |
| Onboarding | Slow and error-prone; can take hours per new dev. | A single command gets new members up and running in minutes. |
| Scalability | Poor. Becomes unmanageable with more than 2-3 devs. | Excellent. Scales effortlessly to large teams and many CI jobs. |
| CI/CD | Complex and brittle to configure; requires manual uploads. | Simple and reliable; build server pulls assets like a developer. |
In the end, automation is the clear winner for any professional development environment. Adopting a tool like Match is a fundamental step toward building a more robust and efficient development cycle. To see how this fits into the larger picture of a professional setup, it’s worth exploring broader CI/CD best practices to build a truly solid pipeline.
Answering Your iOS Certificate Questions
No matter how long you’ve been in the game, some questions about iOS certificates always seem to crop up. These are the little snags that can trip up anyone. Let’s walk through a few of the most common ones I hear from developers.
What Happens When a Distribution Certificate Expires?
This is a classic source of late-night panic, but take a deep breath—it’s not as bad as it sounds. When your distribution certificate expires, your apps already live on the App Store are completely safe. They’ll keep running and people can still download them without a hitch.
The real impact is on your workflow. You won’t be able to submit any new apps or updates. To fix this, you’ll need to jump into the Apple Developer Portal, revoke the expired certificate, and generate a new one. From there, you have to regenerate all your App Store provisioning profiles to use the new certificate, and then you can re-sign and upload your latest build.
Can I Use My iOS Certificates on Multiple Macs?
Absolutely. In fact, you pretty much have to if you’re working on a team. The trick is transferring the certificate and its private key together. That private key is the secret sauce; it’s created on the Mac where you first made the Certificate Signing Request (CSR) and it’s not meant to be shared casually.
Here’s the right way to move it:
- On the original Mac, open up Keychain Access.
- Locate the certificate you need to share. You should see a little arrow next to it, revealing the private key nested underneath.
- Right-click the certificate and hit “Export.”
- Make sure you save it as a .p12 file and lock it down with a strong password.
Now you can securely send that .p12 file to your teammate or move it to your other machine. On the new Mac, just double-clicking the file will prompt for the password and install both the certificate and its vital private key into the local Keychain. For a full breakdown of the whole lifecycle, check out our in-depth guide on managing iOS certificates.
A quick pro-tip: A certificate file (
.cer) on its own is useless for signing code. You need the private key. The.p12format is what bundles them into a single, portable identity.
What Is the Difference Between an App ID and a Bundle ID?
This one is a common point of confusion because the names are so similar, but they play very different roles.
Think of the Bundle ID (like com.mycompany.myapp) as your app’s local nickname. It’s a unique string you define right inside your Xcode project, and it identifies that specific app binary.
The App ID, however, is an official record over in the Apple Developer Portal. It’s what connects your app to Apple’s ecosystem of services—think Push Notifications, Sign in with Apple, or HealthKit. An App ID can be explicit, matching your Bundle ID exactly, or it can be a wildcard (like com.mycompany.*) to cover a group of apps that only need basic functionality.
At CodePushGo, we’re obsessed with making development faster and simpler. Why wait days for App Store reviews when you can ship updates instantly and securely? Learn how CodePushGo can accelerate your React Native release cycle.

