If you’re looking to build for both iOS and Android without managing two separate codebases, creating a React Native app is the way to go. Big names like Instagram and Shopify use it for a reason: it dramatically speeds up development and keeps costs in check by letting you apply your web development skills directly to mobile.
Your Starting Point for Building Cross-Platform Apps

Ever wondered how major companies roll out slick, high-performance apps on both the Apple App Store and Google Play Store without doubling their engineering team? React Native is very often the answer. It’s a powerful framework that bridges the gap between the web and native mobile worlds, letting you use the React you already know to build interfaces that look and feel completely native.
This guide is designed to be a practical, hands-on walkthrough for creating your first app. We’ll skip the heavy theory and focus on what you actually need to get up and running. The goal here is to build a solid foundation by truly understanding the core ideas that power every single React Native application.
Understanding the Core Concepts
At its heart, React Native is all about building your user interface from small, reusable chunks of code called components. Think of them like LEGO bricks. You start with simple, fundamental components like <Text> and <View> and snap them together to create more complex UI structures.
Beyond just components, there are two other ideas you absolutely need to grasp:
- Props (Properties): This is how you pass information down from a parent component to a child. It’s how you customize things. For instance, you could pass a
titleprop to a custom button component to change the text it displays. - State: This is data that a component manages internally. The magic happens when the state changes—the component automatically re-renders itself to show the updated information. This is what makes your app feel alive and interactive.
As you dive into app creation, getting a feel for the broader landscape of mobile app cross-platform development can give you great context for why frameworks like React Native have become so incredibly popular.
Why Choose React Native for Your Next App
The advantages of React Native extend beyond just code reuse. It empowers small teams to achieve big results and helps large organizations maintain a consistent user experience across platforms.
Let’s break down some of the key benefits that make it such a compelling choice for developers and businesses.
| Feature | Benefit for Developers & Businesses |
|---|---|
| Single Codebase | Write your application logic once in JavaScript and deploy it on both iOS and Android, saving up to 40% in development costs. |
| Native Performance | Unlike web-based solutions, React Native renders UI using native components, ensuring a smooth, responsive user experience. |
| Hot Reloading | See your code changes reflected in the app instantly without a full recompile. This feature dramatically speeds up the dev cycle. |
| Large, Active Community | A massive ecosystem of libraries, tools, and community support means you’re never stuck for long when you hit a problem. |
| Reusable Components | Build a library of your own UI components that can be shared across different screens or even different projects. |
Ultimately, this combination of efficiency, performance, and strong community backing is why so many developers are betting on React Native for their mobile projects.
Why Is React Native Gaining Popularity
Since Facebook first released it back in 2015, React Native has solidified its spot as a top-tier framework for building mobile apps. It’s not just a trend; the numbers back it up.
Demand for developers with this skill set is projected to grow with a compound annual growth rate (CAGR) of 16.7% between 2023 and 2033. This impressive growth is largely because of its efficiency. By using a single codebase for both iOS and Android, companies can slash their development costs by up to 40%.
Getting Your Development Environment Ready
Before you even think about writing code, you have to get your workshop in order. Setting up a solid development environment for React Native is probably the most critical first step you’ll take. Getting this right from the start will save you from a world of headaches later.
You’ve really got two main roads you can go down here: the easy-going scenic route or the all-access backcountry trail. Each has its place.
Your first option is Expo Go. Think of it as a managed, all-in-one toolkit that gets you from zero to a running app in just a few minutes. It handles a ton of the messy native configuration behind the scenes, which is a lifesaver if you’re new to mobile development or just want to knock out a prototype quickly. In many cases, you can build a full-featured app without ever needing to open Xcode or Android Studio.
The other path is the React Native CLI. This is what’s often called the “bare” workflow, and it gives you total, unfiltered control over the native side of your project. If you already know your app is going to need some custom native modules that Expo doesn’t support, or you need to dig deep into platform-specific APIs, this is your route. It takes more work to set up, but the power and flexibility are unmatched.
Choosing Your Path: Expo Go vs. React Native CLI
So, which one should you pick? It’s not about which is “better,” but which is the right tool for your job.
I almost always tell beginners to start with Expo Go. The learning curve is so much gentler, and it lets you focus on what really matters at the beginning: learning to write React code and build your app’s UI.
But if you’re building something more complex—say, an app that needs to interface with specific Bluetooth hardware or requires custom background tasks—the React Native CLI gives you the freedom you need. Just know that you can always start with Expo and then “eject” to a bare workflow if your needs change down the line.
My rule of thumb: If your app can be built with standard device APIs and your main goal is speed, go with Expo. If you can already see yourself needing to write custom Swift/Objective-C or Java/Kotlin code, do yourself a favor and start with the CLI from day one.
Installing the Essential Tools
No matter which path you take, there are a few tools you absolutely have to install. The bedrock of any React Native project is Node.js. I strongly suggest using a version manager like nvm (Node Version Manager). It makes switching between different Node versions for different projects a breeze. Stick with an LTS (Long-Term Support) version for stability.
You’ll also need a good code editor. The community has pretty much standardized on Visual Studio Code, and for good reason. Its marketplace is packed with fantastic extensions for React Native, JavaScript, and TypeScript that make development so much smoother.
If you’re on a Mac and plan to build for either iOS or Android, you’ll also want to grab Watchman. It’s a file-watching service from Meta that helps the Metro bundler see your code changes almost instantly. A quick install via Homebrew is all it takes.
The official documentation lays out the typical dependencies you’ll need.
As you can see, the setup involves Node, the React Native CLI, and platform-specific tools like the JDK and Android Studio. Nailing this part is key to a stable foundation.
Platform-Specific SDKs
Here’s where things can get a little more hands-on, especially if you chose the React Native CLI. You need the full development kit for each mobile platform you want to support.
-
For iOS Development: This is a Mac-only affair. You’ll need to install Xcode directly from the Mac App Store. It’s a big download, but it comes with everything you need: the iOS SDK, simulators for testing, and all the command-line tools for building your app.
-
For Android Development: You’ll need to install Android Studio. This gives you the Android SDK, device emulators, and the necessary build tools. A common stumbling block here is forgetting to set up your environment variables, like
ANDROID_HOME, so pay close attention to those instructions.
Getting these configurations just right is non-negotiable. For a different take on these initial steps, check out another helpful guide on creating a React Native app which offers some extra tips. Trust me, spending a little extra time on this foundational setup makes the actual building process much more enjoyable.
Building the Core of Your First React Native App
Alright, with your environment all set up, it’s time for the fun part: actually building something. This is where we leave the theory behind and start making the concepts of components and state management feel real. We’re going to build a classic To-Do List app—it’s the perfect project for getting your hands dirty with the fundamentals of React Native.
We’ll walk through how to structure the project, create reusable bits of UI, and handle the app’s data. You’ll see firsthand how a few core pieces can snap together to create a fully interactive screen.
Structuring Your Project for Future Growth
Before you write a single line of UI code, let’s talk about organization. Trust me, a messy project folder becomes a nightmare as an app gets more complex. For our To-Do app, a simple, component-based structure is the perfect place to start.
Go ahead and create a src directory at the root of your project. Inside src, make another folder called components. This is where we’ll keep our reusable UI elements, like the input field for new tasks and the individual list items themselves.
This little bit of upfront organization keeps your main App.js file clean. It can focus on the big picture—layout and data—without getting bogged down in the nitty-gritty of every button and text box.
Crafting Reusable Components
The real magic of React Native is its component-based architecture. Instead of wrestling with one giant, monolithic screen, we break our UI into small, manageable pieces. For our app, we’ll create two main custom components.
TaskInput.js: This will handle everything related to adding new tasks. It’ll just be a<TextInput>field and a button to submit a new to-do.TaskItem.js: This component will be a single to-do item in our list. It’ll show the task’s text and have a way for the user to delete it, probably using a<TouchableOpacity>.
Building them this way means you can easily use them elsewhere, style them on their own, and manage their logic in isolation. It’s a core practice for building a maintainable React Native app. For a deeper dive into this and other best practices, check out our guide on building apps with React Native.
My Take: Think of components as custom HTML tags you invent for your app. Seeing a
<TaskItem>in your code is way more intuitive than trying to decipher a complex nest of<View>and<Text>elements.
Managing App Data with React Hooks
So, how does the app actually remember the list of tasks? That’s where state management comes in. We’ll use one of the most essential React Hooks, useState, to keep track of our to-do items.
In your main App.js file, you’ll initialize your state with something like this: const [tasks, setTasks] = useState([]);. Here, tasks is simply the array holding our to-do items, and setTasks is the function we call anytime we need to add, remove, or change a task.
When a user adds a new task in our TaskInput component, that component will send the new task’s text up to App.js. The App component then uses setTasks to add the new item to the tasks array. Because tasks is a state variable, React Native is smart enough to automatically re-render the list to show the new item. No manual UI updates are needed.
Bringing the UI to Life with Core Components
With our structure and data logic planned out, we can assemble the UI using React Native’s built-in components. These are the basic building blocks you’ll use constantly.
<View>: Think of this as the<div>of the mobile world. It’s a fundamental container that supports styling, Flexbox layouts, and touch events.<Text>: Simple enough—you use this for displaying any and all text.<TextInput>: The go-to component for creating a text input field for user input.<TouchableOpacity>: A great little wrapper that makes any view respond to touches. When pressed, it briefly lowers the opacity, giving the user some nice visual feedback.
In App.js, you’ll use a <View> for the main layout, place your custom <TaskInput> at the top, and then use a <FlatList> to efficiently render the tasks array, feeding each item into your <TaskItem> component.
Styling for a Polished Look
An unstyled app just feels clunky. React Native gives us the StyleSheet API to handle all the visual design. It feels a lot like CSS, but it’s all written in JavaScript. You create style objects that you can then apply directly to your components.
For instance, to style a container, you might write:
const styles = StyleSheet.create({ container: { flex: 1, paddingTop: 60, backgroundColor: ‘#f0f0f0’, }, title: { fontSize: 24, fontWeight: ‘bold’, textAlign: ‘center’, }, });
You then just apply these to your components with <View style={styles.container}>. This approach keeps your styles organized and right next to your component code, which makes everything much easier to manage. Best of all, this single styling system works across both iOS and Android.
This cross-platform power is a huge deal. On average, React Native projects see about 70–85% code sharing between iOS and Android, which is a massive time-saver. For example, Spotify expanded their React Native usage from a single screen to their entire app, which resulted in a 35% faster development cycle and a 40% reduction in bugs. You can find more real-world examples of these powerful cross-platform capabilities on metadesignsolutions.com.
By piecing together reusable components, managing state with Hooks, and adding a clean styling system, you’ve now built the foundation of a real, working app. You’ve got a solid handle on how the essential parts of React Native click together to create a great user experience.
Implementing Over-The-Air Updates With CodePushGo
You’ve built your app, nailed the styling, and have state management humming along nicely. But what happens after you ship? A tiny typo is spotted, or you decide a button color is just slightly off. The old way means building a brand new binary, submitting it to the App Store and Google Play, and then waiting… and waiting. That process can take days, killing your momentum and leaving users stuck with known issues.
There’s a much better way. What if you could skip that whole song and dance for small changes? That’s exactly what Over-the-Air (OTA) updates let you do. By plugging in a service like CodePushGo, you can push JavaScript and asset updates directly to your users’ devices. This makes your app feel alive and instantly responsive to fixes and improvements.
Why OTA Updates Are a Game Changer
OTA updates completely change the post-launch maintenance game. You’re no longer trapped in a slow, formal release cycle dictated by app store review times. Instead, you gain incredible agility.
This approach is perfect for:
- Rapid Bug Fixes: Crush crashes or UI glitches without forcing everyone to download a whole new version of your app.
- Immediate UI/UX Tweaks: Swap out text, change colors, or adjust layouts based on real-time user feedback.
- Continuous Improvement: Roll out small, iterative enhancements that keep your app feeling fresh and modern.
The magic here is that this method separates your native code (the app’s shell) from your JavaScript bundle (where all the logic and UI lives). Since most of your day-to-day changes happen in that JS bundle, you can update it completely independently.
Let’s look at how this changes the workflow. The difference between the traditional update cycle and using CodePushGo is stark.
Traditional App Updates vs CodePushGo OTA Updates
| Process Step | Traditional App Store Update | CodePushGo OTA Update |
|---|---|---|
| Code Change | Developer makes changes in the codebase. | Developer makes changes in the JS codebase. |
| Build & Bundle | Generate a new signed binary (.apk/.ipa). | Bundle only the JavaScript and assets. |
| Submission | Upload the new binary to App/Play Store. | Push the bundle via the CodePushGo CLI. |
| Review Process | Wait 1-3 days (or more) for app review. | No review process; instant deployment. |
| User Action | User must manually update from the store. | The update is downloaded silently in the background. |
| Update Applied | Applied after the user updates the app. | Applied on the next app restart. Seamless. |
As you can see, what used to be a multi-day process involving manual steps and waiting periods becomes a task of a few minutes. You get your fixes and features out to users almost instantly, creating a much better experience for them and a far more efficient workflow for your team.
Setting Up CodePushGo in Your Project
Let’s get this integrated into the To-Do app we just built. It’s a pretty straightforward process. First thing’s first: you’ll need to head over to the CodePushGo platform, create an account, and register your application for both iOS and Android. This step provides you with the unique deployment keys that are essential for linking your app to the service.
With keys in hand, it’s time to install the React Native SDK into your project.
npm install react-native-code-push-go —save
Once that’s installed, the next critical step is linking the native dependencies. The setup is really well-documented and just requires a few small adjustments in your native Android (build.gradle, MainApplication.java) and iOS (AppDelegate.m, Info.plist) project files.
The final piece of the puzzle is to wrap your app’s root component. In your App.js or index.js file, you’ll import CodePushGo and simply wrap your main App component with it. This wrapper is what gives your application the power to check for updates and apply them automatically.
My Advice: Think carefully about how you configure the update check. You can have it check every time the app starts, only when it resumes from the background, or even trigger it manually. For the smoothest user experience, checking silently in the background when the app starts is usually the best bet.
Pushing Your First Update
Let’s run through a real-world scenario. Imagine you want to change the “Add Task” button text in our app to something clearer, like “Add New To-Do”.
- Make the Code Change: Pop open your
TaskInput.jscomponent and just change the text inside the<Button>or<TouchableOpacity>. Simple. - Bundle and Release: Now, you’ll use the CodePushGo command-line interface (CLI) to bundle your updated JavaScript and release it. You can target a specific deployment, like “Staging” for testing or “Production” for your users. The command is clean and simple:
codepushgo release-react <appName> <platform>. - Automatic Sync: That’s it on your end. The next time a user opens your app, the CodePushGo SDK will quietly check for this new version. It’ll download the tiny, differential update in the background, and on the next restart, they’ll see the new button text.
The user experience is completely seamless. They don’t have to lift a finger.
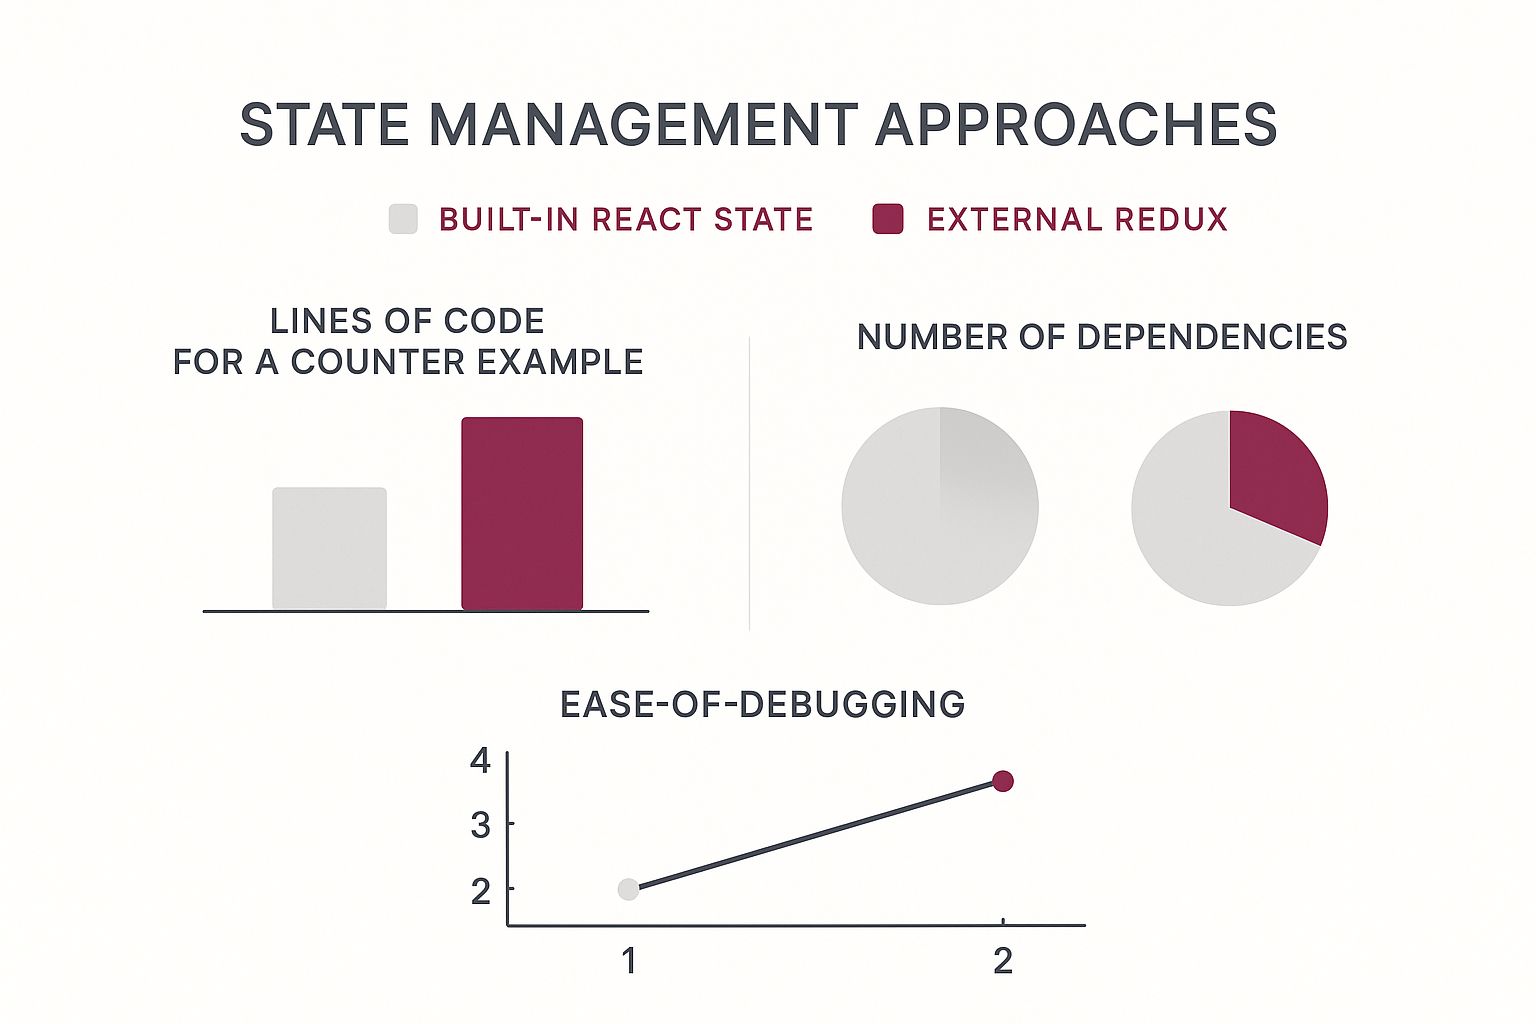
The image above highlights a similar principle: for simple state management, React’s built-in tools are far more efficient than a heavy library like Redux. The same logic applies to updates—a simple text change shouldn’t demand a full, cumbersome app store submission.
The process of building a React Native app that supports these kinds of updates is surprisingly simple. For more advanced use cases, I’d recommend diving into the official guides on deploying your React Native app with CodePushGo to learn about powerful features like staged rollouts and automatic rollbacks. Mastering OTA updates gives you a serious advantage, allowing you to ship a more polished and stable app faster than you ever thought possible.
You’ve done the hard work of building your app, from the initial setup to creating a great-looking UI that pulls in live data. Now comes the last mile: getting it ready for the world. This is where we shift gears from coding features to polishing and packaging your app for the official stores.
It might seem like a whole new world of configurations and settings, but it really just boils down to a few key tasks. We’ll walk through everything from the visual branding, like app icons and splash screens, to the technical necessities like versioning and code signing. Getting these details right is what makes for a smooth submission process.
https://www.youtube.com/embed/DREQwNb99l0
Polishing Your App for Production
First impressions count. Before you even think about building the final version, you need to lock in your app’s visual identity. This means creating a full set of app icons that look crisp and clean on every possible device and screen resolution. You’ll also want to set up a splash screen—that’s the first thing users see while your app loads—to give it a professional, polished feel right from the start.
Another crucial piece is managing your app’s version. For Android, you’ll need to set both a versionCode (a simple number that increases with each release) and a versionName (the public-facing version, like “1.0.0”). On the iOS side, Xcode has a corresponding build number and version. Keeping these in sync and incrementing them properly is essential for managing future updates.
Generating Your Android Release Build
When you’re ready to ship to the Google Play Store, you’ll need to create a signed release build. These days, the standard is the Android App Bundle (.aab), which has largely replaced the old APK format. Why the change? The App Bundle lets Google Play deliver smaller, highly optimized downloads specific to each user’s device, which is a big win for your users.
To make an .aab, you first need to generate a private signing key. Think of this key as your app’s digital fingerprint—it proves you’re the authentic developer. Once you have that key, you’ll configure your build.gradle file to use it for release builds. From there, it’s just a single command to generate the signed .aab file, and you’re ready to upload.
Navigating the iOS Deployment Process
Getting an app on the Apple App Store has a few more moving parts, and most of it happens within Xcode. First thing’s first: you’ll need an active Apple Developer Program membership. The whole process hinges on creating and managing certificates and provisioning profiles, which are Apple’s way of linking your developer identity to your app and the specific devices it can run on.
After your code signing is all set up in Xcode, you’ll “archive” your app. This step compiles your project and packages it for submission. The Xcode Organizer window will then pop up, allowing you to validate the build against App Store rules and upload it directly to App Store Connect, which is Apple’s dashboard for managing your app listings.
Pro Tip: Always, always test your release builds on actual physical devices before you hit submit. Emulators are fantastic for day-to-day development, but they can’t fully replicate real-world performance quirks, memory limits, or the feel of touch interactions. A final test on a couple of different phones can be the difference between a 5-star review and a bug report.
The framework’s adoption just keeps climbing. By 2024, React Native’s global market share hit about 6.75%, making it the most popular non-native framework on the App Store. Companies often pick it to cut development costs by up to 40% and launch their products faster. If you want to dive deeper, you can explore more on these cross-platform mobile development trends on makeitnew.io.
As you get more comfortable with deployment, you’ll find that automating tasks is a huge time-saver. Learning about creating reusable GitHub Actions is a great next step. And while this guide walked through the manual process, remember that you can take your workflow even further by exploring options for automating your app updates.
Got Questions? Let’s Talk React Native

Once you get past the “hello world” stage, the real questions start popping up. Getting these early decisions right can be the difference between a smooth project and a major headache down the line. Let’s tackle some of the most common hurdles you’ll face.
I’ve been there, and these answers come from hands-on experience, aimed at helping you dodge a few bullets and build with confidence.
Is React Native Fast Enough for Performance-Heavy Apps?
Ah, the million-dollar question. The short answer? For the vast majority of apps—think e-commerce, social media, or typical business tools—React Native is absolutely fast enough. Your users won’t be able to tell the difference between it and a fully native app. It’s a powerhouse for building beautiful, responsive UIs.
Now, if you’re building something incredibly demanding, like a 3D gaming engine or a real-time video editor, you might find that native Swift or Kotlin still has the upper hand. That said, the gap is closing fast. With the new architecture rolling out (Fabric and TurboModules), React Native can handle much more intensive tasks than it could just a few years ago.
How Do I Deal with Platform-Specific Code?
You’re aiming to write code once and run it everywhere, but inevitably, iOS and Android will demand slightly different things. Thankfully, React Native has some really clean ways to handle this.
- The
PlatformModule: This is your go-to for small, quick fixes. Need to add a bit of padding just for iOS? A simpleif (Platform.OS === 'ios')check right in your code will do the trick. - Platform-Specific File Extensions: When the differences are more significant, this is the cleaner approach. Just create two versions of a component, like
MyComponent.ios.jsandMyComponent.android.js. The build system is smart enough to grab the right one automatically. No messy conditional logic needed.
Mastering these two techniques is key. It lets you keep your codebase lean while still delivering a polished, native feel on both platforms.
What’s the Real Difference Between Expo Go and React Native CLI?
This is one of the first big forks in the road you’ll encounter. Think of Expo Go as the “managed” path. It handles a ton of the native setup and configuration for you, which is fantastic for getting started quickly or for projects that don’t need obscure native features. It comes packed with a great library of pre-built APIs.
The React Native CLI, on the other hand, is the “bare” workflow. It gives you raw, full access to the underlying iOS and Android projects. You’ll want to go this route if you know you need to write your own custom native modules or require total, granular control over every aspect of the build process.
Choosing the right tools is just the beginning. To keep your app healthy after launch, you have to know which app metrics to track. This insight is crucial for maintaining a great user experience.
Ready to push updates to your users in minutes, not days? CodePushGo allows you to deploy bug fixes and new features instantly, bypassing the slow app store review process. Take control of your release cycle and deliver a better app, faster. Explore the features at https://codepushgo.com.


