If you’ve ever deployed a React Native app, you know the drill. The traditional path involves bundling your app, submitting it to the Apple App Store or Google Play, and then… you wait. This review cycle can drag on for days, bringing your development momentum to a grinding halt.
This isn’t just a minor annoyance. It’s a genuine bottleneck that can cripple your ability to respond to issues. Picture this: a critical bug is crashing your app for a portion of your user base. With a standard release, you’re stuck waiting for store approval while user frustration grows and your ratings take a hit. Even for a simple typo fix, the process feels painfully slow and rigid.
Why Over-The-Air (OTA) Updates Are a Game-Changer
This is exactly where Over-The-Air (OTA) updates change everything for React Native developers. Because React Native separates your JavaScript code from the native binary, you can push updates to the JS bundle and assets (like images or fonts) without ever touching the native code installed on the user’s device.
OTA updates send these new bundles directly to your users. The app quietly downloads the update in the background and applies it the next time it’s launched. Suddenly, a multi-day deployment process becomes a matter of minutes.
This approach lets you ship bug fixes, release small features, or even A/B test changes without the friction of the app store review. It’s a more agile, responsive way to manage your application.
The Rise of a Better Deployment Workflow
The shift towards OTA updates is a natural evolution in the React Native ecosystem. The framework itself is incredibly popular, pulling in over 2.6 million weekly downloads on npm as of early 2025. This massive adoption has spurred the creation of powerful tools designed to solve real-world development challenges—deployment being one of the biggest.
This table really puts the difference into perspective:
Traditional Deployment vs OTA Updates with CodePushGo
| Aspect | Traditional App Store Deployment | OTA Updates (via CodePushGo) |
|---|---|---|
| Speed | Slow, multi-day review process. | Nearly instant. Updates are live in minutes. |
| Flexibility | Rigid. Every change requires a new build and submission. | Highly flexible. Push JS/asset changes anytime. |
| Bug Fixes | Very slow. Critical fixes are delayed by store reviews. | Rapid response. Fix critical bugs immediately. |
| User Experience | Disruptive. Users must manually update from the store. | Seamless. Updates are applied automatically in the background. |
| Rollbacks | Complex. Requires submitting a new “fixed” version for review. | Simple. Revert to a previous version with a single command. |
The benefits are clear. An OTA workflow gives you a level of control and speed that’s impossible to achieve through the traditional app store model.
Enter CodePushGo: Your OTA Command Center
While the concept of OTA is powerful, you need a reliable service to manage the releases, and this is where CodePushGo shines. It’s a purpose-built, open-source tool designed to make OTA updates for React Native simple and robust.
Think of it as your deployment control panel. With CodePushGo, you can:
- Release instantly, turning days of waiting into minutes of action.
- Deploy to specific environments like
Stagingbefore a fullProductionrollout. - Roll back a faulty update with one click, protecting your users from bad code.
- Provide a smooth user experience with https://codepushgo.com/blog/automatic-app-updates/ that happen behind the scenes.
In this guide, we’ll walk through how to set up CodePushGo and build a modern, agile deployment workflow for your React Native app. It’s time to leave the slow lane behind for good.
Getting CodePushGo into Your React Native Project
Alright, let’s move from theory to practice. This is where the rubber meets the road. Integrating CodePushGo is pretty straightforward, but I can’t stress enough how important it is to understand why you’re doing each step. It makes managing your deployments down the line so much easier. We’re going to skip the dry, official-sounding docs and walk through this like we’re setting it up for a real project.
Before we jump in, just make sure you have a few things squared away:
- An existing React Native project ready to go.
- Node.js and npm (or yarn) installed on your development machine.
- Your app set up in the Apple App Store and Google Play. It doesn’t have to be live, even a placeholder entry is fine.
Got all that? Great. Let’s start building a much more flexible deployment pipeline.
Initializing CodePushGo
First things first, you need the CodePushGo Command Line Interface (CLI). Think of this as your mission control for everything OTA. You’ll use it to create your apps, push out new releases, and check on your deployments, all from the comfort of your terminal.
Go ahead and install it globally with npm:
npm install -g codepushgo-cli
With the CLI installed, you need to link it to your CodePushGo account. Just run the login command. It’ll pop open a browser window for you to sign in and grant access.
codepushgo-cli login Once you’re logged in, your terminal is officially authenticated with the CodePushGo service.
Now, we need to tell CodePushGo about your app. This is a critical step: you absolutely must create separate app entries for iOS and Android. They are completely different platforms with their own native binaries, and mixing them up is a recipe for disaster. Trust me, keeping them separate is a core tenet of a clean mobile app deployment strategy.
Let’s register the iOS version first. Use a name that’s easy to identify.
codepushgo-cli app add MyApp-iOS ios react-native And then do the exact same thing for Android.
codepushgo-cli app add MyApp-Android android react-native After running each command, the CLI will spit back two incredibly important pieces of information: the Staging and Production deployment keys for that app. Keep these handy.
Expert Tip: I’ve seen teams try to use a single app for both platforms to save time. Don’t do it. Always create separate CodePushGo apps for iOS and Android. This prevents you from accidentally pushing an iOS-specific bundle to Android users (and vice-versa) and makes version management a thousand times simpler. It’s a non-negotiable best practice.
Setting Up Your Deployment Environments
Out of the box, CodePushGo gives you two environments: Staging and Production. This two-tiered approach is the bedrock of a safe release process.
- Staging: This is your internal playground. Every single update should land here first. It’s where your QA team, product managers, or a group of beta testers can hammer on the new features using real devices.
- Production: This is the big one—it’s what your actual users see. An update only gets promoted to Production after it has passed all checks and been thoroughly vetted in Staging.
Following this flow dramatically lowers the chances of a nasty bug making it out into the wild and ruining your users’ day.
Embedding the SDK into Your App
With your app registered on the backend, it’s time to wire up your React Native project. This involves integrating the CodePushGo SDK, a small library that gives your app the power to check for, download, and install those OTA updates you’ll be sending.
Start by adding the package to your project’s dependencies:
npm install —save react-native-code-push-go
Next, you’ll need to link the native bits. For iOS, just pop into your ios directory and run the pod installer.
pod install
Now for the platform-specific configuration. This is where you’ll use those deployment keys you got earlier.
iOS Configuration
Open up your project in Xcode and find the AppDelegate.m (or .mm) file. We need to tell the app where to load the JavaScript bundle from. Instead of grabbing the static file that was packaged with the app, we’ll let CodePushGo handle it.
// In AppDelegate.m #import <CodePushGo/CodePushGo.h>
- (NSURL *)sourceURLForBridge:(RCTBridge *)bridge
{
#if DEBUG
return [[RCTBundleURLProvider sharedSettings] jsBundleURLForBundleRoot:@“index”];
#else
return [CodePushGo bundleURL];
#endif
}
You also have to add your deployment key to the
Info.plistfile. Create a new entry with the keyCodePushGoDeploymentKeyand paste in your Staging key. Why Staging? Because you want your local development and debug builds to check for updates from the Staging environment, making it easy to test your OTA flow. The Production key is typically handled with build configurations in Xcode, so it only gets bundled into your final App Store releases.
Android Configuration
The Android setup mirrors the iOS one. First, you’ll update your MainApplication.java file to include the CodePushGo package.
Then, you’ll override the getJSBundleFile method so that CodePushGo can decide whether to use the bundled file or a freshly downloaded update.
// In MainApplication.java import com.microsoft.codepush.react.CodePush;
public class MainApplication extends Application implements ReactApplication {
// …
@Override
protected String getJSBundleFile() {
return CodePush.getJSBundleFile();
}
// …
}
Finally, open your app/build.gradle file. This is where you’ll store both your Staging and Production keys. By adding them to the buildTypes block, the correct key will automatically be baked into your app depending on whether you’re building for debug or release.
// In android/app/build.gradle android { // … buildTypes { debug { // … resValue “string”, “CodePushGoDeploymentKey”, ‘“YOUR_STAGING_KEY”’ } release { // … resValue “string”, “CodePushGoDeploymentKey”, ‘“YOUR_PRODUCTION_KEY”’ } } } And that’s it! Once you’ve completed these steps, your React Native app is fully wired up and ready to receive OTA updates. You’ve just laid the groundwork for a much more dynamic and agile update cycle.
Executing Your First Release to Staging
With everything configured, we’re at the exciting part: pushing your first React Native update to the staging environment. This is where you really get to see the magic of an OTA workflow unfold. We’ll make a small change, bundle it up, and send it to your Staging deployment for a safe test run.
Think of your Staging environment as the final dress rehearsal. It’s a complete replica of your production setup, giving you the chance to spot any last-minute bugs or unexpected behavior before it ever reaches your users. A solid staging process is what separates a confident, smooth release from a risky, hope-for-the-best gamble.
Making a Change to Deploy
To see an update, we first need to make an update. It doesn’t have to be anything groundbreaking. Go into your app’s code and find something small and visible to change.
Maybe you tweak the background color of a primary button or change a line of text on the home screen. The goal here is simple: create a new JavaScript bundle that looks different from the one currently on your test device. This simple change is all we need for our first OTA payload.
Once you’ve made your change, just save the file. That’s it. You don’t need to rebuild the native app in Xcode or Android Studio. The real power of this approach is that we’re only touching the JavaScript and asset files—exactly what CodePushGo is built to manage.
Bundling and Releasing with the CLI
It’s time to put the CodePushGo CLI to work. With a single command, we’ll bundle your JavaScript, talk to the CodePushGo service, and upload the new version. This makes the update instantly available to any device configured with your Staging deployment key.
Pop open your terminal and run this command. Remember to swap MyApp-iOS with the actual name you gave your app. This example is for iOS, but the process for Android is identical—just use your Android app name.
codepushgo-cli release-react -a MyApp-iOS -d Staging
Let’s quickly break down what this command is doing:
release-react: This is the primary command for releasing a React Native update.-a MyApp-iOS: The--appflag (or-afor short) tells the CLI which app you’re targeting. This is why having unique names for your iOS and Android apps is so important.-d Staging: The--deploymentNameflag (-d) is crucial. It directs this release specifically to yourStagingenvironment, ensuring it doesn’t accidentally go live to all your users.
After running the command, you’ll see the CLI bundle your code and show a progress bar as it uploads. Automating this step can seriously streamline your team’s workflow. For a more advanced setup, you can integrate these CLI commands into a CI/CD pipeline. We’ve got a whole guide on how to do that, which you can read about in our post on React Native continuous integration.
The command-line interaction is the heart of this process, as illustrated below.
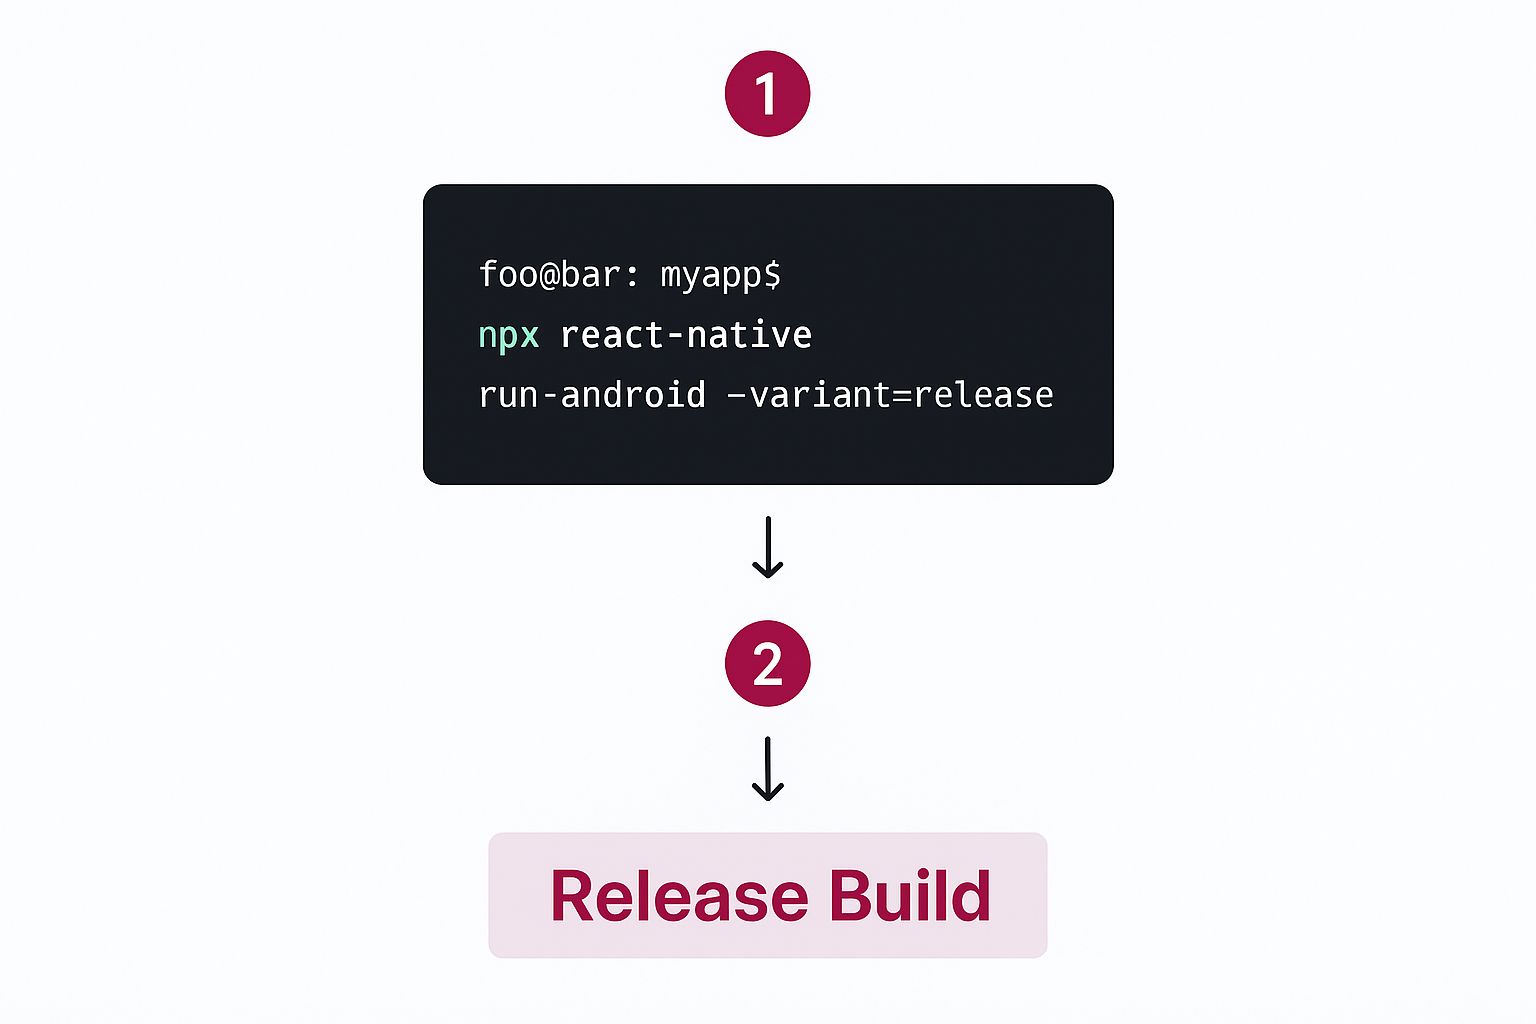
This image captures the essence of using the command line to execute a release build—a fundamental step in deploying your React Native app.
Verifying the Update on a Device
Now for the moment of truth. Grab a test device that has a version of your app installed—specifically, a build that was compiled with the Staging deployment key.
First, close the app completely. Then, reopen it.
By default, the CodePushGo SDK checks for new updates every time the app starts. When your app launches, it will ping the service, find the new release you just pushed to Staging, and download it quietly in the background.
The update won’t apply immediately. It gets installed the next time you open the app. So, to see your change, you’ll need to kill the app and relaunch it one more time.
On this second launch, your changes should be live! The button will have its new color, or the text will be updated. Congratulations—you’ve just pushed your first OTA update without touching the app stores. This whole cycle, from a line of code to a live update on a device, probably took less than a couple of minutes.
Advanced Rollout and Rollback Strategies
Pushing an update to your Staging environment is a solid start, but let’s be honest—the real world is messy. Once an update is tested and looks good, blasting it out to 100% of your users at once is a high-stakes gamble. A subtle bug that slipped through testing could suddenly affect your entire user base.
This is where you graduate from just shipping code to managing risk like a pro. With tools like phased rollouts and instant rollbacks, you can transform your over-the-air (OTA) update process from a simple convenience into a powerful safety net. You get the fine-grained control needed to deploy with real confidence.
The Power of Phased Rollouts
A phased rollout, sometimes called a canary release, is your secret weapon for safe deployments. The idea is simple: you release a new update to a small slice of your production users first. This lets you watch how the update behaves in a live environment before it goes out to everyone. Think of it as your final, real-world sanity check.
Let’s say you’ve just finished a major new feature. Even after rigorous testing, a little caution goes a long way. With CodePushGo, you can kick off the release to just 10% of your users.
It’s as simple as adding the --rollout flag to the release command:
codepushgo-cli release-react -a MyApp-Android -d Production --rollout 10
Now, only one in ten users will get the new version. This gives you the breathing room to keep a close eye on your analytics and crash reporting tools. Are error rates creeping up? Is engagement taking a nosedive? This limited exposure contains the “blast radius” of any potential problem, safeguarding the vast majority of your users.
If all your metrics look healthy after a day or two, you can confidently widen the audience. You don’t even need to create a new bundle; you just “patch” the existing release to expand its reach.
codepushgo-cli patch -a MyApp-Android Production --rollout 50
This command updates the release to now target 50% of your users. You can continue this process incrementally until you hit 100%, giving you complete command over the release velocity.
Your Ultimate Safety Net: The Instant Rollback
So, what happens if that phased rollout uncovers a show-stopping bug? Maybe the app crashes on a specific Android model you didn’t have for testing, or a backend change is causing the UI to freeze unexpectedly. In the old world of app store reviews, you’d be in for a stressful few days waiting for an emergency fix to be approved.
With CodePushGo, the fix is immediate. You can execute a rollback, which instantly tells all devices that received the faulty update to revert to the previous stable version. It’s the ultimate undo button.
Performing a rollback is a single, powerful command:
codepushgo-cli rollback -a MyApp-Android Production
This command immediately deactivates the latest release in your Production deployment. The SDK on user devices then automatically reinstalls the last known good version. It’s a feature that provides incredible peace of mind. For a deeper look into preparing for these situations, our guide on creating a solid deployment rollback plan offers some valuable strategies.
Key takeaway: A rollback doesn’t delete the bad release; it just deactivates it. This is great because it preserves the release history, allowing your team to investigate the buggy code later without losing any data.
Enforcing Mandatory Updates for Critical Fixes
Sometimes, an update is too important to be optional. Think of a critical security patch or a fix for a bug that could corrupt user data. In these high-stakes scenarios, you need to get every single user onto the new version, and fast.
You can mark any release as mandatory with the --mandatory flag:
codepushgo-cli release-react -a MyApp-iOS -d Production --mandatory
When a device fetches a mandatory update, the CodePushGo SDK installs it and restarts the app on the spot. This ensures the fix is applied without any delay. You’ll want to use this sparingly—it can interrupt the user’s workflow—but it’s an absolutely essential tool for protecting your users when it truly counts.
Real-World Best Practices for Smooth Deployments
Executing staged rollouts and having a solid rollback plan are your safety nets, but a truly professional deployment workflow goes much deeper. It’s about building a system grounded in consistency, clarity, and automation—this is what separates the pros from the amateurs.
The most critical piece of the puzzle is a strict versioning strategy. You have to maintain a crystal-clear link between your native binary version (say, 1.5.0) and the OTA updates targeting it. This single practice prevents one of the most common sources of crashes: pushing a JavaScript bundle that calls a native module that simply doesn’t exist for users on an older binary.
This isn’t just a suggestion; it’s a hard rule. OTA updates are powerful, but they aren’t magic. Sooner or later, you will absolutely need to ship a full update through the app stores.
Knowing When a Full App Store Update Is Unavoidable
OTA updates are fantastic for pushing changes to your JavaScript code and assets. However, the moment you touch anything in the native layer, you have to prepare for a full binary release through the app stores. No exceptions.
Here are the most common triggers:
- Updating Native Dependencies: If you’re upgrading a core library like React Native itself or another native module, you need a new binary.
- Adding New Native Modules: Integrating a feature that requires a new native library—like a payment SDK or Bluetooth functionality—means a full release is necessary.
- Changing App Permissions: Any tweak to the
Info.pliston iOS orAndroidManifest.xmlon Android to add permissions requires store approval. - Modifying App Icons or Splash Screens: These core assets are baked right into the binary and can only be changed with a fresh app store submission.
Each time you release a new binary, remember to update your CodePushGo targeting. You’ll point all subsequent OTA releases to the new binary version to maintain that perfect compatibility.
Gracefully Communicating Updates to Users
How your app feels when it updates is a huge part of the user experience. Silent, background updates are perfect for tiny bug fixes. But for significant feature releases, a more hands-on approach is often better.
You can easily build a simple in-app notification to let users know a new version has been downloaded and is ready to go.
A friendly pop-up that says, “We’ve added some exciting new features! Restart the app to check them out,” is worlds better than a sudden, confusing UI change. It’s a small touch that gives users a sense of control and keeps them in the loop.
The financial stakes are high, too. Mobile apps are projected to generate over $935 billion in revenue in 2024. React Native helps companies get a piece of that pie by drastically cutting development costs, which can otherwise range from $15,000 to $300,000 for a single project. By streamlining deployments and avoiding separate iOS and Android teams, you gain a massive competitive edge.
Automating Releases with a CI/CD Pipeline
The ultimate goal is to remove human error from the deployment process. Manually running CLI commands is fine when you’re starting out, but it’s not scalable and is ripe for mistakes. This is where integrating CodePushGo into a CI/CD (Continuous Integration/Continuous Deployment) pipeline becomes a total game-changer.
You can set up a workflow in a tool like GitHub Actions, Jenkins, or CircleCI to automate the entire release cycle.
Here’s what a common professional setup looks like in practice:
- A developer merges a feature into the
developbranch. This automatically triggers acodepushgo-cli release-reactcommand to your Staging environment. - Your QA team gets a notification and thoroughly tests the new build on their devices.
- Once approved,
developis merged into themainbranch. This action triggers acodepushgo-cli promotecommand, which takes the exact same bundle from Staging and pushes it to Production with a safe 10% phased rollout.
This level of automation ensures every single release is consistent, tested, and tracked. It frees up your developers to do what they do best: build great features, not babysit deployments. For more on this, check out our guide on software deployment best practices.
Common Questions About Deploying with CodePushGo
When you start using Over-the-Air (OTA) updates to deploy your React Native app, you’ll naturally run into some questions. It’s one thing to run the commands, but it’s another to truly understand the practical limits and smart ways to use the system. Let’s walk through some of the most common things people ask, with real-world advice you can act on.
Moving to OTA updates definitely requires a mental shift, especially when you’re juggling changes to your native code and your JavaScript bundle.
What Happens If I Need to Update Native Code?
This is probably the most important concept to get right. OTA updates through CodePushGo are only for your JavaScript bundle and any assets it uses, like images and fonts. If you need to touch the native side of your app, you have to go through the classic route: releasing a new version to the Apple App Store and Google Play Store.
What counts as a native code change? Think of things like:
- Integrating a new native module or third-party SDK.
- Bumping up your project’s React Native version.
- Modifying app permissions or core configuration files like
Info.pliston iOS orbuild.gradleon Android.
Here’s a pro tip we live by: always tie your CodePushGo releases to a specific binary version. The moment you ship a new build to the stores, all your future OTA updates should target that new version. This simple habit is key to keeping your app stable.
Following this practice prevents your JavaScript code from making calls to native functions that simply don’t exist on an older version of the app—a classic cause of hard-to-diagnose crashes.
How Does CodePushGo Handle Different App Versions?
This is where CodePushGo truly proves its worth. It lets you aim your OTA updates at a specific binary version of your app, or even a range of versions. This isn’t just a nice-to-have feature; it’s absolutely essential for managing deployments responsibly.
Imagine you need to ship a hotfix that only works for users on version 2.1.0 of your app. You can do that. Anyone still running an older build, like version 2.0.0, won’t get the update. This level of targeting is critical because your new JavaScript code might rely on native APIs that were only added in the latest binary.
You get this fine-grained control right from the command line with the --targetBinaryVersion flag when you release an update. It puts you in the driver’s seat, letting you decide exactly who gets what, which is a lifesaver for avoiding compatibility headaches.
Can I Use CodePushGo in My CI/CD Pipeline?
Yes, you absolutely should! For any project that’s more than just a hobby, integrating CodePushGo into your CI/CD pipeline is the way to go. The CLI was built specifically to be scripted and automated. You can easily build out the entire release, promotion, and rollback flow in whatever tool you’re using, be it GitHub Actions, Jenkins, or CircleCI.
A typical professional workflow looks something like this: a developer merges a feature into the develop branch, which automatically triggers a CodePushGo release to your Staging deployment. Once your QA team gives it the thumbs-up on real devices, a merge into the main branch can automatically promote that exact same release to Production. Automating how you deploy your React Native app this way cuts down on human error and dramatically speeds up your release cadence.
Is There a Risk of Breaking My App?
Of course. Any time you push code, there’s a risk. That’s precisely why having a solid, multi-stage deployment strategy is non-negotiable. The biggest danger with OTA is pushing a bad JavaScript bundle that crashes your app on startup. If that happens, everyone who gets the update is locked out until you fix it.
To keep this from happening, always release to a Staging environment first. Test it thoroughly on actual phones, not just simulators. Once you’re ready for Production, use a phased rollout. Start small by pushing the update to just 1-5% of your users. Keep a close eye on your crash reporting tools. If everything looks stable, you can gradually dial up the rollout percentage.
And remember, the instant rollback feature is your ultimate safety net. If a nasty bug does make it out, you can immediately revert the update and protect the rest of your user base.
Ready to stop waiting for app store reviews and start shipping updates in minutes? CodePushGo gives you the tools to build a fast, safe, and professional deployment workflow. Take control of your release cycle and start deploying your React Native app with confidence. Check out the CodePushGo website to get started for free.


