Alright, let’s get your React Native app ready for the App Store. The journey involves a few key stages: enrolling in Apple’s program, prepping your app’s listing details, handling the configuration in Xcode, and finally, submitting it for review through App Store Connect. It might sound like a lot, but this whole process is Apple’s way of making sure every app on the store meets their standards for quality and security.
Laying the Groundwork for a Smooth App Launch

Before you even think about opening Xcode, a bit of prep work will save you a world of headaches later. Think of this as your pre-flight checklist. Nailing these early steps is the secret to avoiding common rejection reasons and speeding up the entire submission process.
The App Store has come a long way since it first launched back in 2008. Today, you’re competing in a marketplace with around 1.96 million apps, so every detail counts.
Your first official move is to enroll in the Apple Developer Program. It’s a $99 annual subscription, but it’s non-negotiable. This membership is your golden ticket, giving you access to all the essential tools, most importantly App Store Connect. This is the web portal where you’ll manage everything about your app, from submission to updates.
Your Pre-Submission Checklist
Once you’re in the program, it’s time to get your assets in order. Seriously, don’t rush this part. A well-prepared submission makes the review process infinitely smoother.
Here’s what you need to tackle first:
- Create an App ID: This is a unique string that links your app directly to your developer account. It’s absolutely essential for enabling services like Push Notifications or integrating with HealthKit.
- Generate Certificates: You’ll need to create a specific distribution certificate. This is how you “sign” your app, which is Apple’s way of verifying it came from a trusted developer (you!). If you need a deep dive, this guide on managing your Apple developer certificate is incredibly helpful: https://codepushgo.com/de/blog/apple-developer-certificate/
- Gather Visual Assets: Get your app icon, screenshots, and maybe even a short preview video ready. These are the very first things potential users will see, so they need to look sharp and meet Apple’s precise dimension requirements.
A classic rookie mistake is treating the app description and screenshots as an afterthought. These aren’t just assets; they’re your most powerful marketing tools on the App Store. Spend real time crafting a story that sells your app’s value and shows off its best features.
Designing a Standout User Experience
Beyond all the technical boxes you have to check, the actual quality of your app is what truly matters. An app that’s polished, intuitive, and looks great has a much better shot at getting featured by Apple and earning those coveted five-star reviews.
If design isn’t your strong suit, it’s worth considering a partnership with professional mobile app design agencies to make sure your product really shines. A fantastic user interface (UI) and a seamless user experience (UX) aren’t just nice-to-haves anymore—they’re fundamental to a successful app. Investing in solid design upfront pays dividends in user retention and better ratings down the line.
Getting Your App Ready for Release in Xcode
Now it’s time to head into Apple’s home turf: Xcode. This is where your React Native project gets its final polish before heading off to the App Store. The first thing you need to do is open the .xcworkspace file from your project’s ios folder. Be sure you open this one, not the .xcodeproj file.
Getting these next few settings right is absolutely critical. It’s the difference between a smooth submission and a frustrating rejection. Think of it this way: your React Native code is the engine, but Xcode is where you build the car’s body, give it a paint job, and get the official license plate.
Nailing Down Your App’s Identity
Once you’re inside Xcode, your first stop should be the General tab in your project settings. This is where you set the core identity of your app. You’ll define the version and build numbers, which are essential for every update you push.
I’ve found that using a semantic versioning system like 1.0.0 is the best practice. The version number is what your users will see on the App Store page. The build number, on the other hand, is just for Apple and your own tracking—it has to be a unique, incrementing number for every single build you upload.
This is also where you’ll set your app icon and launch screen. Don’t blow past these. A generic launch screen or a missing icon looks sloppy and can be an easy reason for Apple to reject your app right off the bat.
This image gives a great overview of the metadata steps you’ll take right after wrapping up your Xcode configuration.
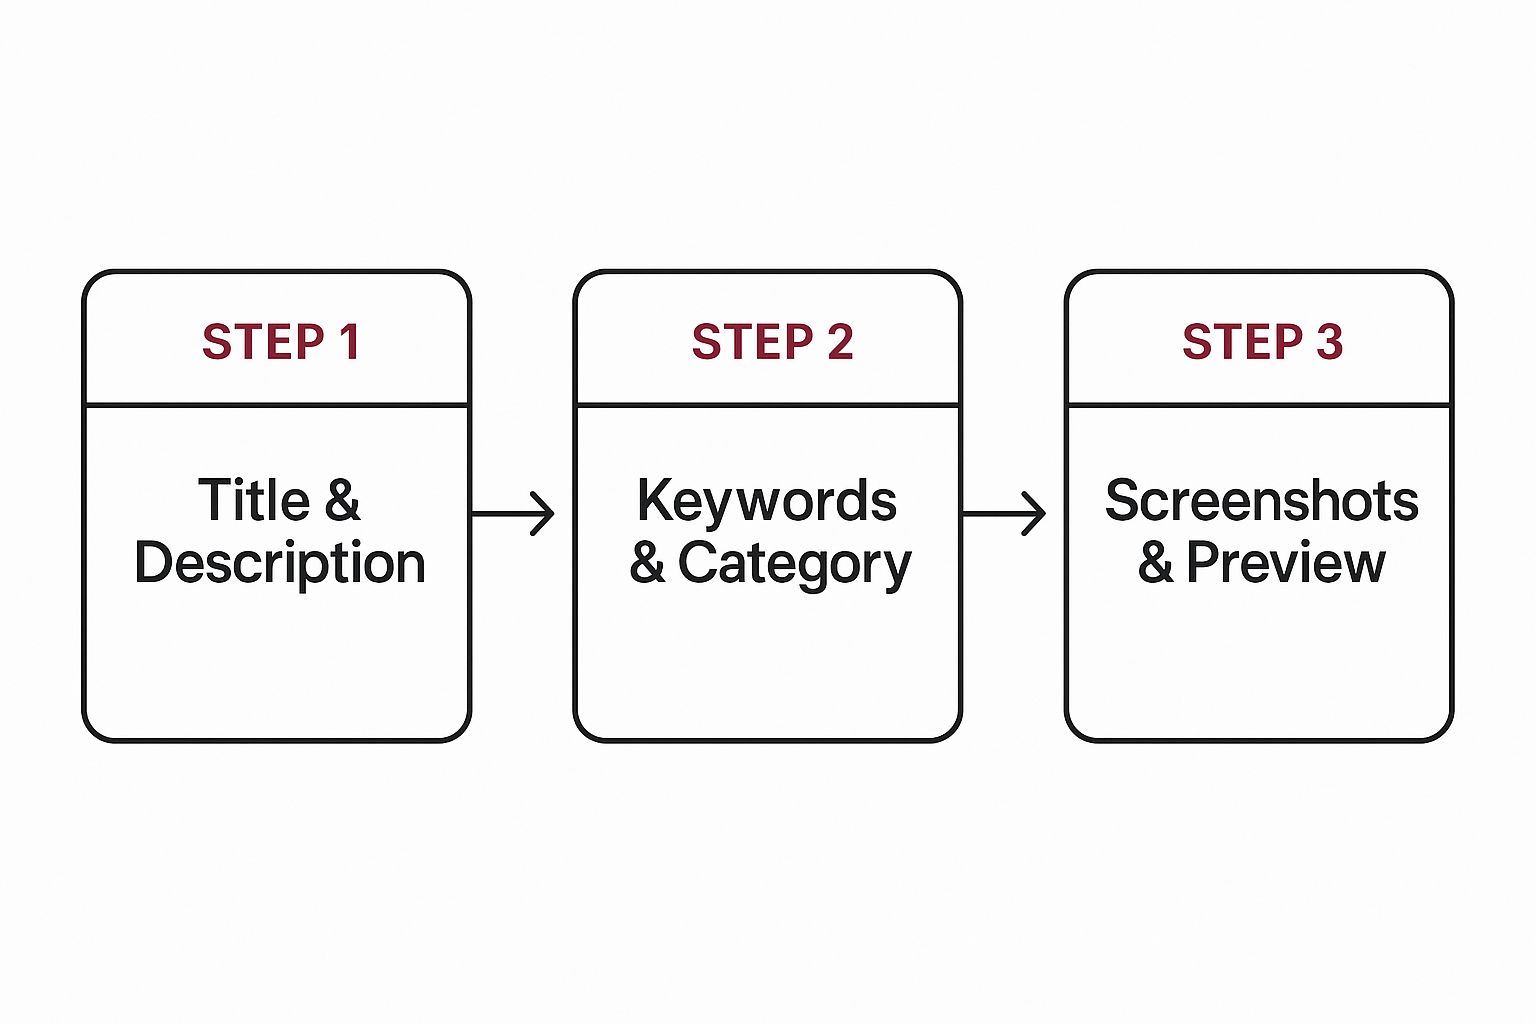
It helps visualize how all the pieces—from your app’s name and description to your screenshots and keywords—fit together to build your final store listing.
Handling Signing and Capabilities
Next up, click over to the Signing & Capabilities tab. I can’t stress this enough: this is probably the most important screen in the entire submission process. It’s where you tether your Xcode project to your Apple Developer account, proving your app is secure and authentically yours.
Here’s the breakdown of what you need to do:
- Let Xcode Handle Signing: For most developers, the easiest route is to check the box for “Automatically manage signing.” This tells Xcode to take care of creating and managing all the complex provisioning profiles and certificates for you.
- Pick Your Team: From the dropdown, select the developer team associated with your Apple Developer account. This links everything to the App ID you created earlier.
- Check Your Bundle Identifier: Take a second and triple-check that the Bundle Identifier listed here is an exact match for the App ID you registered on the developer portal. Even a tiny typo will cause the signing process to fail.
Think of your provisioning profile as your app’s passport. It tells iOS devices that your app is from a legitimate, verified developer. Without a valid signature, your app won’t even install on a device, let alone pass the App Store review.
If your app uses features like Push Notifications, Sign in with Apple, or HealthKit, this is where you’ll add them as “Capabilities.” Just be aware that adding a capability here often means you’ll have extra configuration steps to complete in App Store Connect.
For a broader look at the journey from a simple idea to a finished product, our guide on how to develop an app for iPhone offers some great context. Once these settings are locked in, your app is officially primed and ready for the final build.
Archiving a Clean Build for the App Store
Alright, you’ve dialed in all the project settings. Now for the main event: creating the actual build file that Apple needs. This is called archiving, and it’s how Xcode packages up your entire application—code, assets, and all—into a neat little bundle ready for the App Store.
First things first, you need to tell Xcode what you’re building for. Look at the top of the Xcode window, next to the play and stop buttons. You’ll see the current target, which is probably set to an iPhone simulator or your connected test device. Click on it and change it to Any iOS Device (arm64). This is a critical step; it ensures Xcode compiles a universal binary that will run on any modern iPhone or iPad out there.
Kicking Off the Archive
With your target set to Any iOS Device, you’re ready to go. Head up to the main menu bar and select Product > Archive.
This will start the build process. Xcode will chug away, compiling your React Native code and all the native iOS bits and pieces. Don’t be surprised if this takes a few minutes, especially the first time you archive a new project. Good time for a coffee break.
Once it’s finished, Xcode will automatically pop open the Organizer window. This is basically your command center for every build you create. You’ll see your new archive sitting in a list, complete with its version number, build number, and the time you created it.
This Organizer view is where the magic happens for the final steps, acting as the bridge between your machine and App Store Connect.
Validate Your Build Before You Upload
Your shiny new archive should be selected in the Organizer. Over on the right, you’ll see a few buttons. I know it’s tempting to hit “Distribute App” right away, but trust me on this: click Validate App first.
Think of the validation step as a dress rehearsal. Xcode sends your build to Apple’s servers for a quick pre-flight check. It scans for common deal-breakers like missing icons, invalid entitlements, or private API usage—all the stuff that gets you an instant rejection.
Running this check can save you a ton of headaches. It’s so much better to find a simple configuration mistake now than to wait a day for an App Review rejection notice.
If everything looks good, you’ll get a satisfying green checkmark. If not, Xcode will give you a clear list of what’s wrong. Fix the issues, archive a new build, and validate again. It’s a small step that makes the whole submission process go infinitely smoother.
Mastering Your App Store Connect Listing
With your pristine build archived in Xcode, it’s time to shift gears to App Store Connect. Think of this as more than just a place to dump your .ipa file; it’s the digital storefront where you’ll meticulously craft your app’s entire public identity. Honestly, getting this listing right is just as important as the code itself—it’s what will make or break your app’s discovery and download numbers.
The goal here isn’t just to fill out forms. This is your first real shot at App Store Optimization (ASO), the art and science of making sure the right people find your app. It all starts with the holy trinity: your app’s name, subtitle, and keywords.
Crafting Your Core Metadata
Your app’s name and subtitle are like the headline and sub-headline of a great article. They need to be catchy, descriptive, and strategically packed with your most powerful keywords.
For example, instead of a generic name like “TrekTracker,” a much smarter, optimized name would be “TrekTracker: Hiking & GPS Trails.” It immediately tells potential users what the app is all about while grabbing a few high-value search terms.
The keywords field is your secret weapon. You only get 100 characters, so make every single one count. Brainstorm what your ideal user would actually type into the search bar to find an app like yours. Quick tip: don’t waste space by repeating words from your app name or subtitle—Apple automatically includes those in its search index.
One of the biggest mistakes I see developers make is treating their keywords as a “set it and forget it” task. ASO is a living process. You need to constantly check your analytics and see how your competitors are ranking to fine-tune your keywords over time.
Visual Storytelling with Screenshots and Previews
Once someone lands on your product page, your screenshots and app preview video have to do the heavy lifting. This is absolutely not the place for a boring shot of your login screen. You need to tell a compelling visual story that screams your app’s value in the first few seconds.
Make sure you create tailored screenshots for all the required device sizes. Apple is very specific about the dimensions, and using a tool to generate these can save you a massive headache. Each screenshot should spotlight a key feature or benefit, maybe with a short, punchy caption overlaid on the image to give it some context.
Before you get started, it’s helpful to have a checklist of all the assets and information you’ll need. This will make the process much smoother and prevent you from having to scramble for missing pieces later.
App Store Connect Metadata Checklist
| Metadata Component | Requirement Details | Pro Tip |
|---|---|---|
| App Name | Max 30 characters. Must be unique. | Include your top keyword if it fits naturally. |
| Subtitle | Max 30 characters. Appears under your app name. | Use this for a short, descriptive tagline with secondary keywords. |
| App Icon | 1024x1024 pixels. No transparency. | Keep the design simple and recognizable, even at small sizes. |
| Screenshots | Specific sizes required for different devices. | The first 2-3 screenshots are most important. Show your app in action! |
| App Preview Video | Optional, but highly recommended. Max 30 seconds. | Focus on the user experience and core functionality. |
| Promotional Text | Max 170 characters. Can be updated anytime. | Announce new features, promotions, or events here. |
| Description | Max 4000 characters. | Write compelling copy that tells a story and highlights user benefits. |
| Keywords | Max 100 characters. Comma-separated. | Don’t use spaces after commas. Use single words or short phrases. |
| Privacy Policy URL | Required. Must link to a valid privacy policy. | Be transparent. This is a must-have for passing review. |
Having all these components ready to go before you even log in will save you a ton of time and ensure your listing looks polished from day one.
Navigating Privacy and Pricing
Finally, you’ll tackle the practical details. The pricing section is pretty straightforward, but the privacy section requires your full attention. Apple has really doubled down on user security, a trend highlighted in many recent Apple App Store statistics.
This commitment to privacy is why you now have to fill out the “nutrition label.” You’ll need to declare exactly what data your app collects and how you use it. Be thorough and completely honest here—this information is displayed right on your app’s product page for everyone to see. Transparency is absolutely essential for building trust with users and knowing how to publish app in appstore without getting rejected. For a more detailed walkthrough, our complete guide covers the entire journey: https://codepushgo.com/de/blog/how-to-publish-app-in-app-store/
Submitting Your App for Review

This is it—the moment you’ve been working toward. Your build is uploaded, the App Store Connect listing is looking sharp, and you’re at the very last step. Hitting that final “Submit for Review” button can feel a little nerve-wracking, but a few last-minute checks will set you up for success.
First things first, you need to tell App Store Connect which build you want to submit. Head over to the “App Store” tab, find the app version you’ve been working on, and look for the “Build” section. Click on it, and you’ll see a list of the binaries you’ve uploaded from Xcode. Just select the correct one to officially pair your code with all the marketing info you’ve entered.
Answering the Final Questions
Before Apple lets you hit submit, they’ll ask you a few important legal questions. It’s tempting to just blaze through these, but take a moment to answer them correctly.
- Export Compliance: This one is about encryption. If your app uses HTTPS for API calls—which almost every React Native app does—the answer is technically yes. The good news is that standard HTTPS usage almost always qualifies for an exemption, so you can declare it without a hassle.
- Content Rights: Apple needs to know you have the legal right to use everything in your app. This question is just a confirmation that you own or have licensed all the third-party content you’re using.
- Advertising Identifier (IDFA): Be truthful here. If you’ve included an SDK like AdMob to serve ads, you have to declare it and check the boxes that explain why you’re using the IDFA.
Pro Tip: Don’t underestimate the ‘Notes for Reviewer’ section. This is your chance to talk directly to the person testing your app. If your app requires a login, provide a demo account username and password here. Got a tricky or unique feature? A short explanation can prevent a rejection just because the reviewer didn’t understand what to do. A little clarity goes a long way.
Understanding the Review Process
Once you submit, your app’s status will flip to “Waiting for Review.” This means you’re officially in the queue. Apple’s review team will comb through your app, checking it against their guidelines for privacy, security, and overall quality.
Thankfully, the review times have gotten much better over the years. Most apps are reviewed within 24 to 48 hours, but don’t be surprised if a more complex app takes a bit longer. From there, the status will change to “In Review”—that means a real person is actively looking at your app.
The next notification you get will either be an approval or a message in the Resolution Center detailing any issues that need fixing. For a deeper dive into the entire process from start to finish, check out our full guide on https://codepushgo.com/de/blog/how-to-publish-on-app-store/.
Got Questions About App Store Publishing?
Getting your app ready for the App Store often feels like the final boss battle. It’s totally normal to have a few last-minute questions pop up as you navigate those final steps. Let’s tackle some of the most common ones I hear from developers, from dealing with the dreaded rejection notice to getting the most out of beta testing.
So, what happens if Apple rejects your app? First off, don’t panic. It happens to everyone, even seasoned pros. It’s not a dead end. Apple will send you a message in the Resolution Center explaining exactly what went wrong.
Often, it’s something fixable like a bug, a crash on a specific device, or missing metadata. Other times, you might have unintentionally bent one of their core rules. Your best defense is a good offense: get familiar with their guidelines beforehand. For a deep dive, check out this guide to App Store review guidelines.
How Do I Handle Updates and Beta Testing?
Once your app is live, you’ll inevitably need to push updates. Thankfully, the process is pretty much the same as your first submission. You just archive a new build in Xcode with a higher build number, upload it to App Store Connect, and submit it for review. This is also your chance to update your app’s description or add new screenshots to show off cool new features.
Before you send that update to all your users, you need to test it properly. This is where TestFlight comes in—it’s an absolute must-use tool.
- Internal Testers: You can add up to 100 people from your team in App Store Connect for quick, internal feedback.
- External Testers: For a wider audience, you can invite up to 10,000 people using a public link. This is fantastic for getting a ton of real-world feedback before a major release.
A quick heads-up: Apple does a light review on external TestFlight builds. It’s way faster than a full App Store review, but it’s not instant. This process is incredibly valuable for catching those sneaky bugs you and your team might have overlooked.
Why Is All This Effort Worth It?
It’s easy to get lost in the weeds of provisioning profiles and build numbers, but it’s important to remember the big picture. The App Store is an absolute powerhouse. Getting your app published there puts it in front of a massive, highly engaged audience.
Think about this: by 2025, global consumer spending on iOS apps is projected to hit $89.3 billion, with downloads soaring past 92 billion. Mastering this submission process is your ticket to tapping into that incredible market.
Tired of waiting for App Store reviews just to fix a small bug? CodePushGo lets you send over-the-air updates directly to your React Native app users. Ship fixes and features in minutes, not days. Check out our platform and speed up your release cycle at https://codepushgo.com.


