So, you’ve built your React Native app and now you’re ready to share it with the world. Getting it onto the Apple App Store is the final hurdle, and while it can seem daunting, it’s really just a series of well-defined steps. Think of this guide as your roadmap through the entire process.
We’ll cover everything from getting your developer account in order to handling the often-tricky certificates and profiles. Then, we’ll dive into the nitty-gritty of building the app in Xcode, creating a compelling App Store listing, and finally, submitting it for Apple’s review. Let’s get started.
A Quick Look at the App Store Landscape
Before we jump into the technical details, it’s good to have some context. You’re entering a marketplace with roughly 1.8 to 1.9 million other apps as of early 2025. Thousands more are launched every single day. That’s a lot of competition.
This is why a polished submission isn’t just about ticking boxes for Apple. It’s about making sure your app can stand out. Having an effective product launch strategy is just as critical as getting the code right.
Success on the App Store isn’t just about passing the review; it’s about preparing your app to stand out among millions. This means focusing on quality, from your code to your marketing assets.
The Big Picture: Key Milestones
To give you a clear overview of the journey ahead, I’ve broken down the process into a simple checklist. These are the major milestones we’ll walk through together.
App Store Submission Checklist
| Milestone | Key Objective |
|---|---|
| Developer Foundation | Enroll in the Apple Developer Program and set up your signing certificates. |
| Xcode Build & Archive | Prepare and build a production-ready version of your React Native app. |
| App Store Connect Listing | Create your app’s public profile with all metadata and screenshots. |
| Submission & Review | Upload your final build and navigate Apple’s approval process. |
This table maps out our path. By tackling each milestone one by one, you’ll find the entire submission process is far more manageable than it first appears.
Setting Up Your Developer Foundation
Before your React Native app can ever land on the App Store, you have to get your house in order with Apple. This isn’t a React Native thing; it’s a foundational step that happens entirely within Apple’s ecosystem, and it’s absolutely non-negotiable. Getting this right from the start will save you from a world of headaches down the line.
Your first move is to enroll in the Apple Developer Program. Think of this as your official license to publish. It grants you access to all the tools and permissions you need. Be prepared for an annual fee and a verification process that can sometimes take a couple of days to clear.
This quick visual breaks down the enrollment process. It really is that simple.
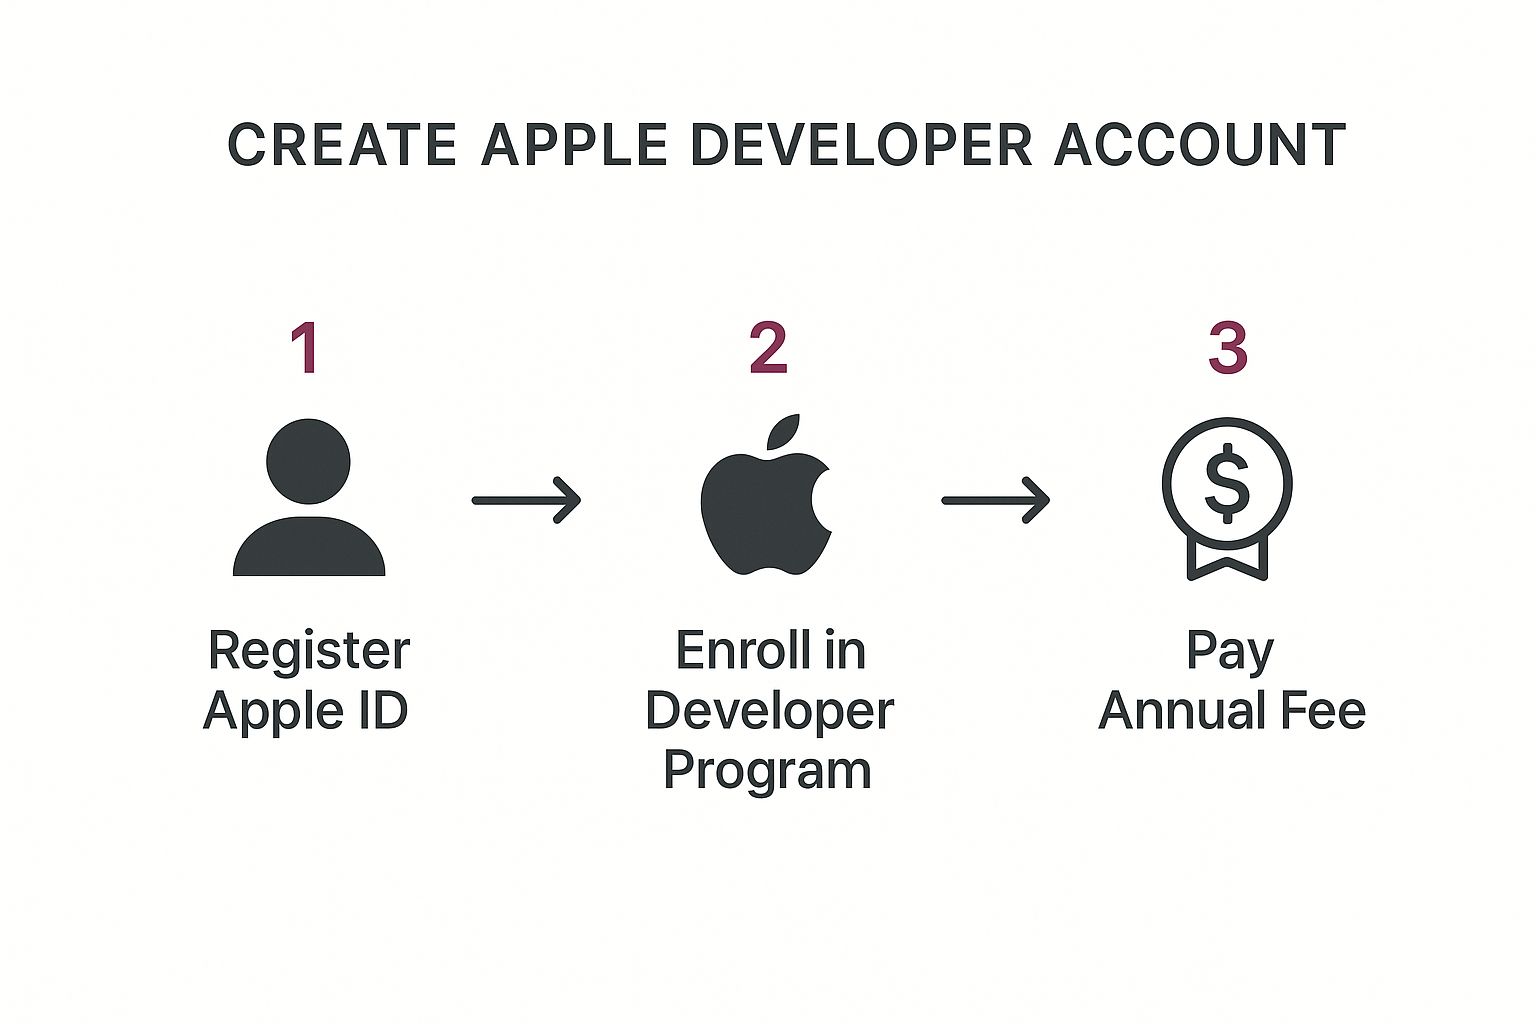
As you can see, it boils down to creating an Apple ID, enrolling in the program, and paying the fee. Once you’re in, you’ll gain access to the “Certificates, Identifiers & Profiles” section of your account—this is where the real work begins.
Managing Certificates and Profiles
This is the part of the process where I’ve seen countless developers get tripped up. The best way to think about it is creating a secure, digital handshake between you, your app, and Apple. For this handshake to work, you need three key components to play nicely together:
- Certificates: These act as your digital passport, verifying your identity. You’ll need a Development Certificate for testing on real devices and a Distribution Certificate for the final App Store submission.
- App ID: This is a unique identifier for your application. It is absolutely critical that this ID exactly matches the Bundle Identifier you set in your Xcode project. No exceptions.
- Provisioning Profile: This is the glue that binds everything together. It ties your App ID and certificates into one neat package, authorizing your app to be installed on specific devices or uploaded to the App Store.
A mismatch between your App ID and your project’s Bundle Identifier is one of the most common—and frustrating—errors a developer can face. I can’t stress this enough: double-check them before you even think about building your archive.
Understanding how these three pieces connect is vital. If you want to dive deeper into this, our guide to Apple Developer certificates covers this topic in much greater detail. Nail this foundation now, and you’ll spend less time debugging cryptic signing issues and more time focused on what matters—your app.
Building Your App in Xcode for Release
Alright, it’s time to move out of your code editor and into Apple’s world. This is where your React Native project officially gets packaged up as a native iOS app using Xcode. Think of this step as translating your hard work into a format the App Store understands and accepts. It’s more than just clicking “build”—we need to get some crucial settings right.
First things first, find the ios directory in your project and open the .xcworkspace file. This is a common pitfall; always open the workspace, not the .xcodeproj file. The workspace contains all your project files plus the CocoaPods dependencies, which are essential.

Configuring Your Build Settings
Once you’re inside Xcode, the “Signing & Capabilities” tab is your first stop. You need to double-check that the “Release” build configuration is using the Distribution Certificate and Provisioning Profile we set up earlier. This is how you signal to Xcode that this build is the real deal, meant for public distribution, not just for a test device.
Next, head over to the “General” tab to handle your version and build numbers. It’s easy to get these mixed up, but here’s how to think about them:
- Version Number (Marketing Version): This is what your users see on the App Store page, like
1.0.1. It tells the story of your app’s updates. - Build Number: This is an internal tracker for Apple. Every single time you upload a new package to App Store Connect, this number must be higher than the last one, even if the user-facing version number hasn’t changed.
Getting your versioning right is non-negotiable. App Store Connect will flat-out reject any new build that has the same version and build number as a previously uploaded one. I always make it a habit to bump the build number right before I create an archive.
Getting these details right is your ticket into a massive ecosystem. In 2023, consumer spending on the App Store hit approximately $89.3 billion, a figure that dwarfs spending on the Google Play Store. It’s a huge market to tap into.
With all your settings locked in, you’re ready to create the final package. From the Xcode menu, just go to Product > Archive. This process compiles your code, bundles up all your assets, and creates the .ipa file that you’ll eventually upload. For a deeper dive into project setups, our guide on https://codepushgo.com/blog/building-apps-with-react-native/ has some extra pointers.
Crafting a Compelling App Store Listing
You’ve successfully archived your .ipa file. Now it’s time to switch hats from developer to marketer. Think of this next phase as building your app’s digital storefront—because even the most brilliant app is useless if no one can find it. Your App Store Connect listing is your best shot at convincing someone to tap that “Get” button.
First things first, you’ll need to create a new app record in App Store Connect. This is where you’ll stake your claim on your app’s name, which has to be 100% unique across the entire App Store. You’ll also lock in the primary language, the bundle ID (this must perfectly match the one in your Xcode project), and an SKU, which is just a unique code you create for your own records.

This is your mission control. The App Store Connect dashboard is where you’ll manage everything from your app’s metadata to its performance analytics after launch.
Perfecting Your Product Page Metadata
With the app record in place, it’s time to fill in the details that will help users discover and download your app. This isn’t just data entry; it’s optimization.
- Subtitle: This short phrase sits right under your app’s name and carries a lot of weight in search results. Make it count by packing in keywords that nail down what your app actually does.
- Description: Here you have more space to tell a compelling story. Don’t just list features—explain how your app solves a real problem for the user. What’s in it for them?
- Keywords: They aren’t as powerful as they used to be, but keywords still give Apple’s search algorithm clues about your app’s purpose. Use every last character you’re given.
Your visuals are just as critical as your text. People often decide based on what they see, so you need to master visual storytelling techniques to make your screenshots and previews pop. They need to be sharp, clear, and focused on the most exciting parts of your app.
Your icon, screenshots, and the very first sentence of your description are your digital handshake. They’re what users see before they even decide to click. Make them irresistible.
Finally, you’ll get into the nitty-gritty: setting your price, picking the right categories, and filling out the age rating questionnaire. You’ll also need to link to your privacy policy—this is non-negotiable. Once this metadata is locked in and your https://codepushgo.com/blog/apple-developer-provisioning-profile/ is good to go, you’re on the home stretch to the final upload.
Alright, you’ve made it to the final stretch. Your App Store Connect listing is looking sharp, and you have a production-ready archive sitting on your machine. Now, it’s time to get that build uploaded to Apple.
You have two main paths forward here: Xcode’s Organizer or the standalone Transporter app. Honestly, both work perfectly fine for sending your .ipa file over to App Store Connect. Pick whichever one you’re more comfortable with.
Once your upload completes, you’ll see a “Processing” status next to your build in App Store Connect. Don’t panic—this is totally normal. Apple is just running its own automated checks, which can take anywhere from a few minutes to an hour. When it’s done, your build will be ready to attach to your app version.
Final Checks Before Hitting Submit
Before you can click that big blue “Submit for Review” button, Apple has a few final questions for you. Answer these carefully and honestly, as getting them wrong can lead to a quick rejection.
- Export Compliance: The app will ask if you’re using any encryption. If your React Native app makes standard HTTPS calls (which it almost certainly does), the answer is yes. Don’t worry, you’re usually exempt from providing any heavy documentation for this.
- Advertising Identifier (IDFA): Does your app track users for advertising? If you’re using a service to serve ads or monitor their effectiveness, you need to declare it here. Be upfront about it.
- Notes for the App Reviewer: This is your direct line to the person who will be reviewing your app. Think of it as a mini-guide. If your app requires a login, provide a demo account. If there’s a feature that isn’t immediately obvious, explain it.
A clear, helpful note for the reviewer can be the difference between a smooth approval and a week of frustrating back-and-forth emails. Assume they’re seeing your app for the first time and guide them through its best parts.
Getting your app published isn’t the end; it’s just the beginning. The mobile world moves fast. In fact, new data shows that 73% of mobile apps get updated at least monthly. This means having a smart update strategy is non-negotiable.
To dig deeper into the whole process, check out the app submission lifecycle in our complete guide. In today’s market, knowing how to publish on App Store efficiently is a crucial skill. You can see more about just how competitive it is by looking at update frequency stats on Statista.com.
Navigating Common App Store Submission Hurdles
Even when you’ve double-checked every detail, hitting that “Submit for Review” button can be nerve-wracking. The whole process can feel a bit mysterious. Let’s walk through some of the questions I hear most often from developers pushing their first app to the App Store.
How Long Does the Review Actually Take?
This is probably the biggest source of anxiety. The good news is, Apple has gotten significantly faster over the years. From what I’ve seen, you can typically expect an initial review to be wrapped up within 24 to 48 hours.
Updates to existing apps often sail through even more quickly. Keep in mind, though, that this can slow down. If you submit during a major holiday rush or right after a big new iOS launch, you might be in for a longer wait.
What Are the Top Reasons for Rejection?
Crashes and bugs are the absolute top deal-breakers. An unstable app is a guaranteed rejection, so test, test, and test again. Another classic pitfall is incomplete or misleading metadata. Your descriptions, keywords, and screenshots need to be an honest reflection of what the app does.
Apple also scrutinizes privacy and user-generated content heavily. You’ll need a solid content moderation plan and a privacy policy that’s easy for users to find.
The most common rejections are almost always the most preventable. Test your app on real devices, proofread your entire listing, and be upfront about how you handle user data.
For a much deeper dive into what Apple’s review team focuses on, our guide to App Store review guidelines is an essential read. I’d recommend bookmarking it.
What Do I Do If My App Gets Rejected?
First off, don’t panic. Take a breath and read the rejection notice from top to bottom. Apple will almost always point to the specific guideline you’ve run afoul of. If anything is unclear, you can talk directly with the review team through the Resolution Center in App Store Connect.
Once you know what to fix, get it done, bump up your build number, and resubmit. If you feel the rejection was a genuine mistake, you also have the right to appeal the decision.
Remember, pushing updates and fixing critical bugs doesn’t always have to mean waiting on the App Store. With a service like CodePushGo, you can push JavaScript and image updates directly to your users’ devices in minutes, completely bypassing the review queue. Get instant updates and faster fixes with CodePushGo.


