
When you’re gearing up to test a mobile app, it’s about more than just finding bugs. You’re really checking four critical areas: functionality, performance, security, and usability. This means mixing things up—doing some manual checks to feel out the user experience, running automated scripts for the repetitive stuff, pushing the app’s limits with performance tests, and finally, getting it into the hands of real users for beta testing.
Why Your Mobile App Testing Needs a Strategy
Before we jump into the “how,” let’s talk about the “why.” Creating a solid testing strategy isn’t just a box to check. Skipping it isn’t just about missing a few bugs; it’s about risking one-star reviews, seeing your user retention plummet, and damaging your brand’s reputation right out of the gate.
In a marketplace as crowded as the app stores, users have zero patience for crashes, slow load times, or confusing layouts. A well-thought-out testing plan is your final line of defense. It’s what stands between a smooth, successful launch and a frantic scramble to fix embarrassing, public-facing errors. Think of it as insurance against the chaos of different devices, operating systems, and spotty network conditions.
The Business Case for Quality Assurance
The demand for high-quality apps has created a massive industry. The global market for mobile application testing services was valued at approximately $6.558 billion in 2025, and that number is only expected to grow. This isn’t just tech spending; it’s a clear signal that businesses know thorough testing is directly tied to revenue and happy users. You can dig deeper into these market trends and what they mean for developers.
A strategic approach to testing isn’t just a technical task; it’s a core business function. It ensures your app delivers the kind of seamless experience that builds loyalty and gets people talking. Without it, you’re just rolling the dice on your launch.
A well-tested app feels intuitive and reliable, building subconscious trust with the user. A buggy app, however, erodes that trust almost instantly, and it’s incredibly difficult to win back.
To give you a clearer picture, this infographic breaks down where testing efforts are typically focused. It’s all about finding the right balance.
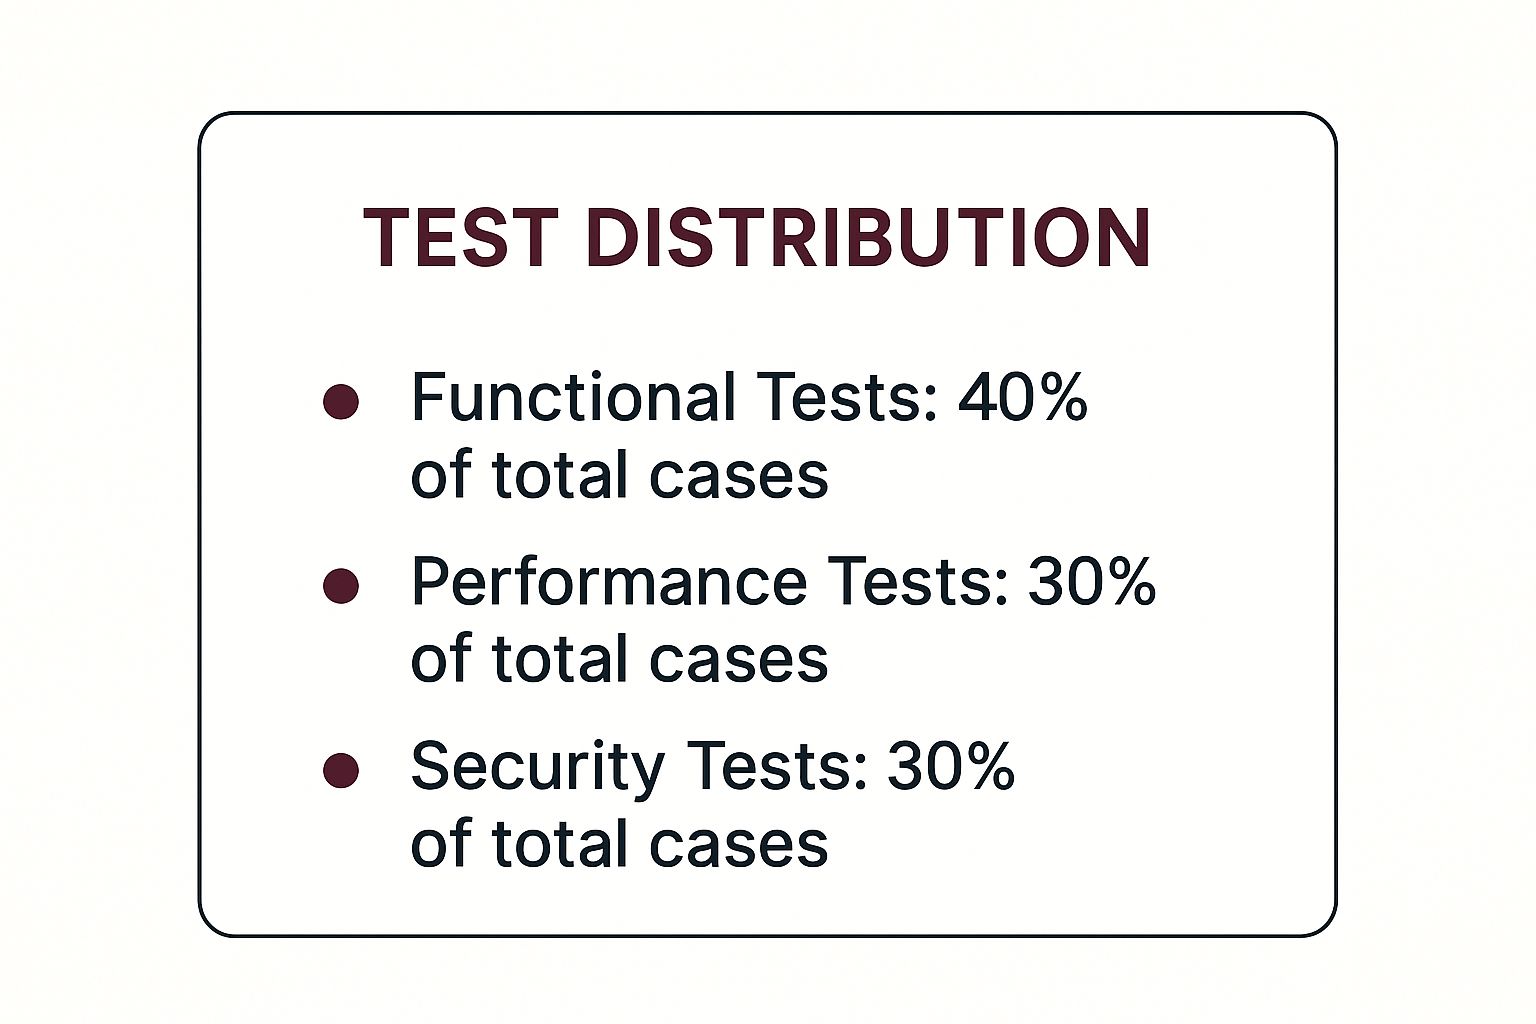
As you can see, functional testing takes the biggest slice of the pie, but performance and security testing aren’t far behind. This balanced approach is key to making sure an app doesn’t just work, but that it’s also fast and secure for everyone.
The Real-World Impact of Neglecting Tests
Let’s imagine a retail app that forgets to test its checkout flow on older Android devices. On launch day, a huge chunk of their potential customers can’t actually buy anything. The result? Lost sales and a wave of angry reviews. A simple oversight in device testing just turned into a major revenue and reputation crisis.
Here’s another one: an app that runs flawlessly on fast Wi-Fi but grinds to a halt on a 3G network. You’ve just alienated every user who tries to use it on their commute. These scenarios show that testing is about more than catching code errors—it’s about making sure the entire user journey works under real-world conditions.
To help you get started, here’s a quick rundown of the essential testing types we’ll be covering in this guide.
Core Mobile App Testing Types at a Glance
| Testing Type | Primary Goal | When to Use |
|---|---|---|
| Manual Testing | To evaluate usability, user experience (UX), and complex user flows. | Early in development for exploratory testing and before release for user acceptance. |
| Automated Testing | To verify functionality and catch regressions quickly and efficiently. | Throughout the development cycle, especially for repetitive checks like login or forms. |
| Performance Testing | To ensure the app is fast, responsive, and stable under load. | Before major releases and after significant code changes that might affect speed. |
| Beta Testing | To gather real-world feedback on all aspects of the app. | In the final stages before a public launch, with a targeted group of end-users. |
Each of these testing types plays a unique role in ensuring your app is polished, reliable, and ready for your users. A great strategy anticipates problems and solves them before they ever see the light of day.
Building Your Foundation with Manual Testing

Before you write a single line of automated test code, you need to roll up your sleeves and do some manual testing. This is far more than just tapping around on a screen; it’s your first and most important line of defense against a clunky, frustrating user experience.
This is where you have to take off your developer hat and think like a real user. Automated scripts are fantastic at catching predictable errors, like a spellchecker flagging a typo. But manual testing is like a human editor who reads a sentence and asks, “Does this even make sense?” It’s all about empathy and discovering the intuitive gaps that code can’t see.
The Art of Exploratory Testing
Instead of sticking to a rigid script, exploratory testing is about investigating your app with genuine curiosity. You aren’t just checking if a button works—you’re actively trying to break it in creative ways. This approach is priceless for finding those weird edge cases and unexpected bugs that always seem to pop up after launch.
Let’s say you’re testing the signup flow for a new e-commerce app. A standard test case would just confirm that valid inputs create an account. An exploratory tester, on the other hand, asks the fun questions:
- What if I use an email with a strange but valid domain, like
.photography? - Can I slip some emojis or special characters into the password field?
- What happens if I hit the back button midway through registration and then try to continue?
- How does the app handle a spotty network connection right when I hit “Sign Up”?
These are the exact kinds of scenarios that automated tests often miss but real users will absolutely run into. Finding them early saves you from panicked bug fixes and a flood of one-star reviews. When you consider that 85.65% of mobile shopping carts are abandoned—often because of friction in these exact flows—you realize how critical this human touch is.
Exploratory testing is less about following a map and more about drawing one. Each session uncovers new territory, revealing paths—and pitfalls—you never knew existed. It’s a discovery process that automation simply can’t replicate.
Crafting a Practical Manual Test Plan
A great manual test plan isn’t a 100-page novel. It should be a focused guide that points your testing efforts to the parts of your app that matter most. For a React Native app, this means zeroing in on the core user journeys that deliver all the value.
Start by mapping out your critical paths. These are the essential sequences of actions a user must be able to complete for your app to be considered functional.
Example Critical Paths for a Retail App:
- User Registration and Login: Can a new user sign up? Can an existing user log in without a hitch?
- Product Discovery: Can someone easily search for products, browse categories, and see item details?
- Shopping Cart Management: Is it easy to add items to the cart, change quantities, or remove things?
- Checkout Flow: This is the big one. It covers everything from entering shipping info and applying a discount code to selecting a payment method and confirming the order.
Once these paths are defined, you can create high-level test scenarios for each. The goal is to provide direction, not a restrictive script that stifles creativity.
Documenting Bugs for Quick Resolution
Finding a bug is only half the battle. If your development team can’t reproduce it, they can’t fix it. Learning to write clear, concise bug reports is a non-negotiable skill for anyone serious about mobile app testing.
A solid bug report should always contain:
- A Clear, Descriptive Title: “App Crashes When Removing Last Item from Cart” is infinitely better than “Cart Bug.”
- Precise Steps to Reproduce: Number each step so a developer can follow your exact path to the bug.
- Expected vs. Actual Results: Clearly state what you thought would happen versus what actually did.
- Visual Evidence: A screenshot or, even better, a screen recording is worth a thousand words. It provides undeniable proof and context.
- Environment Details: Always include the device model (e.g., iPhone 14 Pro), OS version (e.g., iOS 17.5), and app version.
This systematic approach turns what could be a frustrating back-and-forth into a smooth, collaborative problem-solving process. For teams using CI/CD, clear bug reports are crucial for keeping the development cycle moving quickly. To learn more about optimizing this part of your workflow, check out our guide on how to implement Android continuous integration.
Scaling Your Quality with Automated Testing

As your React Native app gets bigger and more complex, you’ll hit a wall with manual testing. It just doesn’t scale. Throwing more people at the problem leads to burnout, slows down your releases, and inevitably lets regression bugs slip through—the kind that break features you thought were stable.
This is where automated testing becomes a game-changer. It’s about creating a safety net of scripts that tirelessly check your app’s core functions every time you push new code. These tests run the same user flows with perfect consistency, freeing up your QA team to do what humans do best: poke around, explore edge cases, and think critically about the user experience in ways a machine can’t.
Choosing Your Automation Framework
When it comes to React Native, you’ve got a couple of solid choices for automation frameworks. Your team’s expertise and project needs will likely guide your decision. The two heavy hitters are Detox and Appium.
- Detox: I often lean towards Detox for pure React Native projects. It’s a “gray-box” framework, which means it has some inside knowledge of your app’s code. This allows it to sync perfectly with animations and background tasks, making your tests faster and way less flaky.
- Appium: Appium is a “black-box” tool, interacting with your app just like a user would. Its biggest strength is its versatility. You can write one test suite and run it across iOS, Android, and even mobile web. It’s a fantastic option if you’re managing native components alongside your React Native code.
For this guide, we’ll dive into Detox. Its design philosophy is all about eliminating the flakiness that plagues so many test suites, making it a reliable partner for any React Native developer.
Setting Up Your First Automated Test
Let’s get our hands dirty and build our first end-to-end (E2E) test. We’ll automate a classic user flow: logging in. The goal is simple: confirm that a user can enter their credentials, tap “login,” and land on the main screen.
First things first, you need to add Detox to your project. A couple of quick commands in your terminal will get the ball rolling.
npm install detox —save-dev npx detox init -r jest
This setup creates a .detoxrc.json config file for defining your app builds and simulators, along with a dedicated e2e folder where your test scripts will live.
A stable test is a valuable test. The golden rule of writing E2E tests is to choose stable locators. Avoid relying on element positions or vague text labels that might change. Instead, use unique
testIDprops in your React Native components.
For our login screen, you’d add testID props directly to your components. It’s a small change that makes a huge difference.
<TextInput
testID=“emailInput”
// … other props
/>
<TextInput
testID=“passwordInput”
// … other props
/>
Writing the Login Test Script
With your testIDs in place, you can now write a test that uses them. Open up the e2e/starter.test.js file and define the test case. The script will find the input fields, type in the credentials, tap the login button, and then check that the right screen appears.
Here’s what that looks like in a Detox/Jest environment:
describe(‘Login Flow’, () => { it(‘should log in successfully with correct credentials’, async () => { // Find elements by their testID and interact with them await element(by.id(‘emailInput’)).typeText(‘[email protected]’); await element(by.id(‘passwordInput’)).typeText(‘password123’); await element(by.id(‘loginButton’)).tap();
// Assert that the home screen is visible after login
await expect(element(by.id('homeScreen'))).toBeVisible();
}); }); This script is clean, easy to read, and tests a critical piece of your app’s business logic. Once you integrate this into your CI/CD pipeline, you’ll have an automated check running with every single pull request, giving you an immediate feedback loop. If you want to dive deeper, we have a whole guide on the benefits and strategies of automated testing.
The move toward automation isn’t just a best practice; it’s a massive market trend. The Mobile Application Testing Solutions market, valued at roughly $9.47 billion in 2025, is expected to explode to $36.09 billion by 2033. This growth is fueled by the fierce competition for user attention and the high standards they demand, especially in industries like gaming.
Ensuring a Fast and Fluid User Experience
Functionality is only half the battle. If your app works but feels sluggish or drains the battery, users will see it as fundamentally broken. This is where performance testing comes in, shifting your focus from “Does it work?” to “How well does it work?”
Perceived speed and responsiveness aren’t just nice extras; they are absolutely core to user retention. In fact, a recent study showed that 53% of users have uninstalled an app because of lag, crashes, or other performance problems. That’s a staggering number. It means you could lose over half your audience before they ever get a chance to fall in love with your app’s features.
Key Performance Metrics to Measure
When you start digging into performance, you have to look beyond a simple “is it fast?” and measure the specific things that users actually notice. Hunting down these bottlenecks requires a focused approach, especially in a React Native environment.
- App Launch Time: This is your first impression. How long does it take from the moment a user taps your icon to the moment they see a usable screen? A long wait here is an immediate turn-off.
- Screen Transition Smoothness: Do your screens and animations glide seamlessly, or do they stutter and jerk? Dropped frames during navigation feel janky and unprofessional.
- Memory Usage: How much RAM is your app hogging? Excessive memory consumption can slow down the user’s entire device, not just your app, leading to frustration.
- Battery Drain: Users are hyper-aware of which apps are killing their battery. If yours is a resource hog, it won’t last long on their phone.
The built-in React Native profiler is your best friend here. It’s an excellent tool that helps you visualize exactly where your app is spending its time during renders, making it much easier to pinpoint inefficient components or heavy computations that are causing slowdowns.
Performance is a feature. Users won’t separate your app’s functionality from its speed. To them, a slow feature is a broken feature. Your goal is to make the experience feel effortless and instantaneous.
The industry is taking this seriously, too. The global mobile application testing services market was valued at around $10.18 billion in 2024 and is projected to surge to $42.4 billion by 2033. This massive investment speaks volumes about how critical robust quality assurance has become. You can find more details about this explosive growth in app testing services.
Simulating Real-World Network Conditions
It’s easy to be fooled by your app’s snappy performance on the office’s high-speed Wi-Fi. But that’s not the real world. Your users will be on spotty 3G on the subway, congested public Wi-Fi at a café, or switching between networks on the go. Testing under these variable, and often poor, conditions is non-negotiable.
Network simulation tools let you throttle your connection to mimic everything from a perfect 5G signal to a barely-there 2G connection. This is how you find the answers to crucial questions:
- How does the app behave when an API response is slow to arrive?
- Does the UI freeze up while data is loading in the background?
- Do you have proper loading indicators to let users know what’s happening?
- Is data cached effectively so the app still works offline or with a spotty connection?
Answering these questions prevents user frustration and ensures your app is dependable, no matter the network. A proactive approach here can also be paired with modern deployment methods. For example, if you discover a performance bug in the wild, being able to push a fix immediately is a massive advantage. Our article explains what an OTA update is and how it speeds up your release cycle, allowing you to react to performance data from the field almost instantly.
Gathering Real-World Feedback with Beta Testing
No matter how thorough your in-house testing is, nothing can truly simulate the beautiful chaos of the real world. Your internal team knows how the app is supposed to work. Real users? They’ll tap, swipe, and navigate in ways you never imagined, on a dizzying array of devices, spotty network connections, and quirky OS versions.
This is where beta testing comes in. It’s your app’s final, and most important, reality check. Your app graduates from the controlled lab environment and faces its first real audience. It’s the ultimate test of everything you’ve built, moving beyond just functionality to gauge genuine user sentiment. Is the app truly intuitive? Is the value clear? Are there hidden friction points that create frustration? Only real users can give you those answers.
Recruiting the Right Beta Testers
The success of your beta program really boils down to the quality of your testers. You aren’t just looking for warm bodies; you need a group that actually represents your target audience. A classic mistake is recruiting only tech-savvy early adopters. While they’re fantastic at sniffing out bugs, their experience rarely mirrors that of the average user who will eventually download your app.
To build a solid testing group, you need to think about diversity. Try to get a mix of people, including:
- Your Ideal Customer Persona: These are the folks you built the app for in the first place. Their feedback on core features and workflows is pure gold.
- Casual Users: People who might not be deeply familiar with your product category. They are perfect for spotting confusing UI elements and a clunky onboarding process.
- Power Users: Tech-literate users who will intentionally push your app to its limits. They’ll find those obscure edge cases you never thought of.
A well-rounded group gives you a 360-degree view of your app’s strengths and weaknesses. You can find these testers everywhere—from your company’s email list and social media followers to dedicated platforms designed to connect developers with beta testers.
Distributing Builds and Collecting Feedback
Once you’ve got your testers lined up, you need a smooth way to get the app into their hands. The industry standards here are TestFlight for iOS and the Google Play Console’s internal testing track for Android. These platforms handle all the logistics of build distribution and updates, saving you a ton of headaches.
But just sending out a build and hoping for the best is a strategy doomed to fail. You need to give users clear instructions and an easy way to submit their thoughts.
A beta program without a clear feedback loop is just giving your app away for free. The goal isn’t just to find bugs, but to understand the “why” behind user actions and sentiment.
Set up a dedicated communication channel like a private Slack group, a Discord server, or even a simple feedback form. This encourages discussion and makes it easy for you to triage bugs, feature requests, and general comments. Don’t be afraid to ask targeted questions to guide their testing, like, “How easy was it to complete the checkout process?” or “What was your first impression of the new dashboard?”
The React Native Advantage: Over-the-Air Updates
Here’s where testing a React Native app gets really powerful. One of the biggest drags in a typical beta test is the feedback cycle. A tester finds a bug, you fix it, build a new version, submit it for review, and then wait for everyone to download the update. That can take days and completely kills your momentum.
This is where over-the-air (OTA) updates, managed by a service like CodePushGo, become a game-changer. Instead of pushing a whole new build through the app stores, you can send JavaScript and asset updates directly to your testers’ devices. Instantly.
Imagine a tester reports a critical typo on the login screen. Normally, that’s a multi-day fix. With CodePushGo, you can push the corrected text file, and it’s live for all your beta users in minutes. This incredible agility lets you:
- Fix bugs in near real-time: Respond immediately to show-stopping issues.
- Run rapid A/B tests: Push two different versions of a feature to different user segments and see which one performs better.
- Iterate on UI/UX feedback quickly: Tweak layouts, colors, and copy based on user comments without a full release cycle.
This rapid iteration transforms your beta program from a slow, clunky process into a dynamic, continuous conversation with your users. For a deeper dive into making your program as effective as possible, our guide on beta testing best practices offers a wealth of actionable tips. By integrating OTA updates, you’ll launch an app that’s not just bug-free, but genuinely loved.
Frequently Asked Questions About Mobile App Testing
Even with the best game plan, some practical questions always surface during the testing process. I’ve been there. Let’s run through a few of the most common queries I hear from development teams to clear up any confusion and get you back on track.
Can You Automate A/B Testing?
Yes, absolutely—to an extent. Automation is fantastic for the technical side of A/B testing, particularly for UI checks. You can write scripts to confirm that both your ‘A’ and ‘B’ variations render correctly without causing any crashes. It’s a great way to ensure the test itself is stable.
But here’s the crucial part: automation can’t measure the human element. It can’t tell you which version users prefer or which one leads to better conversion. Your automated scripts validate the functionality, but the real insights for your A/B test will always come from digging into user analytics and behavior data. Use automation to build a solid foundation for the test, then let real user data tell you the story.
How Do I Test on Devices I Don’t Physically Own?
This is the million-dollar question for most developers. It’s just not feasible to buy every device model and OS version out there. This is precisely why device clouds and emulators are so indispensable.
- Emulators and Simulators: These are your best friends during early development. They mimic device hardware and software right on your computer, making them perfect for quick, iterative functional checks. They’re fast and convenient, but they can’t perfectly replicate things like battery drain, network lag, or specific hardware quirks.
- Real Device Clouds: When you need ironclad results, especially for performance and tricky compatibility bugs, nothing beats a real device cloud. Services like Sauce Labs or BrowserStack give you remote access to a massive library of physical iPhones and Android devices. You get to run your app on actual hardware without the headache of purchasing and maintaining it all yourself.
The most practical approach is a hybrid one: use emulators for your day-to-day development loop and a device cloud for final validation before a release.
A quick word of advice: don’t just test on the newest, shiniest phones. A huge chunk of your audience is likely using older, less powerful devices. Your app needs to work just as well for them.
Can You A/B Test Directly in the App Stores?
This is a common point of confusion. You can’t run a traditional A/B test within the Apple App Store or Google Play Store, where one group of new users gets version A and another gets version B of your app. That functionality doesn’t exist.
What you can do are store listing experiments. Both platforms offer tools to test different versions of your app’s product page—your icon, screenshots, videos, and description. The goal is to see which combination convinces more people to hit the “download” button. Google Play has this feature built-in, and for iOS, you can achieve something similar with Apple Search Ads’ Creative Sets Testing.
For testing features inside your app, you’ll need to use a third-party service or roll your own solution to deliver different experiences to users after they’ve installed it.
What’s the Difference Between Load Testing and Stress Testing?
People often use these terms interchangeably, but they measure two very different things. Nailing the distinction is key to building a backend that won’t crumble under pressure.
| Testing Type | Primary Goal | The Analogy |
|---|---|---|
| Load Testing | See how the system performs under a normal, expected user load. | Making sure a bridge can handle the typical daily flow of traffic without backups. |
| Stress Testing | Find the system’s breaking point by pushing it far beyond its capacity. | Piling trucks onto that bridge until it buckles to discover its absolute max weight limit. |
You run load tests to ensure a smooth user experience during busy periods. You run stress tests to see how and when your system fails so you can build a graceful recovery plan for those unexpected traffic spikes. Both are vital, and you can dive deeper into more strategies by reviewing these mobile app testing best practices.
Ready to ship updates and fix bugs in minutes, not days? CodePushGo gives you the power of over-the-air (OTA) updates for your React Native apps, allowing you to bypass the app store review process for instant deployments. Take control of your release cycle and deliver a flawless user experience.


