
At its core, an iOS universal link is just a standard web link—think https://yourdomain.com—that has a special power. If a user has your app installed, tapping that link whisks them directly to the right screen inside your app. If they don’t? No problem. It simply opens the link in their web browser. This creates a smooth, unbroken journey from the web straight into your application.
Why Universal Links Are a Game-Changer for Apps

Before we get into the nitty-gritty of the setup, it’s crucial to grasp that implementing universal links is more than just a technical task. You’re essentially building a high-speed bridge between your web presence and your native app. This bridge gets rid of the clumsy detours and annoying pop-ups that plague older deep-linking methods.
Instead of interrupting the user with an “Open in app?” prompt, a universal link just works. This frictionless experience is a huge win for keeping users happy and engaged.
Creating a Seamless User Journey
The biggest win here is the ability to create a truly cohesive user experience. Picture this: a user gets a promotional email and clicks a link to one of your products. A universal link takes them directly to that product’s screen inside your app, keeping the context and their shopping intent alive. That seamless transition makes a world of difference for conversions and engagement.
The goal is to blur the line between your website and your app until it’s practically invisible. Users shouldn’t have to think about where they are—they should just land on the content they wanted to see. This directly improves key app engagement metrics by preventing users from dropping off at critical moments.
Security and Trust Advantages
Beyond the slick user experience, universal links provide a major security boost compared to old-school custom URL schemes. Because they are standard HTTPS links tied to a domain you have to own and verify, they are fundamentally more secure. This creates a two-way handshake between your app and your website, stopping other apps from hijacking links meant for you.
This verifiable connection builds trust. When users click your links, they know they’re going to a legitimate destination, whether that’s your website or your app. In today’s world, that kind of security is non-negotiable.
This robust framework is precisely why Apple introduced Universal Links way back in iOS 9. They wanted to build a more integrated and safer ecosystem. By letting a standard web link securely open an app or fall back to Safari, they made it much easier for marketing campaigns to reliably drive users into specific app content, which in turn boosts both retention and conversions.
The AASA File: Your App’s Digital Handshake
At the heart of any iOS Universal Link setup is a small but mighty JSON file: the apple-app-site-association, or AASA file. Think of it as a public declaration you post on your website’s server. It’s your way of telling Apple, “Hey, I own this domain, and I officially authorize this specific iOS app to open links from it.”
When a user installs your app for the first time, one of the first things iOS does is peek at your domain, looking for this file. If it finds a valid AASA file that lists your app’s unique identifier, a secure connection is forged. From that moment on, any link that matches the patterns you’ve defined will bypass Safari and launch your app directly.
Understanding the AASA File’s Anatomy
The file itself is a simple JSON object, but every key and value serves a critical purpose. The main key is applinks, and within it, you lay out the rules for which app can handle which URL paths.
The structure is pretty lean, boiling down to a few key elements:
details: This is an array that contains the configuration for one or more apps.appIDs: Insidedetails, this array lists your application identifiers. It’s crucial to get this right: it’s not just your Bundle ID. You need your Team ID prefixed to your Bundle ID, likeABCDE12345.com.yourcompany.yourapp.components: This is where the magic happens. It’s an array of objects where you define the specific URL paths your app should intercept. You can be as broad or as specific as you need to be.
Let’s look at a practical example:
{ “applinks”: { “details”: [ { “appIDs”: [“4QMDKC8VLJ.com.yourcompany.appname”], “components”: [ { ”/”: “/products/”, “comment”: “Matches any URL starting with /products/” }, { ”/”: “/profile/user/”, “comment”: “Matches all user profile URLs” } ] } ] } }
With this setup, a URL like yourdomain.com/products/cool-gadget would launch the app. However, a link to yourdomain.com/about-us would open in Safari as usual, because it doesn’t match any of our rules. The wildcard (*) is your best friend here, letting you match entire sections of your site without having to list every single possible URL.
The Server Rules You Can’t Afford to Ignore
Writing the perfect JSON is only half the job. How you serve this file from your web server is just as important, and honestly, it’s where most developers get stuck. Apple is extremely strict about how it fetches this file, and if you get it wrong, your links will silently fail.
I can’t stress this enough: your server configuration is the most common point of failure. If the AASA file isn’t served perfectly, iOS won’t even try to open your app. It will just fall back to Safari, giving you no error or warning. Debugging this can be a real headache.
Make sure your web server follows these non-negotiable rules:
- Serve over HTTPS: The file must be available through a secure
https://connection. No exceptions. Your SSL certificate must be valid. - No Redirects: When iOS comes knocking, it expects a direct answer. The URL for the AASA file must return a
200 OKstatus code immediately, without any redirects. - The Right Content-Type: Your server has to tell iOS that it’s sending a JSON file. This means setting the HTTP header
Content-Typetoapplication/json. - A Very Specific Location: You must host the file (with no
.jsonextension) at one of two specific paths:https://yourdomain.com/apple-app-site-associationorhttps://yourdomain.com/.well-known/apple-app-site-association.
How to Configure Your Xcode Project Correctly
Okay, so your AASA file is live on your server. Now what? The next piece of the puzzle is telling your React Native app where to find it. This all happens inside Xcode, and it’s what creates the secure handshake between your website and your app.
Honestly, this part is non-negotiable. Get this wrong, and your iOS universal link simply won’t work.
Think of this step as officially authorizing your app to handle links from your domain. When someone installs or updates your app, iOS looks for this specific permission, grabs your AASA file from the server, and checks that everything lines up. If that native-side configuration is missing, iOS just shrugs and opens every link in Safari as usual.
Adding the Associated Domains Capability
First things first, fire up your project in Xcode. You’ll want to navigate to your project’s settings, select your main target, and then head over to the Signing & Capabilities tab. This is where you manage all the core permissions and special powers your app has.
From there, click the + Capability button and type “Associated Domains” into the search box. Once you add it, a new section will pop up, ready for you to list the domains your app is allowed to manage.
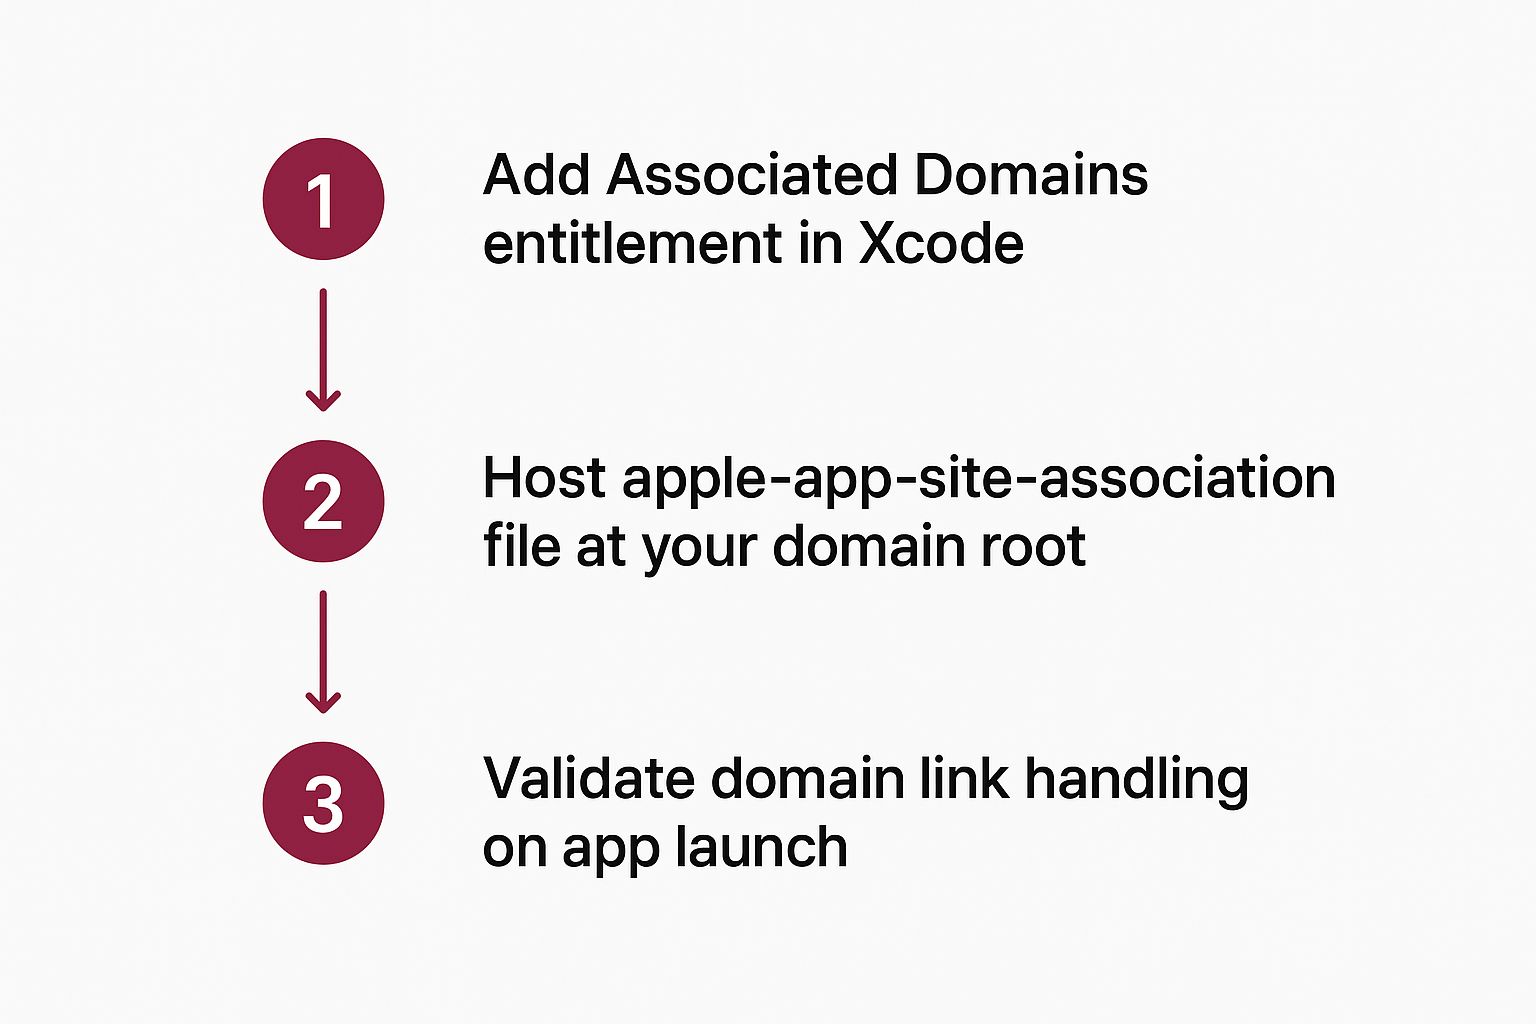
In the domains list that appears, you need to add your domain with a very specific prefix: applinks:www.yourdomain.com. That applinks: part is absolutely mandatory—it’s the signal to iOS that this domain is meant for universal links, not something else.
If you ever get stuck on other Xcode settings, our Xcode guide is a great resource to have handy.
Avoiding Common Configuration Pitfalls
This is where tiny, almost invisible mistakes can derail the whole setup. Double- and triple-check that your Team ID and Bundle Identifier in Xcode perfectly match what you put in your AASA file. Even a small typo here will cause the validation to fail, often without any clear error message.
I’ve seen this trip up countless developers: iOS only checks for the AASA file when your app is first installed or updated. If you’re testing changes, you have to delete the app from your physical device and reinstall it completely to force a fresh validation. Simply rebuilding from Xcode won’t cut it.
The marketing implications of getting this right are huge. The seamless journey from a web link directly into an app is a powerful conversion driver. In fact, web-to-app channels that rely on Universal Links have seen a staggering 77% year-over-year jump in conversions. You can dig into more deep linking trends from AppsFlyer to see just how impactful this native integration can be.
With your AASA file in place and Xcode configured, the server-side and native parts of the puzzle are solved. Now for the fun part: bringing the iOS universal link to life inside your React Native app with JavaScript. This is where we’ll listen for incoming URLs and turn them into navigation commands.
React Native’s built-in Linking module is our go-to tool for this. It gives us the event listeners we need to catch a URL, whether it opened the app from a cold start or was tapped while the app was already running.
Listening for Incoming Links
To build a really solid user experience, you have to account for two different scenarios. First, you need a way to check if the app was launched from a URL. Second, you have to listen for any new URLs that come in while the app is active.
For the first case, Linking.getInitialURL() is perfect. It returns a promise that gives you the URL that opened the app, if there was one. For the second scenario, Linking.addEventListener('url', callback) will be your active listener.
A great pattern I’ve found is to bundle this logic into a custom hook or a component that initializes right when your app mounts.
import { Linking } from ‘react-native’; import { useEffect } from ‘react’; import { useNavigation } from ‘@react-navigation/native’;
const useDeepLinkHandler = () => { const navigation = useNavigation();
const handleUrl = (url) => { if (!url) return; // Example: ‘https://yourdomain.com/products/123’ const { pathname, searchParams } = new URL(url); const pathParts = pathname.split(’/‘).filter(Boolean);
if (pathParts[0] === 'products' && pathParts[1]) {
  const productId = pathParts[1];
  navigation.navigate('ProductDetail', { id: productId });
}
// Add more routing logic here
};
useEffect(() => { // 1. Handle the URL that opened the app Linking.getInitialURL().then(url => { if (url) { handleUrl(url); } });
// 2. Listen for URLs that come in while the app is running
const subscription = Linking.addEventListener('url', ({ url }) => {
  handleUrl(url);
});

return () => {
  subscription.remove();
};
}, []); };
This dual approach ensures you never miss a link, creating a seamless journey for the user no matter how they arrive. For an even deeper dive into this, check out our complete guide on deep linking in React Native.
Parsing and Navigating
Once you’ve caught the URL, the next job is to parse it to figure out where in the app to send the user. The standard JavaScript URL object works beautifully for this, letting you easily pull out the path and any query parameters.
The core idea is simple: map URL patterns to specific screens in your app. A URL like
yourdomain.com/profile/jane-doeshould reliably open the profile screen for the user “jane-doe.” Your parsing logic acts as the router that connects the web link to a native view.
For example, in an e-commerce app, your routing logic might look something like this:
- A URL with the path
/products/[id]should navigate to theProductDetailscreen, passing along the product ID. - The path
/ordersshould take the user to theirOrderHistoryscreen. /settings/notificationsshould navigate deep into theNotificationSettingsscreen.
If you’re using a library like React Navigation, this is incredibly straightforward. Your parsing function just needs to call navigation.navigate() with the right screen name and any parameters you’ve extracted from the URL.
While our focus here is on React Native, it’s interesting to see how other frameworks handle this. For instance, guides on developing apps from scratch using Flutter show that the core concepts of mapping URLs to in-app routes are quite similar across different cross-platform technologies.
Universal Link vs Custom URL Scheme
It’s worth taking a moment to understand why Universal Links are the modern standard on iOS. They offer significant security and user experience advantages over the older custom URL schemes (like myapp://).
| Feature | Universal Link | Custom URL Scheme |
|---|---|---|
| Fallback | Gracefully opens your website in Safari if the app isn’t installed. | Fails silently or shows an error if the app isn’t installed. |
| Security | Securely associated with your domain via the AASA file. | Can be claimed by any app, leading to potential conflicts. |
| Uniqueness | Globally unique because it’s tied to your web domain. | Not unique; another app could register the same scheme. |
| User Trust | Uses a standard https:// link, which is familiar to users. | Uses a custom appname:// format, which can look strange. |
| Configuration | Requires server-side setup (AASA file) and app configuration. | Requires only app-level configuration in Info.plist. |
Ultimately, Universal Links provide a much more professional and reliable experience. The fallback to your website is a huge win, ensuring the user always ends up somewhere useful.
Making Universal Links Work with Over-The-Air Updates
Pushing over-the-air (OTA) updates with a service like CodePushGo is a game-changer. You can ship fixes and new features in minutes, not days. But there’s a sneaky “gotcha” that can trip you up: your apple-app-site-association (AASA) file. If your web assets and AASA file are part of the same deployment, a simple web update could accidentally move or block the path to this file, and your Universal Links will just stop working.
The problem lies in how modern web apps are served. The AASA file needs to be accessible at a very specific, static path: /.well-known/apple-app-site-association. No redirects allowed. However, when you deploy a React Native web build, you’re often dealing with hashed filenames and a server set up to route everything through a single index.html file for your Single-Page Application (SPA). This SPA routing can hijack the request for the AASA file, causing your iOS Universal Link validation to fail without any obvious errors.
Keeping Your AASA File Locked in Place
The fix is a simple but crucial server-side tweak. You need to create a specific rewrite rule that tells your server, “Hey, for this one specific path—/.well-known/apple-app-site-association—ignore the SPA routing and serve this JSON file directly.”
This one rule decouples the AASA file from your dynamic app updates, ensuring Apple’s servers can always find and validate it, no matter how many OTA updates you push through CodePushGo. We dive deeper into deployment strategies like this in our guide on how to deploy a React Native App.
A classic mistake is just dropping the AASA file into a public folder and calling it a day. With most modern hosting setups for SPAs, that’s not enough. Without an explicit server rule, the platform will likely still try to route the
/.well-known/request through your app’s main entry point, breaking the validation.
Getting this right is more important than ever. With over 1.9 million apps on the Apple App Store and a projected revenue of $123 billion in 2025, competition is fierce. Universal Links are your secret weapon for pulling high-value iOS users directly into your app, and you can’t afford for them to break.
Real-World Server Configurations
So, how do you actually implement this rule? It depends entirely on where you host your site. The concept is always the same: make sure the AASA file request is handled before any other routing logic.
Here are a few practical examples to get you started:
- Netlify: Add a specific rule to your
netlify.tomlfile. You’ll want to place it before the general SPA rewrite rule to give it priority. - Vercel: Use the
rewritesproperty in yourvercel.jsonconfiguration file to create an exception for the/.well-knownpath, preventing it from being handled by the main routing logic. - AWS S3/CloudFront: This is a bit more involved. You’ll need to configure a specific routing rule within your CloudFront distribution to serve the AASA file directly from its S3 bucket, bypassing any other rules.
By making these small but vital server-side adjustments, you can confidently use the power of OTA updates without ever worrying about silently breaking the seamless experience that iOS Universal Links provide.
Common Universal Link Questions and Fixes
Even when you follow the instructions to the letter, getting an iOS universal link to work can feel like a guessing game. You’ve double-checked everything, but tapping your link still opens Safari. It’s a classic problem.
Let’s break down some of the most common hangups I’ve seen and, more importantly, how to fix them so you can get back to building.
Why Does My Link Still Open Safari?
This is, without a doubt, the number-one frustration. If your links are stubbornly opening in the browser instead of your app, the first place to look is your AASA file. Is it actually live and publicly accessible over HTTPS? Crucially, it must not have any redirects. You can use an online AASA validator to confirm this quickly.
Next, it’s time to get forensic with your Xcode project settings. The “Associated Domains” capability needs to be perfect. Make sure each entry has the applinks: prefix, and check for any typos. A single misplaced character will cause the entire thing to fail without so much as a warning.
Here’s the tip that solves this 90% of the time: iOS only checks for the AASA file when an app is first installed or updated. If you’ve made any changes to your AASA file or your Xcode capabilities, you must delete and reinstall the app on your test device. Simply rebuilding from Xcode isn’t enough to trigger a new check.
Also, keep in mind how you’re tapping the link. If you paste a URL directly into the Safari address bar and hit go, it will always open in Safari. That’s just how iOS is designed. To properly test, you need to tap the link from a different app, like Notes, Messages, or Mail.
Do I Need a Paid Apple Developer Account?
The short answer is yes, absolutely. A paid Apple Developer Program membership is a non-negotiable requirement for this feature.
The whole system is built on a foundation of trust, where Apple cryptographically verifies that your app and your domain are legitimately connected. This verification process relies on the official provisioning profiles and certificates that are only available through the paid program. The “Associated Domains” capability, which is the heart of this setup, simply won’t work without it.
If you’re stuck on this part of the process, our guide on the Apple Developer provisioning profile can walk you through the specifics.
The Best Way to Test Universal Links
Forget the simulator. For Universal Links, you need a real, physical device. The simulator is notoriously unreliable for this and often produces false negatives.
Once you have a fresh build installed on an actual iPhone, the easiest test is to use the Notes app.
- Open Notes on your iPhone.
- Type out one of your app’s complete URLs (like
https://www.yourdomain.com/products/123). - Tap the link you just typed.
If everything is configured correctly, your app should launch immediately.
For more advanced troubleshooting, you can plug your device into your Mac and fire up the Console app. In the search bar, filter for the process swcd (which stands for shared web credentials daemon). This will show you the system logs related to fetching and parsing your AASA file, giving you a behind-the-scenes look at whether iOS sees an error.
Using Separate Domains for Staging and Production
Not only can you use different domains for different environments, but you absolutely should. It’s a best practice that keeps your development and testing work completely isolated from your live production app.
The setup is straightforward. In Xcode, just add multiple entries to your “Associated Domains” list. For instance, you could have applinks:www.yourdomain.com for production and applinks:staging.yourdomain.com for your test environment.
From there, you just need to host a separate AASA file on each of those subdomains. This lets you confidently build and test your deep linking logic in a safe staging environment before it ever touches production.
Ready to ship updates and fixes to your React Native app in minutes, not days? With CodePushGo, you can push over-the-air updates instantly, bypassing the app store review process. Find out how you can accelerate your development cycle and deliver a better user experience at https://codepushgo.com.


