So, you’ve written the code, and your app is finally taking shape. Now comes the exciting—and often daunting—part: getting it into the hands of your users. This is what the mobile app deployment process is all about. It’s the journey from your finished code to a live application on the Apple App Store or Google Play Store.
This isn’t just a simple upload. It’s a multi-stage process that involves code signing, building the app binary (the IPA for iOS or APK/AAB for Android), running through a gauntlet of tests, and successfully navigating the app store submission gauntlet. Nailing this process is the bedrock of a successful launch.
Preparing for a Flawless App Launch

Before anyone can even think about downloading your app, you have to lay some critical groundwork. I can’t stress this enough: this initial preparation is probably the single most important phase of the entire deployment journey. If you cut corners here, you’re practically inviting frustrating delays, security holes, or even flat-out rejections from the app stores down the line.
This prep work isn’t just about ticking boxes on a checklist. It’s about building a solid, secure foundation that will support your app for its entire lifecycle. Getting this right is the difference between a chaotic, hair-pulling launch day and a smooth, predictable one. Think of it as building the launchpad long before you start assembling the rocket.
Configuring Your Development Environment
First things first, you need to get your build environment in order. This means setting up the right Software Development Kits (SDKs) for both iOS and Android, along with all the command-line tools and dependencies your project relies on. Consistency is everything here, especially on a team. You need to ensure every developer can build the app under the exact same conditions.
A properly configured environment solves that classic, frustrating “well, it works on my machine” problem that can completely derail a deployment schedule. To enforce this consistency, many teams I’ve worked with use tools like Docker to create containerized build environments, which is a fantastic practice.
Managing Code Signing and API Keys
Code signing is non-negotiable for both Apple and Google. It’s a cryptographic process that proves you are who you say you are and guarantees the app code hasn’t been meddled with since you signed it. For iOS, this means wrestling with certificates and provisioning profiles in the Apple Developer portal. For Android, you’ll create a Keystore file to sign your app.
Pro Tip: Whatever you do, never commit your signing certificates, keystores, or sensitive API keys directly into your Git repository. Use secure secret management tools like GitHub Secrets, AWS Secrets Manager, or simple environment variables to inject them safely into your build process.
Speaking of keys, securing your API keys is just as vital. Hardcoding keys for third-party services—like Google Maps or an analytics platform—is a massive security flaw. If someone decompiles your app, they can easily find and abuse those keys, leading to service interruptions or a shockingly high bill.
Establishing Strong Version Control Practices
A disciplined approach to version control with Git is an absolute must. It gives you a clean history of every change, makes team collaboration possible, and allows for quick rollbacks when—not if—something goes wrong. A battle-tested branching strategy like GitFlow is a great place to start.
It gives every branch a clear purpose:
- main/master: This branch is sacred. It should always mirror the exact code running in production.
- develop: This is the integration hub where features are merged once they’re ready for the next release.
- Feature Branches: Developers create these from
developto work on new features in isolation, merging back when complete. - Release Branches: When
developis ready for a release, you fork areleasebranch for final testing, bug squashing, and prep. - Hotfix Branches: Pulled directly from
main, these are for emergency patches to fix critical bugs in your live app.
This kind of structured workflow keeps your codebase tidy and makes the mobile app deployment process far more predictable.
Before we dive into the nuts and bolts of CI/CD, here’s a quick look at the essential prep work we’ve just covered. Getting these tasks right from the start is crucial for a smooth and secure deployment.
Essential Pre-Deployment Tasks
| Task | Objective | Key Tool or Method |
|---|---|---|
| Environment Setup | Ensure consistent and reproducible builds across the team. | Docker, specific SDK versions |
| Code Signing | Verify developer identity and guarantee app integrity. | Apple Developer Portal, Android Keystore |
| API Key Management | Prevent unauthorized access and abuse of third-party services. | GitHub Secrets, AWS Secrets Manager |
| Version Control | Maintain a clean codebase and enable collaboration. | Git, GitFlow branching strategy |
Treating these steps with the seriousness they deserve will save you countless headaches later on. This discipline is a core tenet of agile development, which is all about creating flexible and efficient workflows. If you want to go deeper, our guide to agile mobile app development is a great resource.
While traditional mobile app deployment can take a lengthy 3 to 9 months, the landscape is shifting. Modern low-code platforms and reusable component libraries are dramatically speeding things up, allowing some teams to get an MVP out the door in as little as 4 to 6 weeks. It’s a testament to how much organized preparation and the right tools can impact your timeline.
Automating Builds with CI/CD Pipelines
If you’re still manually building, testing, and packaging your app for every little change, you’re playing a dangerous game. It’s not just slow and tedious; it’s practically an open invitation for human error to sneak into your release. This is where a solid Continuous Integration and Continuous Deployment (CI/CD) pipeline isn’t just a nice-to-have—it becomes your most valuable asset for shipping quality apps, fast.
A well-oiled CI/CD pipeline takes that entire manual sequence and puts it on autopilot. Instead of a developer kicking off a build on their own machine (which might have its own weird configurations), the process starts automatically. Usually, a simple code commit to your Git repository is the trigger. From there, the pipeline jumps into action, running a script that compiles the code, blitzes through your automated tests, and—if everything gets a green light—packages the app into a signed binary (APK or IPA) that’s ready to go.
This simple shift means every single commit can be treated as a potentially shippable version of your app.
This infographic breaks down the simple but powerful flow of a CI/CD pipeline, taking you from a code commit all the way to a deployed app.
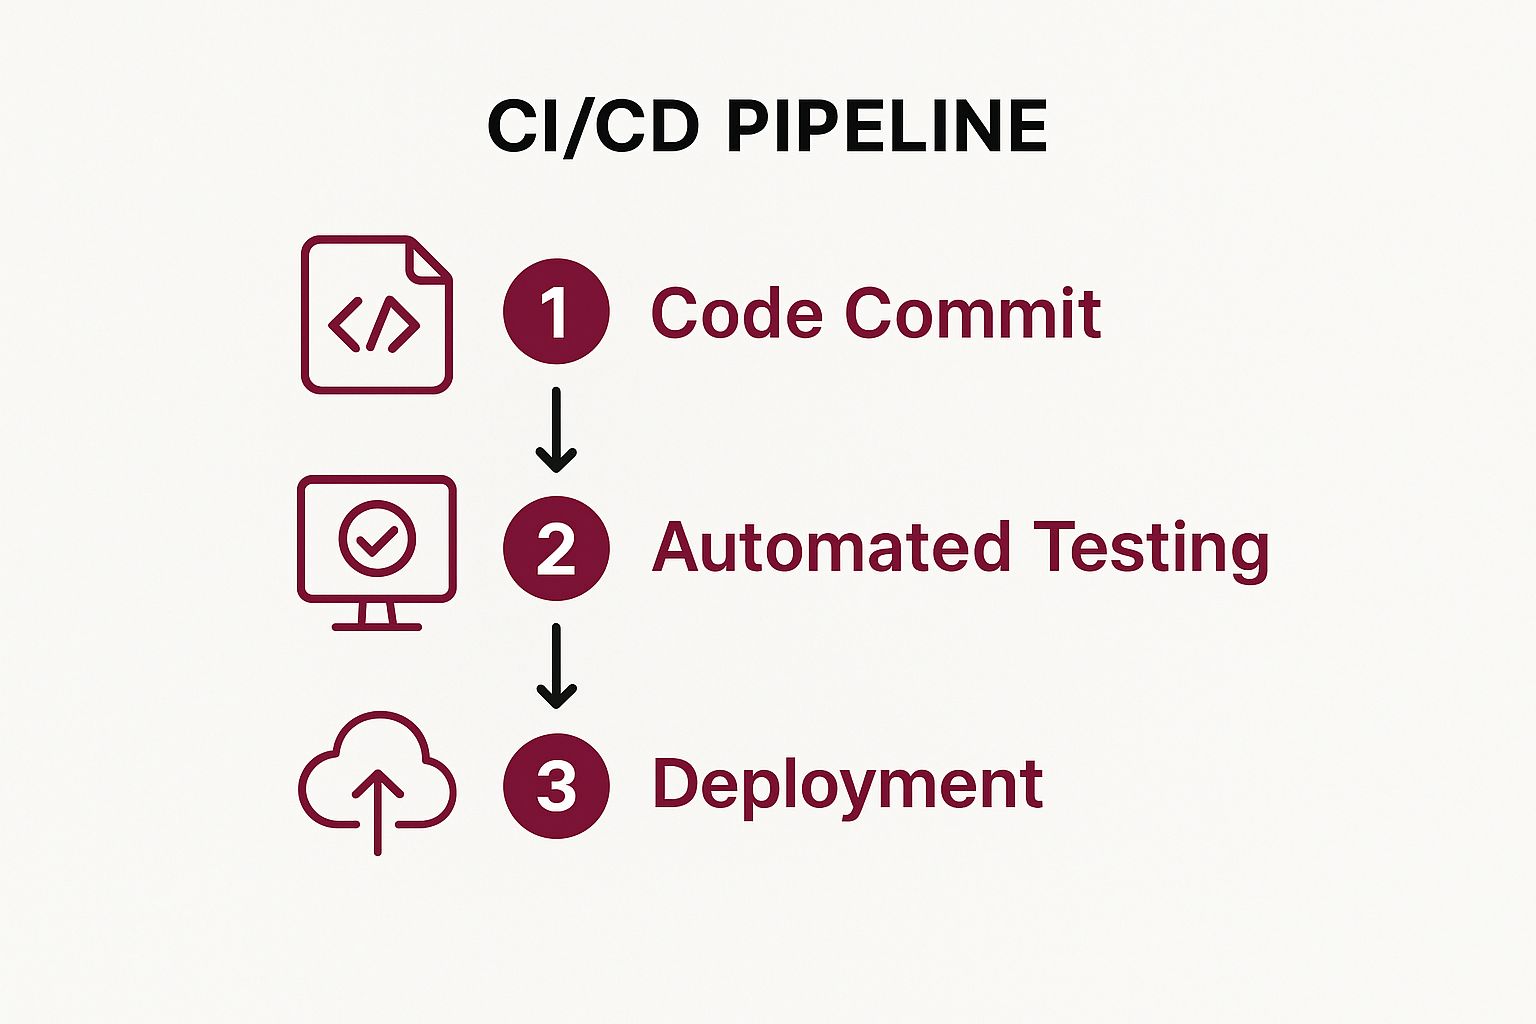 As you can see, automation is the glue holding each stage together. It creates a dependable, repeatable system that sniffs out problems early and gets your app into users’ hands faster.
Choosing the Right CI/CD Tools
You’ve got some fantastic platforms to choose from when building out your pipeline. The best one for you really boils down to your team’s existing tech stack, budget, and unique needs.
Here are a few of the most popular choices I’ve seen teams succeed with:
- GitHub Actions: If your code is already on GitHub, this is a no-brainer. You define your automation workflows in YAML files that live right inside your repository. This is huge because it means your pipeline is version-controlled right alongside your code. It’s an excellent starting point with a surprisingly generous free tier.
- Jenkins: This is the open-source workhorse of the CI/CD world. You can self-host it, giving you ultimate control over your build environment. Its plugin ecosystem is massive, so you can make it talk to almost any tool you can think of. The trade-off? It generally requires more hands-on setup and maintenance.
- Bitrise: Built from the ground up for mobile, Bitrise is a CI/CD platform that speaks iOS and Android fluently. It has a slick visual workflow editor and pre-built “steps” for common mobile tasks like code signing or pushing builds to TestFlight. This can drastically cut down on setup time, especially for dedicated mobile teams.
No matter which tool you pick, the mission is the same: automate the repetitive grunt work so your developers can focus on what matters. The time you invest upfront in setting up a CI/CD pipeline will pay you back over and over again in saved hours and fewer headaches.
By automating your build and test processes, you’re not just moving faster. You are building a quality-control machine that works for you 24/7, catching bugs at the earliest possible moment—when they are cheapest and easiest to fix.
Crafting Your Pipeline Script
The real magic of your CI/CD setup lives in the pipeline script (for example, a workflow.yml file for GitHub Actions). This is the instruction manual that tells the build server exactly what to do. While the syntax will differ between platforms, the script for a React Native app will almost always follow a logical sequence of jobs.
A typical real-world script would execute steps like these:
- Checkout Code: The very first thing is to pull the latest code from the Git branch that triggered the pipeline.
- Install Dependencies: The pipeline runs
npm installoryarn installto grab all the project’s necessary packages. - Run Linters and Tests: It then executes your test suite with a command like
npm test. This is your first line of defense. If any tests fail, the pipeline stops dead in its tracks, preventing a broken build from ever seeing the light of day. - Manage Secrets: The pipeline needs to access things like your code signing certificates and API keys. These are never stored in the repository; instead, they’re kept as encrypted secrets within the CI/CD platform itself.
- Build the App Binary: With all checks passed, it’s time to run the platform-specific build commands to generate the signed APK for Android or IPA for iOS.
- Archive Artifacts: The final binary file is saved as a “build artifact.” This makes it easy to download and deploy to your testing tracks or directly to the app stores.
This level of automation transforms mobile deployment from a nail-biting, manual chore into a reliable, push-button operation. Every build becomes a high-quality, viable release candidate, ready for the next step of its journey.
Getting Through App Store Submission and Review
Alright, your CI/CD pipeline has done its job, and you’re holding a perfectly signed and packaged app. Now for the real test: getting it onto the app stores.
Publishing on the Apple App Store and Google Play Store is a rite of passage for any developer, but it’s a path filled with tricky rules and potential delays that can trip up even seasoned teams. Think of this stage not as the finish line, but as a critical checkpoint guarded by two very different gatekeepers.
Just uploading your binary file won’t cut it. You have to nail your store listing, truly understand each platform’s review guidelines, and be completely transparent about how you handle user data. Getting this right is the difference between a quick approval and getting stuck in a frustrating loop of rejections and resubmissions.
Nailing Your Store Listing
Your app’s store page is its digital storefront—it’s the first thing a potential user sees. A sloppy or uninspired listing can kill your visibility and download numbers before you even get started, no matter how fantastic your app is.
You’ll need to pull together a collection of assets that don’t just look professional but also shout your app’s value from the rooftops. This includes:
- App Icon: It has to be distinctive and instantly recognizable. Your icon needs to look sharp at any size and stand out in a crowded search results page.
- Screenshots & App Previews: These are your best marketing tools, period. Use them to show off your app’s core features and UI in action. Don’t just show static screens; tell a visual story about the problem your app solves.
- Description & Keywords: Your description needs to be persuasive and informative, hooking the reader in the first couple of sentences. Weave in relevant keywords naturally to boost your App Store Optimization (ASO) and help people actually find you.
The competition for attention is insane. In February 2024 alone, a staggering 48,056 new apps flooded the Google Play Store. Meanwhile, the Apple App Store is home to roughly 1.96 million applications in total. A polished store presence isn’t just nice to have; it’s essential for survival.
Understanding the Review Gauntlet
Both Apple and Google have massive rulebooks designed to make sure apps are safe, stable, and don’t provide a terrible user experience. Ignoring them is the fastest way to get your submission booted. And while their end goals are similar, their review processes and what they focus on can be worlds apart.
The golden rule of app store submission is to treat the guidelines not as obstacles, but as a blueprint for a high-quality app. A rejection often isn’t a “no,” but rather a “not yet,” pointing you toward an area that needs improvement.
Apple’s review process is famously meticulous, often involving human reviewers who scrutinize every corner of your app. They are laser-focused on user privacy, an interface that follows their Human Interface Guidelines, and preventing any kind of user deception.
Google’s process tends to be faster and more automated, but it’s just as strict about policies on malware, user-generated content, and data safety. Their “Data safety” section is a huge deal—you have to be dead-on accurate about what data you collect and why.
To avoid common pitfalls, it’s worth bookmarking our detailed breakdown of the App Store review guidelines.
How to Handle a Rejection
Getting that rejection notice stings, but don’t panic. It’s a normal part of the process. How you respond is what really counts.
First, read the rejection message carefully. Don’t just skim it. Pinpoint the specific guideline your app violated. Both stores are usually good about providing the clause number and a brief explanation.
Next, actually fix the issue. Don’t look for clever workarounds or try to resubmit without making real changes. That’s a great way to earn yourself longer review times in the future.
Finally, communicate clearly when you resubmit. Use the channels they provide, like the Resolution Center in App Store Connect, to explain exactly how you’ve fixed the problem. Be polite, professional, and straight to the point.
By treating the submission and review stage with the strategic importance it deserves, you can dramatically increase your chances of a smooth, successful launch.
Using Phased Rollouts and Beta Testing
Pushing a brand-new app out to 100% of your users on day one is a recipe for disaster. I’ve seen it happen, and it’s never pretty. A much saner, more professional approach involves carefully managing your launch through phased rollouts and a solid beta testing program. This gives you a chance to catch those inevitable last-minute bugs and gather real-world feedback in a controlled setting.
Think of it as a crucial safety net between your development environment and a full-blown public release. Instead of gambling everything on a single launch, you get your app into the hands of small, specific groups of users first. This is an invaluable opportunity to watch crash reports, check performance metrics, and see how people actually use your app before it goes out to everyone.
Leveraging Platform-Native Testing Tools
Fortunately, you don’t have to build this infrastructure from scratch. Both Google and Apple give you fantastic, built-in tools for managing these pre-launch distributions. They’re designed to make beta testing a natural part of your workflow.
If you’re building for Android, the Google Play Console is your command center. It offers a few different testing tracks, each with a specific purpose:
- Internal Testing: This is for your immediate team and QA folks. It’s perfect for quick-and-dirty build checks.
- Closed Testing: Here, you can expand the circle to a wider, private group by inviting them via email. It’s great for friends, family, or a dedicated pool of external testers.
- Open Testing: This lets anyone on the Play Store opt-in to your beta program, giving you a much larger sample size for feedback.
On the iOS side of things, Apple’s TestFlight is the undisputed king. You can bring in up to 10,000 external testers with a public link or email invite. The real magic of TestFlight is how it streamlines feedback—users can send screenshots and crash reports right from the app, which makes tracking down and fixing issues so much easier.
Think of these tools as mission control for your pre-launch checks. They give you the power to gradually dial up your audience, from a few trusted colleagues to thousands of eager beta testers, all while collecting the data you need for a smooth launch.
Of course, just pushing out builds isn’t enough. You need a structured feedback loop to collect, sort, and act on what your testers are telling you. For a much deeper look into setting this up, check out our guide on implementing beta testing best practices.
The Power of Phased Rollouts
Once you’ve squashed the bugs found during beta and you’re ready for the big day, you still don’t have to hit the big red “launch” button for everyone at once. Google Play, in particular, has a fantastic feature for staged rollouts that lets you release your app to a small slice of users first.
You might start by pushing the update to just 1% of your target audience. This is your chance to monitor key metrics in a live environment without a massive blast radius.
- Are crash rates creeping up?
- Is your server getting hammered with unexpected load?
- Are users in a specific region reporting a show-stopping bug?
If the coast is clear, you can confidently dial it up—to 5%, then 20%, 50%, and finally 100%. This methodical climb gives you a crucial kill switch. If something goes wrong, you can pause the rollout and fix the problem before it tanks your app’s store ratings and reputation.
This controlled exposure is all about minimizing risk, which is a huge deal when you consider the investment. Complex apps with significant backend needs can easily run between $25,000 and $80,000. After spending that kind of money, the last thing you want is for a preventable bug on launch day to put it all at risk.
By following this careful, data-driven process, you’re not just launching your app—you’re turning what could be a wild guess into a calculated, confident release.
Pushing Instant Updates with CodePushGo
Getting your app on the store is a huge milestone, but it’s really just the starting line. Once your app is in the wild, the real work begins: fixing bugs, tweaking features, and polishing the user experience. Historically, every tiny change meant a full resubmission to the app stores, leaving you stuck in a review queue for days, sometimes even weeks.
That agonizing wait is precisely why Over-the-Air (OTA) updates are such a powerful tool in a developer’s arsenal. With a service like CodePushGo, you can push updates to your app’s JavaScript code and assets directly to user devices, skipping the app store review process entirely.
Think about it. You’ve just launched a major new version, and a critical bug pops up. Instead of a frantic, week-long scramble to get a hotfix approved, you can patch the code and deploy an OTA update in a matter of minutes. That kind of agility is more than a convenience; it’s a massive competitive edge.
How Do OTA Updates Actually Work?
The concept is surprisingly simple. Your React Native app has two core components: the native binary (the .apk or .ipa file from the store) and the JavaScript bundle, which holds most of your app’s logic and UI. OTA services let you update that JavaScript bundle without touching the native code.
Here’s how it plays out: when a user opens your app, the CodePushGo SDK checks in with your server to see if a new JS bundle is available. If it finds one, it quietly downloads the update in the background. The next time the app restarts, the new code is live. The user never had to do a thing.
This approach gives you the iteration speed of web development while maintaining the performance of a native app. It turns a sluggish, bureaucratic update cycle into something fast and incredibly flexible.
The beauty is in what you can—and can’t—change. You can fix typos, adjust UI layouts, patch logic errors, and even roll out small features, all through the JS bundle. However, changes to the native side of your app, like adding a new device permission or integrating a new native module, will still require a classic app store update.
Getting Started with Your First CodePushGo Deployment
Integrating CodePushGo into your workflow is refreshingly straightforward. You’ll start by installing the SDK in your React Native project and then wrapping your root component with the CodePushGo provider. That one-time setup is all it takes to connect your app to the service.
From there, you’ll use the CodePushGo command-line interface (CLI) to manage everything. A smart first move is to set up different deployment channels to mirror your development environments. A common practice is to have:
- Staging: For your internal QA team to test and approve fixes.
- Production: The live channel that pushes updates to every user.
This system gives you a safety net. You can push a new update to your Staging channel, let your QA team give it the green light on their own devices, and then promote that exact same build to Production with a single command. It’s a professional, phased rollout for your OTA updates.
When you’re ready to release, you just run a simple command in your terminal. Point the CLI to your updated JavaScript bundle, tell it which channel to target, and you’re done. CodePushGo takes care of the rest, making the update available to your users almost instantly.
App Store Updates vs CodePushGo OTA Updates
Seeing a side-by-side comparison really drives home just how much of a difference OTA updates can make in your day-to-day development cycle.
| Feature | Traditional App Store Update | CodePushGo OTA Update |
|---|---|---|
| Review Time | Days to weeks | Instantaneous (no review) |
| Update Type | Native code, JS code, and assets | JavaScript code and assets only |
| User Action | Requires manual update from the store | Automatic background download |
| Rollback Speed | Requires a new app version submission | Instant one-click rollback |
| Deployment Speed | Very slow (days) | Extremely fast (minutes) |
The table makes it clear: for anything related to your app’s JavaScript, the OTA method provides unmatched speed and control.
For an even deeper look, especially on the Android side of things, check out our detailed guide on how OTA updates for Android work. By adopting OTA updates, you’re not just improving your deployment process—you’re fundamentally changing how quickly you can respond to your users and the market.
Answering Your Top Deployment Questions
No matter how buttoned-up your deployment plan is, you’re bound to run into a few curveballs. Moving an app from your local machine to the app stores and into the hands of users is a journey with plenty of “what if” moments.
This is where experience comes in handy. I’ve gathered some of the most common questions that pop up during the deployment process to give you straightforward answers based on real-world situations.
How Do I Handle App Updates and Versioning?
Getting versioning right is crucial. It’s more than just a label; it’s how you communicate the scale of a new release to your team and, just as importantly, to your users. The gold standard here is Semantic Versioning (SemVer), which brings a welcome dose of logic and predictability to your releases.
SemVer breaks down a version number into three parts: MAJOR.MINOR.PATCH.
- PATCH (like 1.2.1): Reserve this for small, backward-compatible bug fixes. A quick typo correction or a minor performance improvement that doesn’t alter how anything works fits perfectly here. These are often great candidates for Over-the-Air (OTA) updates.
- MINOR (like 1.3.0): Bump this when you introduce new features that don’t break existing ones. Maybe you’ve added a new screen or some fresh functionality that complements what’s already there.
- MAJOR (like 2.0.0): This is for the big stuff—changes that are not backward-compatible. A complete UI redesign or a fundamental change to a core feature definitely calls for a major version increase.
This simple system instantly tells a story. When a user sees an update from 2.1.5 to 2.1.6, they know it’s a minor tune-up. But a jump to 3.0.0 signals that something big has changed, prompting them to check out what’s new.
When Should I Use an OTA Update vs. a Store Update?
This is a strategic decision you’ll make all the time. The choice between pushing an update instantly with OTA or going through the traditional app store review process really boils down to what you’re changing.
An OTA update is your go-to when the changes are limited to your JavaScript bundle and assets. It’s incredibly fast and perfect for:
- Crushing critical bugs in your app’s logic.
- Updating text, tweaking colors, or swapping out images.
- Making small UI adjustments or styling changes.
- Rolling out small, low-risk features to test the waters.
On the other hand, you must submit a new build for a traditional app store update any time your changes touch the native code. There’s no getting around this for things like:
- Integrating new native modules or third-party SDKs.
- Modifying app permissions (like asking for camera or location access).
- Updating your app’s icon, name, or launch screen.
- Making any change that alters the core native functionality of the app.
The rule of thumb is pretty clear: if the change lives in your JavaScript code, OTA gives you speed and agility. If it touches the native container, you have to go through the official app store review.
What if My Deployment Fails?
First, don’t panic. A failed deployment is stressful, but it’s a normal part of the process. Your first move should always be to check the logs. Your CI/CD service—whether it’s GitHub Actions, Jenkins, or Bitrise—keeps a detailed record of every step, and the error message you need is almost always in there.
I’ve seen builds fail for all sorts of reasons, but a few usual suspects pop up again and again:
- Code Signing Errors: This is a classic. An expired certificate, a forgotten provisioning profile, or a mistyped password for your keystore will stop a build in its tracks.
- Dependency Conflicts: You add a new library, and suddenly it doesn’t play nice with an existing one. Look for errors during
npm installorpod installphases. - Failed Tests: Your pipeline should be configured to halt a deployment if tests fail. That’s a good thing! It just saved you from shipping a broken update to your users.
Once you’ve pinpointed the problem in the logs, the fix is usually straightforward. Create a hotfix branch, make your change, and push it. Your CI/CD pipeline will kick off a new build, and you’ll be back on track. For a deeper dive into creating these kinds of resilient workflows, it’s worth exploring different software deployment best practices.
How Can I Secure My Deployment Pipeline?
Security can’t be an afterthought—it needs to be woven into every single step of your deployment. A compromised pipeline is a developer’s worst nightmare, as it could allow an attacker to inject malicious code directly into your app.
A great place to start is with your secrets. Never commit API keys, passwords, or signing certificates directly into your Git repository. Every modern CI/CD platform has a built-in secrets management system. Use it.
Another powerful security measure is to implement branch protection rules in your code repository. You can block direct pushes to your main or release branches, forcing all changes to go through a pull request. Requiring at least one other teammate to review and approve the changes (the “four-eyes principle”) is a simple but incredibly effective way to defend against both mistakes and malicious code.
Ready to eliminate app store delays and ship updates in minutes? CodePushGo gives you the power of Over-the-Air updates with end-to-end security and real-time analytics. Take control of your release cycle and deliver a flawless user experience. Explore CodePushGo today.


