When you’re ready to share your React Native app on Google Play, there’s more to it than simply hitting upload. You need a secure keystore, fine-tuned build settings, and a rollout plan that engages users.
On a basic level, this means producing a signed release build, creating your app entry in the Play Console, and submitting your app bundle for Google’s review.
Understanding The Publishing Workflow
Jumping into the Google Play world can feel overwhelming. With 2.06 million apps already available, the store is buzzing with activity and opportunities for new releases.
Before we go further, take a quick look at the numbers shaping the Play Store:
Google Play Store Key Metrics
Introduction: The table below highlights current stats on app count, developer activity, daily submissions, and projected revenue.
| Metric | Value |
|---|---|
| Number of Apps | 2.06 million |
| Active Developers | 2.3 million |
| Daily Submissions | 4,000+ |
| Annual Revenue Projection | $12.5 billion |
These figures underscore both the scale and the potential you’re stepping into.
For a deeper dive into each phase, check out the mobile app deployment process: https://codepushgo.com/blog/mobile-app-deployment-process/.
Core tasks in this workflow include:
- Secure Keystore Signing: Acts as your app’s digital fingerprint. It confirms your identity and maintains update integrity.
- Build Configurations: Use a debug build for internal tests, and a release build—optimized and signed—when you’re ready to go live.
- Version Management: Bump your versionCode and update versionName correctly to avoid upload errors and ensure smooth user updates.
The Role Of Google Play Console
The Google Play Console is where you’ll oversee everything from uploads to analytics.
This dashboard lets you monitor crash reports, track performance metrics, and manage staged rollouts with precision.
When you’re looking to polish your launch and get more practical tips, you might also want to review this complete step-by-step guide on how to publish your app on Google Play.
Preparing Your App for Release
When I’m gearing up to publish a React Native build on Google Play Console, the very first thing I tackle is creating a secure upload key. This digital signature is how Google confirms you’re the original developer behind every update.
I rely on the keytool utility bundled with the Java Development Kit. Misplacing that keystore means losing the ability to push future updates. Back it up in a password manager or an encrypted drive immediately.

Securing Your Keystore and Credentials
Linking your keystore to a React Native project happens in android/app/build.gradle. You don’t want those passwords floating around in Git. Here’s the workflow I follow:
• Drop a gradle.properties file into ~/.gradle/.
• Inside it, define storePassword, keyAlias, and keyPassword.
• Point your signingConfigs block in build.gradle to these properties.
Treat these credentials like bank logins—store them in 1Password or HashiCorp Vault so they never end up in your repo.
Pro Tip: Your CI/CD pipeline (for example, Jenkins or GitHub Actions) can fetch these secrets at build time without exposing them in version control.
For a deep dive into the mechanics of code signing, check out https://codepushgo.com/blog/what-is-code-signing/
Configuring Gradle for Release Builds
Once your secrets are tucked away, you’ll define a signingConfigs section in android/app/build.gradle. Key elements include:
• storeFile: Path to the .keystore or .jks.
• storePassword: Password for that keystore.
• keyAlias: The unique name of your key.
• keyPassword: Password for the key alias.
Get this setup right. In 2024, 41,000 new apps hit Google Play every month, reaching over 3 billion active Android devices. Misconfiguring your signature can trigger build failures or outright rejection.
You can discover more insights about Google Play’s growth and download trends on appinventiv.com
Now you’re all set to generate a signed release that sails smoothly through Google’s review and straight into users’ hands.
Generating an Optimized Release Build
With all the signing configurations handled, it’s time for the main event: creating the release-ready Android App Bundle (AAB). This isn’t just a simple compile; it’s about building a highly optimized package that will give your users the best possible experience on the Play Store.
The command itself is pretty straightforward. Just pop open your terminal, navigate into your project’s android directory, and run this:
./gradlew bundleRelease
This one little command kicks off the entire Gradle build process. It’ll compile your code, sign the app using the keystore we just set up, and spit out an optimized .aab file. You’ll find the final product tucked away in android/app/build/outputs/bundle/release/. That’s the golden ticket—the file you’ll be uploading to the Google Play Console.

Shrinking Your App with R8
Before you rush to upload, let’s talk about something crucial: app size. A smaller app means quicker downloads, happier users, and better install rates. Android gives us a fantastic tool for this called R8, which is the successor to ProGuard. It works by intelligently stripping out unused code and resources, making your app as lean as possible.
Enabling it is surprisingly simple. Open up your android/app/build.gradle file and find the release build type. Inside, just set minifyEnabled to true.
buildTypes { release { // … minifyEnabled true } }
Don’t underestimate this single line of code. I’ve personally seen apps shrink by over 25% just from this change alone. That can be a game-changer, especially for users in regions with slower internet. If you want to dive deeper, we have a detailed guide on how the https://codepushgo.com/blog/size-of-an-app/ impacts its success.
Splitting Builds for Different Architectures
Here’s another pro-level optimization: creating separate builds for different device architectures. This is known as an ABI (Application Binary Interface) split.
Most modern Android phones run on an arm64-v8a architecture, but plenty of older or lower-end devices still use armeabi-v7a. Instead of packing the code for every possible architecture into one massive file, you can split them. This way, Google Play only sends the specific code a user’s device actually needs.
To get this working, add the following block to your android/app/build.gradle:
android { // … splits { abi { enable true reset() include “armeabi-v7a”, “arm64-v8a” universalApk false } } }
This tells Gradle to generate separate, architecture-specific APKs inside your AAB. It’s a clean and highly effective way to cut down on download size without any extra effort on your part.
Takeaway: Enabling code shrinking with R8 and setting up ABI splits are two of the most impactful things you can do to reduce your app’s final size. This isn’t just a “nice-to-have”—it’s a critical step that directly affects user acquisition.
One last piece of advice before you upload: always, always install and test the final release build on a real, physical device. The release environment can sometimes expose issues that you’d never see while debugging, and catching them now will save you a world of headaches later.
Navigating the Google Play Console
Once you’ve got your signed Android App Bundle (AAB) ready, it’s time to head over to the Google Play Console. Think of this as your command center for everything related to your app on the Play Store. It’s where you’ll handle the entire lifecycle, from the very first upload to sifting through user reviews down the line.
Uploading your AAB is just the start. The real work begins as you craft your app’s identity on the store. This is where you’ll set up your store listing—your app’s title, a compelling description, and the screenshots and videos that will ultimately convince someone to tap that “Install” button. Don’t rush this part; high-quality assets can make a world of difference to your download numbers.
Setting Up Your Release Tracks
Before you unleash your app to the public, Google gives you a few crucial safety nets: testing tracks. These allow you to push your app to small, controlled groups of users, letting you squash bugs and gather feedback before everyone sees it. Honestly, this process is essential for protecting your app’s rating from any last-minute surprises.
Here’s a breakdown of the main tracks you’ll use:
- Internal Testing: This is for your inner circle—your dev team, QA folks, and anyone else who needs immediate access. Releases pop up almost instantly, which is perfect for quick sanity checks.
- Closed Testing (Alpha): Ready for a slightly wider audience? This track is great for a trusted group of beta testers from your community who can give you early feedback on new features.
- Open Testing (Beta): This one’s open to the public. Anyone on the Play Store can opt-in to test your app, exposing it to a massive variety of devices and real-world conditions before the official launch.
- Production: The main event. When you push a release here, it goes live for everyone on Google Play.
Getting comfortable with these tracks isn’t just a good idea—it’s a core part of any solid publishing strategy. It helps you build confidence with every single release.
Mastering Staged Rollouts
Even with all that testing, pushing an update to 100% of your users at once is a high-wire act. One nasty, device-specific bug could send your ratings plummeting. This is exactly why staged rollouts are so valuable for publishing on Google Play.
You can start by releasing your update to a tiny fraction of users, maybe just 5%. Then, you watch. Head into the Play Console and keep an eye on your crash reports and new reviews. If things look stable after a day or two, you can dial it up to 10%, then 50%, and finally, 100%. It’s a methodical approach that turns a risky launch into a controlled, data-backed process.
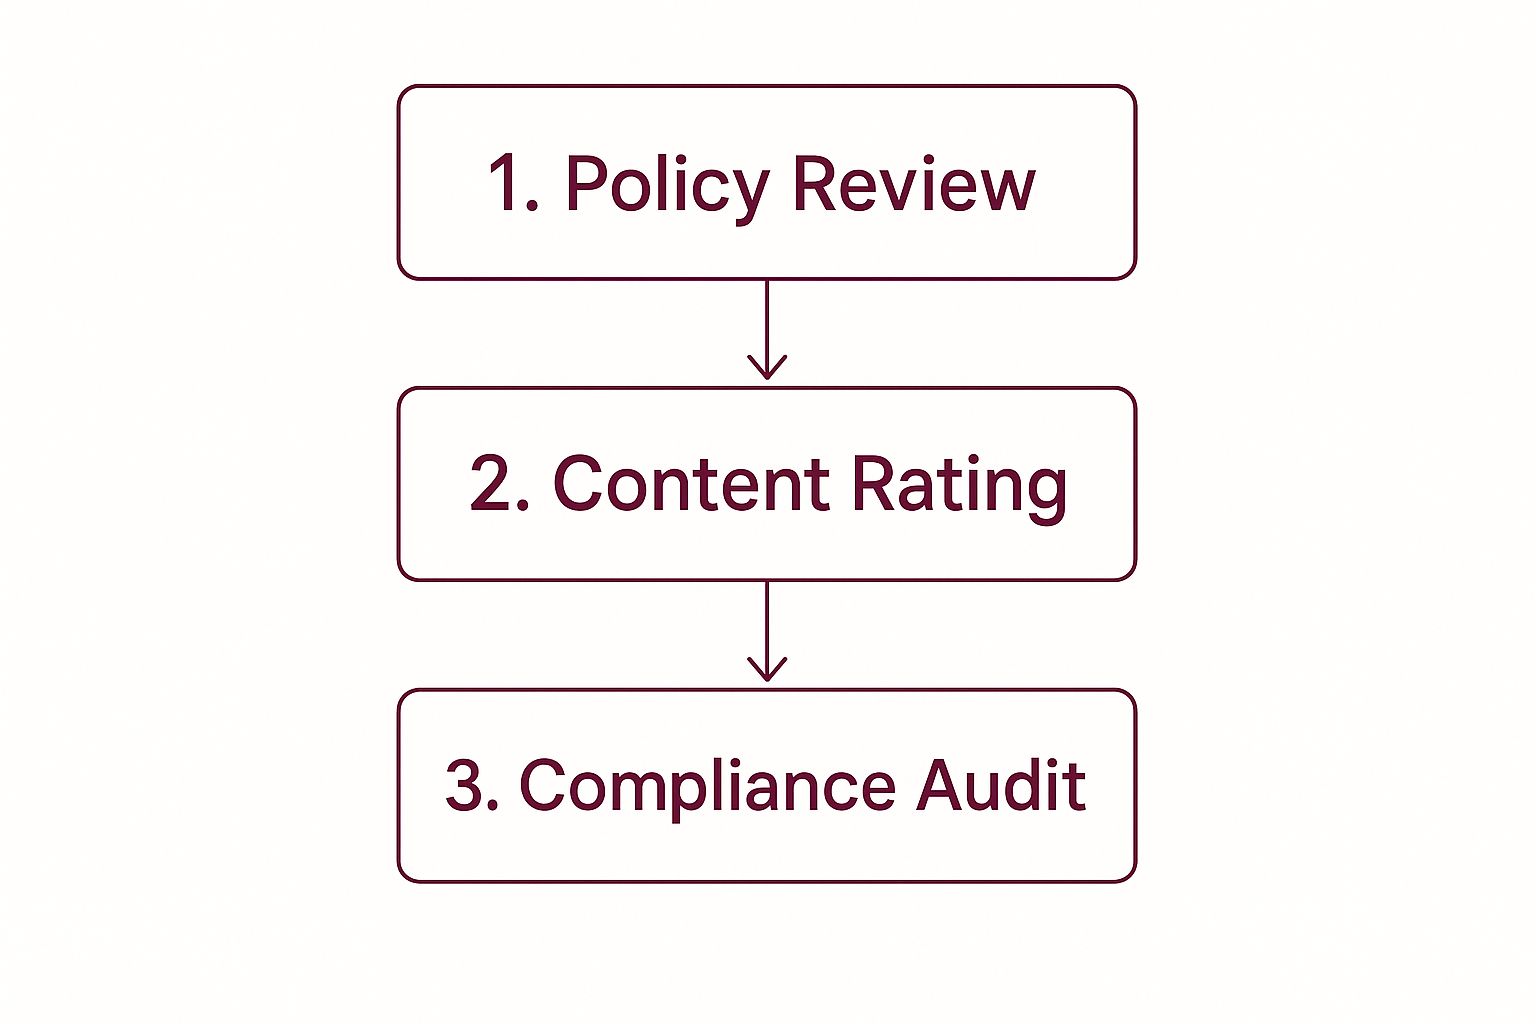
The image below gives you a good sense of the compliance checks your app will face after you hit “Submit.”

As you can see, it’s a multi-step process. Your app has to clear Google’s policy, content, and other compliance hurdles before it’s approved.
A staged rollout is your best defense against unexpected bugs. It turns your launch from a high-stakes gamble into a calculated, data-driven process. Never skip it.
While we’re focused on Google Play here, many of these concepts carry over to Apple’s ecosystem. If you want to understand the other side of the coin, you can learn how to publish an app in the App Store in our other guide. Getting a handle on both platforms is a must for any developer aiming for maximum reach.
Get Ahead of Bugs with Over-The-Air Updates Using CodePushGo
We’ve all been there. You push a release, and a critical bug slips through. Now you’re stuck waiting for Google Play’s review process, which can take days, while your users are left with a broken app. It’s a painful and frustrating experience.
This is exactly why over-the-air (OTA) updates are so essential. They give you a way to bypass the standard review cycle for any changes to your JavaScript code or app assets.

With a tool like CodePushGo, you can push updates directly to your users’ devices almost instantly. I remember one time we deployed a critical hotfix to our entire user base in less than an hour. Through the normal publishing Google Play channel, that same fix would have taken the better part of a week.
OTA updates are perfect for shipping small features, tweaking the UI, and, most importantly, crushing urgent bugs without having to touch the native binary. It completely changes your team’s agility and keeps your users happy by getting solutions into their hands faster.
Getting Started with CodePushGo
So, how do you get this set up in your React Native app? It’s pretty straightforward. You’ll start by installing the CodePushGo SDK into your project. Then, you’ll need to configure your app to check for new updates at certain times—like when the app first launches or when it comes back to the foreground.
The next step is to create your deployment channels inside the CodePushGo dashboard. This is where the real power lies because it enables targeted rollouts. I can’t recommend this practice enough. A typical setup we use looks something like this:
- Staging: This is for your internal QA team to test on real devices.
- Beta: For a small, controlled group of external beta testers.
- Production: The final stage for your entire user base.
This setup is a lot like the testing tracks you see in the Google Play Console, but with one major difference: deployment is nearly instant. You can push an update to your Staging channel, have your team verify it, and then promote that exact bundle to Production with total confidence.
My biggest piece of advice here is to start with a non-intrusive update strategy. Set up updates to install silently in the background and then apply them the next time the user restarts the app. Forcing an immediate update can be really disruptive and should only be used for the most critical, app-breaking fixes.
Managing Update Rollouts and Assets
One of the first questions that always comes up is how to handle the update prompt. Should you force it on the user, or should it be optional? From what I’ve seen, a quiet background download works best for most non-critical updates. For those urgent fixes, a clear, non-dismissible prompt that explains why the update is important is the way to go.
Another thing to think about is how you’ll manage asset updates, like new images or custom fonts. CodePushGo handles these beautifully, bundling them right alongside your JavaScript changes. This keeps your UI looking sharp and consistent without needing a full new build submitted to the store.
Once you get the hang of these techniques, you’ll be able to keep your app dynamic, responsive, and stable.
If you want to get into the nitty-gritty, we have a complete guide that walks you through all the details. Check out our post on OTA updates for Android. It’s the perfect companion to the standard app store process, giving your team the power to react quickly when it counts.
Even with the best preparation, hitting a roadblock when publishing your app is almost a rite of passage. You’ll eventually run into a cryptic error that brings your release to a screeching halt. Let’s walk through some of the most common issues and how to get past them without losing your mind.
Signature and Keystore Headaches
One of the first gremlins you’ll likely meet is a signature mismatch. This error almost always pops up when you’re using Google Play App Signing. What’s happening is that you’re trying to upload an AAB signed with your local upload key, but Google is expecting to handle the final signing itself.
The error message will talk about mismatched certificates. If you see that, it’s your cue to pop open your build.gradle file and make absolutely sure your signing configuration matches the keys you have registered in the Play Console.
Then there’s the ultimate facepalm moment: losing your upload keystore. If this happens, take a deep breath. It’s not the end of the world, but it is a major hassle. Google has a process for resetting it, which involves contacting their support team and proving you own the app. It’s not fast, so you want to avoid it at all costs.
A lost keystore is a preventable disaster. Treat it like the master key to your app’s future. The moment you create it, store it in a password manager and back it up to a secure cloud drive. No excuses.
Pesky Build Failures
Build failures often boil down to dependency conflicts, especially with Gradle. You might see errors because your project’s Gradle version isn’t playing nicely with the Android Gradle Plugin version. Before you start pulling your hair out, always check the official compatibility table. A five-minute check can save you hours of debugging.
This whole process can feel strict, and that’s by design. Google is serious about app quality. In 2025 alone, they blocked over 2.36 million apps from the store for policy violations. It’s a clear message: follow the rules and maintain high standards. You can discover more about Google’s app quality enforcement on scaleupally.io.
For those “oh-no” moments when you’ve shipped a critical bug and a full store update is just too slow, an over-the-air update tool is your best friend. Something like CodePushGo lets you push out an emergency fix directly to your users, bypassing the Play Store review process entirely.
Frequently Asked Questions
Publishing an app on Google Play can raise a few common concerns. Below are answers drawn from real-world experience to help you anticipate delays and pitfalls.
How Long Does a Google Play Review Take
Review durations swing wildly depending on your app’s history and complexity. For a brand-new submission, expect three to seven days, sometimes longer if Google requests extra details. Established apps usually breeze through faster, often within hours or a couple of days.
Here’s what I’ve seen in practice:
- Initial Review: 3–7 days, with occasional extensions
- Routine Updates: anywhere from a few hours to 48 hours
- Suspicious Flags: delays if Google needs clarification or detects policy concerns
Plan every release with a buffer. Surprises happen, so scheduling updates well ahead of critical dates keeps everyone calm.
Can I Update My App Instantly
Native code changes must pass through the Play Console review. There’s no shortcut around that.
But when it comes to JavaScript tweaks or asset swaps, an over-the-air (OTA) service can be a lifesaver. A quick push lets your users get fixes in minutes—no store wait times.
- Native Code: full review required
- JS & Assets: instant OTA push
Key Takeaway: Rely on OTA updates for urgent bug fixes or minor UI adjustments. It prevents your users from waiting days for something that could land in minutes.
What Happens If I Lose My Keystore
Misplacing your upload keystore feels like hitting an emergency button. Fortunately, if you’ve enrolled in Google Play App Signing, Google safeguards your release key on their end. You’ll still need to:
- Contact Google Play support
- Verify you own the app (prepare invoice numbers or developer account details)
- Generate a new upload key and complete their reset form
It’s not instant, and you’ll need patience. Back up your keystore in multiple secure locations to avoid this headache.
Ready to ship updates instantly and dodge store-review delays? CodePushGo lets you deliver bug fixes and new features in minutes, not days. Learn More About CodePushGo and take control of your release cycle.


