
React Native linking is how your app talks to the rest of the world. It’s the bridge that lets you open web pages, launch other apps, and, most importantly, handle deep links that bring users directly to specific content inside your application.
This isn’t just a technical feature; it’s what makes a user’s journey feel smooth and connected. Think of a user clicking a link in an email or a social media post and landing exactly where they need to be in your app—that’s the magic of linking.
Why React Native Linking Is a Game Changer
At its core, “linking” in React Native is all about creating pathways. Instead of seeing your app as a walled-off experience, the Linking module turns it into a hub with roads leading both in and out. It expertly manages two types of traffic.
Two Core Functions of Linking
First, you have the outbound traffic—opening URLs outside your app. This is the most straightforward use case, but it’s essential for connecting your app to the wider digital ecosystem. With it, you can:
- Open a website: Send users to your company blog, a help document, or any other web resource.
- Launch other apps: You can trigger a phone call with a
tel:link, open an email client withmailto:, or even show a location on a map usinggeo:.
Second, and where things get really interesting, is the inbound traffic: deep linking. This is what elevates a good app to a great one. A deep link is a special URL that, when clicked, opens your app and navigates directly to a specific screen, completely skipping the homepage.
A well-executed deep linking strategy is the key to converting external engagement into in-app action. It transforms a passive marketing click into an active, contextual user experience.
The Strategic Importance of Effective Linking
Getting linking right is non-negotiable for any serious app. It powers so many features that are crucial for growth and user retention. For example, using QR codes in social media becomes incredibly powerful when a user can scan a code on a product and land instantly on its purchase page within your app.
This capability is vital for:
- Marketing Campaigns: Drive users from an email promotion directly to a discounted item.
- User Retention: Re-engage dormant users with push notifications that link to new features.
- Seamless Onboarding: Allow users to click a magic link in an email to log in without a password.
The table below breaks down the main functions you’ll be working with in the Linking module.
Core Linking Capabilities in React Native
| Capability | Description | Common Use Case |
|---|---|---|
openURL() | Opens an external URL in the device’s default browser or another app. | Linking to your website, opening a phone dialer (tel:), or composing an email (mailto:). |
canOpenURL() | Checks if the device can handle a given URL before attempting to open it. | Verifying if a user has a specific app installed (like WhatsApp or a maps app) before showing a button to open it. |
getInitialURL() | Retrieves the URL that launched the app, if it was opened from a deep link. | Handling a deep link when the app starts from a cold state (i.e., it was not running in the background). |
addEventListener() | Listens for incoming deep links while the app is already running. | Responding to a deep link clicked from a notification or another app when your app is in the foreground or background. |
Each of these capabilities plays a specific role, and you’ll often use them together to create a robust and seamless linking experience.
The React Native framework itself is constantly evolving to support this kind of deep integration. For a deeper dive into modern development practices, check out our guide on building apps with React Native. By mastering linking, you’re not just adding a feature—you’re fundamentally improving how users interact with your application.
Configuring Your App for Deep Linking
Before your React Native app can magically respond to a deep link, you first have to tell iOS and Android how to recognize and handle those links. This isn’t JavaScript work; it’s pure native configuration. Honestly, this is where most linking problems start.
Getting this foundation right is non-negotiable. If you don’t, your carefully crafted URLs will just open a web browser or do nothing at all, completely defeating the purpose of creating a seamless user journey from a link to your app.
This flow chart gives a high-level view of how React Native’s Linking API processes a URL once you’ve got everything set up correctly.
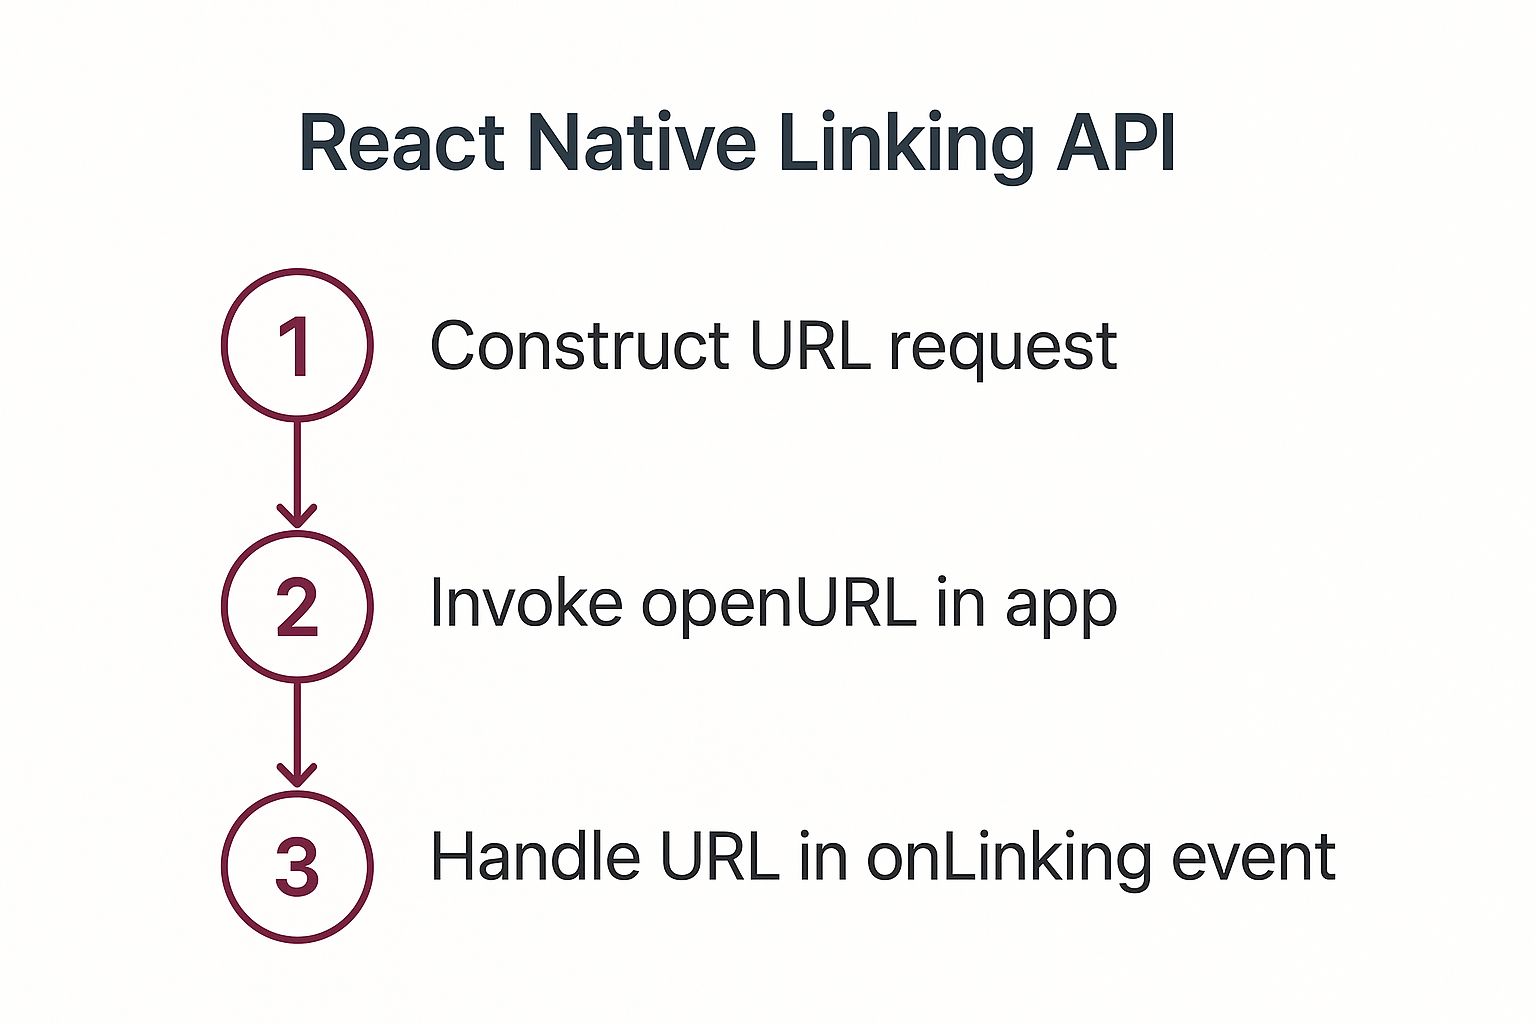
As you can see, the URL—whether it’s from a custom scheme or a Universal Link—gets captured by the native layer and passed up to your app’s JavaScript code to figure out what to do next.
Setting Up iOS for Linking
On iOS, you’ve got two main ways to handle incoming links: Custom URL Schemes and Universal Links. Custom schemes are great for quick internal testing, but for any app heading to production, Apple strongly recommends using Universal Links. They’re far more secure and flexible.
To register a custom scheme, you’ll need to jump into Xcode and edit your project’s Info.plist file, which is basically the central configuration hub for your app.
Here’s the drill:
- Open your project in Xcode and locate the
Info.plistfile. - Add a new row and select “URL Types” from the dropdown.
- Inside, create a unique “URL Identifier” (using your app’s bundle ID is a common practice).
- Finally, add your chosen scheme under “URL Schemes”—something like
myapp.
Once that’s done, any URL starting with myapp:// will be routed directly to your application.
For a more professional and secure setup, Universal Links are the answer. They use standard https:// links, which is a huge plus, but they do require you to configure both your app and your web server. You’ll need to host a special apple-app-site-association (AASA) file on your domain. For a complete walkthrough on that, check out our guide on configuring iOS Universal Links.
My Takeaway: Universal Links are the modern standard for a reason. They stop other apps from hijacking your custom scheme and provide a graceful fallback to your website if a user doesn’t have your app installed. It’s a win-win.
Configuring Android for Linking
Android relies on a system of Intent Filters to manage incoming links, which you define in the AndroidManifest.xml file. Think of this file as the Android equivalent of Info.plist; it tells the operating system what your app is and what it can do.
To set up deep linking, you need to add an <intent-filter> to your main activity’s declaration in the manifest. This filter is what tells Android which URLs your app is capable of handling.
Let’s look at a real-world example for a custom scheme like myapp://products/123:
android:scheme defines the myapp part, and android:host locks it to the products path. The BROWSABLE category is absolutely critical—it’s what allows the link to be triggered from a web browser.
Just like iOS has Universal Links, Android has its own version called App Links. These are just standard https:// URLs that are cryptographically verified to belong to your app. To get them working, you add android:autoVerify="true" to your intent filter and host a assetlinks.json file on your website.
This verification step is key. It ensures only your app can handle links from your domain, which completely bypasses that annoying “Open with…” dialog. It gives the system 100% confidence in which app to open, making for a much smoother experience.
Opening External URLs and Other Apps
While wrangling incoming deep links can get complicated, the outbound side of things with react native linking is refreshingly straightforward. Your app will constantly need to send users to resources outside its own walls, and for that, the Linking.openURL() method is your best friend.
This function is a powerhouse. It does way more than just open a website in a browser. At its core, openURL() takes a URL string and simply asks the phone’s operating system to figure out what to do with it. This might mean launching a browser for an https:// link, but it can also kick off actions in completely different apps.
Common URL Schemes for App Integration
Think of URL schemes as a kind of universal language that mobile operating systems understand. By formatting your URL just right, you can trigger actions in all sorts of native apps, building a seamless bridge from your React Native app to the rest of the user’s device.
Here are a few of the most common schemes you’ll find yourself using all the time:
- Make a Phone Call: The
tel:scheme is a classic. It pops open the user’s phone dialer with a number already typed in.Linking.openURL('tel:+1234567890'); - Draft an Email: With
mailto:, you can launch the default email client and even pre-fill the recipient, subject line, and body content. Super handy for support or feedback buttons.Linking.openURL('mailto:[email protected]?subject=App%20Feedback&body=Hello%20Team,'); - Open a Location in Maps: The
geo:scheme lets you point to a specific set of coordinates, and the device will open its default map application right to that spot.Linking.openURL('geo:37.7749,-122.4194'); - Send an SMS Message: Just like making a call,
sms:opens the messaging app with a contact pre-selected.Linking.openURL('sms:+1234567890');
These might seem like small touches, but they make a massive difference in the user experience. Instead of making someone copy a phone number, switch apps, and paste it, you get them there with a single tap.
Checking Before You Leap with canOpenURL
Just calling openURL() is easy, but it’s also a bit risky. What happens if you try to open a link for an app the user doesn’t have installed, like WhatsApp? On some older systems, this could actually crash your app. Even on modern OSes, it fails silently, leaving the user tapping a button that does nothing.
This is exactly why Linking.canOpenURL() is an essential tool in your belt. It’s a simple check that asks the OS, “Hey, is there an app on this phone that knows how to handle this kind of link?” It returns a promise that resolves to true or false, allowing you to build in a graceful fallback.
Always use
canOpenURL()before callingopenURL(). This simple check is the difference between an app that feels robust and professional and one that feels fragile and buggy. Never assume the user has a specific app installed.
Let’s say you want to let users open a chat in a specific social app. Your code should look something like this:
import { Linking, Alert } from ‘react-native’;
const handleOpenChat = async () => { const url = ‘someapp://chat/user123’; const supported = await Linking.canOpenURL(url);
if (supported) { // It’s safe to open the url await Linking.openURL(url); } else { // The app isn’t installed, so show an alert Alert.alert(‘App not installed’, ‘Please install the app to continue.’); } };
This approach is defensive and user-friendly. You make sure the path is clear before you try to send the user down it. If it’s blocked, you give them helpful feedback instead of a dead end. You can even use this same logic to conditionally render UI—for example, only showing a “Contact on WhatsApp” button if you know for sure the app is available.
This principle of proactive checks is a cornerstone of good app development, extending far beyond linking. For instance, when implementing login flows, you must verify tokens and credentials before granting access. For a deeper look into building secure and user-centric features, check out our guide on handling authentication in React Native. Building in these kinds of checks is what separates a good app from a great one.
Handling Incoming Deep Links in Your App
Once you’ve got your native projects configured, the real fun begins—making your React Native app actually do something when it receives a deep link. This is where you’ll write the core logic to parse a URL and whisk the user away to the right screen.
To pull this off, you have to plan for two very different situations. You need to know what state your app is in when the link is tapped. Is it completely closed, or just hanging out in the background? The approach for each is slightly different, but you absolutely need to handle both to avoid a broken user experience.
Handling Links That Launch Your App
First up, let’s tackle the scenario where a deep link launches your app from a cold start. The app isn’t running at all, not even in the background. A user taps a link, and your app springs to life. In this case, you need to check for an “initial URL” the moment your app loads.
The Linking.getInitialURL() method is your go-to tool here. It returns a promise that resolves with the URL that launched the app. If the app was opened normally (say, by tapping the icon), it resolves to null. The perfect place to call this is inside a useEffect hook in your root component, so it only runs once on startup.
import React, { useEffect } from ‘react’; import { Linking } from ‘react-native’;
const App = () => { useEffect(() => { // Check if the app was launched by a deep link const handleInitialUrl = async () => { const initialUrl = await Linking.getInitialURL(); if (initialUrl) { console.log(‘App launched with URL:’, initialUrl); // Now, you can add your navigation logic to handle this URL } };
handleInitialUrl();}, []);
// … rest of your app component };
This snippet is your foundation. As soon as the app boots, it checks for a launch URL. If one exists, you can kick off your navigation logic to parse it and get the user where they need to go.
Responding to Links When the App Is Open
What about when a user taps a deep link while your app is already running? Maybe it’s open in the foreground, or just sitting in the background. For instance, they might switch to their email app, tap a link, and expect to be brought right back to a specific screen in your app.
In this case, getInitialURL() won’t help because the app isn’t being launched for the first time. Instead, you need to subscribe to incoming URL events using Linking.addEventListener('url', callback). This sets up a listener that fires every single time a new URL is sent to your app while it’s active.
A classic mistake is only implementing
getInitialURL()and forgetting this event listener. This leads to a really frustrating bug where deep links only work when the app is fully closed, breaking the experience for anyone multitasking.
It’s super important to set up this listener in a useEffect hook and—just as important—to clean it up in the return function. If you forget to remove the listener, you can introduce memory leaks and other weird bugs as your components re-render.
useEffect(() => { // This listener handles links opened while the app is running const subscription = Linking.addEventListener(‘url’, ({ url }) => { console.log(‘App received URL while running:’, url); // Add navigation logic here });
// Don’t forget to unsubscribe on cleanup return () => { subscription.remove(); }; }, []);
By combining both getInitialURL() and addEventListener(), you’ve built a robust solution that covers all the bases. Your app will now reliably handle incoming links, no matter its state. For a deeper dive, our comprehensive guide to deep linking in React Native covers more advanced scenarios and best practices.
Integrating with React Navigation
Let’s be honest: manually parsing URLs and wiring up navigation can get messy fast. This is where a library like React Navigation really shines. It has fantastic built-in support for deep linking that takes care of all the heavy lifting for you.
You just need to define a linking configuration object that maps URL patterns directly to your navigation screens and then pass it to your top-level NavigationContainer.
Here’s the general game plan:
- Define Prefixes: List all the URL schemes and domains your app should recognize (e.g.,
myapp://andhttps://yourapp.com). - Map Screens: Create a
configobject that connects URL paths to specific screens in your navigators. - Pass to Container: Add the
linkingprop to yourNavigationContainer.
Imagine an app with a profile screen that takes a user ID. Your setup would look something like this:
import { NavigationContainer } from ‘@react-navigation/native’;
const linkingConfig = { prefixes: [‘myapp://’, ‘https://yourapp.com’], config: { screens: { Profile: ‘user/:id’, // Matches myapp://user/123 Settings: ‘settings’, // Matches myapp://settings }, }, };
function App() {
return (
With this configuration in place, React Navigation does all the work. When it intercepts a URL like myapp://user/123, it automatically parses the path, identifies the Profile screen, extracts the id parameter, and navigates there. It’s a powerful abstraction that keeps your code clean and your routing logic organized.
The growth of the React Native ecosystem is a testament to its power in modern app development. The global market for React Native app development was valued at around USD 325 million in 2024 and is projected to hit USD 499 million by 2031. This expansion is driven by features just like these linking capabilities, which help developers create deeply integrated and user-friendly apps. You can dig into more of these trends in a detailed analysis of React Native app development.
Troubleshooting Common Linking Issues

Even with a perfect setup, you’ll inevitably hit a snag with react native linking. Universal Links might mysteriously open in Safari, or Android could present that dreaded “Open with…” dialog. This section is your field guide for diagnosing and squashing these common but frustrating edge cases.
The key to effective troubleshooting is knowing which type of linking you’re dealing with. Your choice between custom schemes and universal links has massive implications for both security and user experience.
Custom Schemes vs. Universal Links
Think of a Custom URL Scheme (like myapp://) as a private, unlisted road just for your app. It’s wonderfully simple to set up and fantastic for internal development and testing. The big catch? It’s not secure. Any other app can register the same scheme and potentially hijack your links.
On the other hand, Universal Links (iOS) and App Links (Android) are like verified addresses using standard https:// URLs. They are far more secure because they require a digital handshake between your app and your web server, proving you own the domain.
Here’s a quick breakdown of what you’re getting with each:
- Custom URL Schemes:
- Pros: Simple to configure for both platforms. Great for getting up and running quickly.
- Cons: Not unique, which is a security risk. If a user doesn’t have your app, the link is a dead end.
- Universal/App Links:
- Pros: Secure and globally unique. They also provide a seamless fallback to your website if the app isn’t installed.
- Cons: They demand server-side configuration, which means setting up an
apple-app-site-associationfile for iOS and anassetlinks.jsonfile for Android.
For any app heading to production, Universal Links and App Links are the industry standard. The initial setup effort is a small price to pay for a more secure and reliable experience for your users.
Essential Command-Line Debugging
When a link isn’t behaving, your first move should be to test it directly, cutting out variables like the app you’re clicking from. The command line is your best friend here.
For Android, the Android Debug Bridge (adb) lets you simulate a deep link tap. This is an invaluable way to test your AndroidManifest.xml intent filters in isolation.
adb shell am start -W -a android.intent.action.VIEW -d "myapp://products/123" com.yourpackage.name
For the iOS Simulator, xcrun simctl gives you the same power. This single command lets you test both your custom schemes and Universal Links right from your terminal.
xcrun simctl openurl booted "https://yourdomain.com/products/123"
Using these commands helps you pinpoint the problem. If the link works from the command line, the issue isn’t with your app’s setup—it’s likely with the source of the link, like a misconfigured email client. For a deeper dive, our comprehensive guide on debugging React Native covers more advanced techniques for tracking down these kinds of issues.
Fixing Common Frustrations
Let’s walk through a few of the most common headaches developers run into when implementing react native linking.
A frequent source of pain is the Android intent filter. If it’s too broad, your app might try to open links it shouldn’t. If it’s too specific, it will miss valid deep links. Always test your
android:hostandandroid:pathPrefixattributes carefully.
Why Are My Universal Links Opening in Safari?
This is a classic iOS problem. It almost always points to a configuration mistake with your apple-app-site-association (AASA) file. First, double-check that it’s being served over HTTPS, has the correct application/json content type, and has no server redirects. Also, remember you can’t test a Universal Link by pasting it directly into Safari’s address bar; it has to be clicked from another app to work.
How Do I Manage App State From a Link?
What happens when a link arrives while your app is already open? This can be disruptive if not handled gracefully. For example, if a user is in the middle of a checkout flow and a link to a product page comes in, should you interrupt them? It’s often best to show a temporary notification or a modal asking if they want to navigate. This gives them control over their experience.
Mastering these troubleshooting skills is crucial, especially as the demand for skilled React Native developers continues to climb. A quick market analysis shows its strength: there are over 6,400 developer job postings on LinkedIn in the US alone, far exceeding its competitors. This popularity comes from its power to connect with native features, making complex tasks like linking much more manageable. You can find more data on these job trends in a detailed comparison of cross-platform frameworks.
Got Questions About React Native Linking?
Working with React Native’s Linking module can feel tricky at first. A few common questions pop up time and time again, so let’s walk through them with some practical advice.
How Can I Send Data Through a Deep Link?
The best way to make your deep links powerful is by embedding data directly into them. You can do this with either URL path segments or query strings. It’s how you tell your app what to show the user.
Think about a link like myapp://products/123?ref=promo. When your app catches this link, you can easily pull out the important bits. In this case, ‘123’ is the product ID from the path, and { ref: 'promo' } is extra info from the query string.
If you’re using a library like React Navigation, this becomes even easier. It’s built to automatically parse these parameters and hand them off as props to the right screen, which keeps your code much cleaner.
Why Do My Universal Links Keep Opening in Safari on iOS?
Ah, the classic iOS headache. If your Universal Links are launching Safari instead of your app, it almost always means there’s a misconfiguration between your server and your Xcode project. The secure connection between your website and your app is failing somewhere.
Here’s a checklist I run through whenever this happens:
- Check the Server: Is your
apple-app-site-associationfile exactly right? It needs to be valid JSON, served over HTTPS from the root of your domain, and have theapplication/jsoncontent type. No exceptions. - Check Xcode: Pop open your project and double-check that the ‘Associated Domains’ capability is turned on. The domain must be listed with the
applinks:prefix, likeapplinks:www.yourdomain.com. - Check How You’re Testing: This one gets a lot of people. You can’t just paste a Universal Link into the Safari address bar and expect it to work. It has to be triggered by a real user tap, like clicking a link in an email or a text message.
What’s the Real Difference Between getInitialURL and addEventListener?
You absolutely need both getInitialURL and addEventListener to build a linking solution that works in every situation. They solve two different problems and don’t overlap.
Linking.getInitialURL()is for one specific moment: when your app is launched from a completely closed state by a link. It’s a one-time check that gives you the URL that started everything.
On the other hand, Linking.addEventListener('url', callback) is a listener that’s always on. It’s designed to catch links that come in while your app is already running (either in the foreground or background). Think of links from push notifications or other apps. If you don’t use both, you’ll miss entire user scenarios.
Ship updates and bug fixes instantly, without waiting for app store approval. CodePushGo lets you deliver over-the-air updates to your users, so they always have the latest and greatest version of your app. See how it works at https://codepushgo.com.


