
When you’re building a React Native app, authentication is more than just a login screen. It’s the entire system you create to confirm who your users are, keep them logged in securely, and guard sensitive information on both iOS and Android. For any app that deals with accounts, personal details, or content behind a paywall, getting this right is non-negotiable.
Why Secure Authentication is a Must-Have in React Native Apps

Before we jump into the code, let’s talk about what’s at stake. Weak authentication isn’t just a technical goof; it’s a huge risk to your users’ trust and your app’s integrity. People keep their lives on their phones, so a security breach can be a disaster for them and a death blow to your brand.
React Native is incredibly popular because it lets you write one set of code for both iOS and Android, which can slash development costs by as much as 40%. This efficiency has propelled the global React Native market, which is expected to hit USD 499 million by 2031. With so many apps and so much user data flowing through the framework, solid authentication has become an absolute priority.
The Real-World Risks of Cutting Corners
If you don’t nail down your authentication, you’re leaving the door wide open to some serious problems. We’re talking about consequences that go way beyond a few bad reviews.
Here are just a few of the nightmares you could face:
- Data Breaches: Hackers get in and steal sensitive user info—personal details, credit card numbers, you name it.
- Reputation Damage: Once news of a breach gets out, user trust evaporates. You’ll be dealing with a flood of uninstalls and a brand image that’s permanently scarred.
- Financial Fallout: The costs add up fast. Think legal battles, fines for not complying with regulations like GDPR, and the high price of fixing the security holes.
- Account Takeovers: A compromised account lets a bad actor impersonate a real user, making purchases, sending malicious messages, or messing with their data.
Think of your authentication system as the bouncer for your app. It’s the first line of defense, making sure only the right people get past the velvet rope. This builds a foundation of trust that keeps users coming back.
Key Concepts for Mobile Authentication
To build a robust system, you’ll need to get comfortable with a couple of core technologies that are perfect for the mobile world.
- JSON Web Tokens (JWT): These are the modern standard for managing user sessions. A JWT is a compact and self-contained token that securely passes user information between your app and your server.
- OAuth 2.0: This is the protocol that powers all those “Log in with Google” or “Sign in with Facebook” buttons. It lets your app ask for limited access to a user’s account on another service without ever handling their password directly.
Getting these concepts down is the first step toward building a truly secure app. If you want to zoom out for a bigger picture, it’s always a good idea to brush up on general software development security best practices. And, of course, following established https://codepushgo.com/blog/app-security-standards/ is absolutely essential for protecting both your users and your business.
Building Your Authentication Foundation

Alright, now that we understand the ‘why,’ let’s get into the ‘how.’ Building a solid authentication system in React Native isn’t just about slapping a login form on the screen. It’s about architecting your app to handle two very different states: when a user is logged in and when they’re not.
Getting this right from the start saves you from a world of hurt later. Think tangled conditional rendering and passing props down endless component chains. We’re going to avoid that mess.
The first piece of the puzzle is how we handle navigation. We need a clean, clear separation between public screens (like login) and protected screens (like a user dashboard).
Structuring Navigation for Authentication
My go-to tool for this is React Navigation. It’s the standard in the React Native world for a reason. The trick is to create two completely separate navigation “stacks.”
- The Auth Stack: This is for anyone who isn’t logged in. It’ll house your
LoginScreen,SignUpScreen, and maybe aForgotPasswordScreen. Simple. - The App Stack: This is the core of your application. It contains all the good stuff a user gets after they’ve authenticated—think
HomeScreen,ProfileScreen, andSettingsScreen.
By creating these separate flows, we can switch between the entire Auth Stack and the entire App Stack with a single check: is the user authenticated? This is far more robust than trying to hide or show individual screens.
Next up, we need a way to manage the user’s login status across the entire app. The absolute last thing you want to do is pass authentication tokens and user data down as props. This anti-pattern, known as “prop drilling,” makes your app brittle and a nightmare to refactor.
A well-structured authentication flow should feel like a state machine. The user is either ‘logged out’ and sees the Auth Stack, or they are ‘logged in’ and see the App Stack. There should be no in-between states visible to the user.
Leveraging React Context for Global State
So, how do we share the user’s status globally without the prop-drilling headache? We’ll use a powerful feature built right into React: the Context API.
Context is designed for exactly this scenario. It lets us create a global state “provider” that any component, no matter how deeply nested, can tap into.
We’ll create a dedicated AuthContext to hold our authentication state and functions. Here’s what it will expose:
isLoading: A simple boolean. Is the app currently checking if a user is already signed in? This is crucial for a smooth startup experience.userToken: This is the key. When this holds a value (like a JWT), the user is logged in. When it’snull, they’re not.signInfunction: Any component can call this to kick off the login process.signOutfunction: Another globally available function to clear the token and log the user out.
This AuthContext becomes our single source of truth for anything related to authentication. A settings page can call signOut, and a profile screen can read the user’s token, all without a single prop being passed down from the main App component.
This approach separates your UI components from the nitty-gritty of authentication logic, making everything cleaner and easier to manage. It’s a core tenet of building secure systems from the ground up, a practice detailed in the secure software development lifecycle.
With our navigation stacks and global context in place, the magic happens. When our userToken in the context changes from null to a real token, our root navigator will automatically unmount the Auth Stack and mount the App Stack. It’s a seamless and scalable foundation for everything else we’ll build on top.
Now that we have the navigation and context plumbing set up, it’s time to get into the heart of the matter: building a secure login flow with email, password, and JSON Web Tokens (JWTs). This is where your React Native app starts talking to your backend, and how you handle the resulting JWT is what separates a secure app from a vulnerable one.
When a user successfully logs in, your server sends back a JWT. Think of this token as a temporary keycard. It grants access to protected API routes and user-specific data. If you mishandle this keycard, you’re leaving the door wide open for security breaches.
The basic flow seems simple enough: the user enters their credentials, you send them to the server, and you get a token back. The real work, and the part that trips up many developers, is what you do with that token on the device.
The Great Token Storage Debate
So, your app has a fresh JWT from the server. Where do you store it? This is a critical decision. Get it wrong, and you might as well be storing passwords in a plain text file.
You’ve got a couple of options, but from my experience, only one is truly production-ready.
- AsyncStorage: I see this used far too often for things it was never meant for. It’s a simple key-value store, and that’s it. The crucial thing to remember is that it’s completely unencrypted. Storing a JWT here is a major security risk, as the data is easily accessible on a rooted or jailbroken device. It’s fine for user settings, but not for auth tokens.
- Secure Storage Libraries: This is the only way to go. Libraries like
expo-secure-storefor Expo projects orreact-native-keychainfor bare React Native apps are the professional standard. They don’t reinvent the wheel; instead, they act as a bridge to the device’s native, hardware-backed secure storage—the Keychain on iOS and the Keystore on Android.
Let’s be clear: for any app you plan to ship, using a secure storage library is non-negotiable. It offloads the heavy lifting of encryption and secure management to the operating system, which does a far better job than we ever could in JavaScript.
This image breaks down why secure storage is the only real choice.
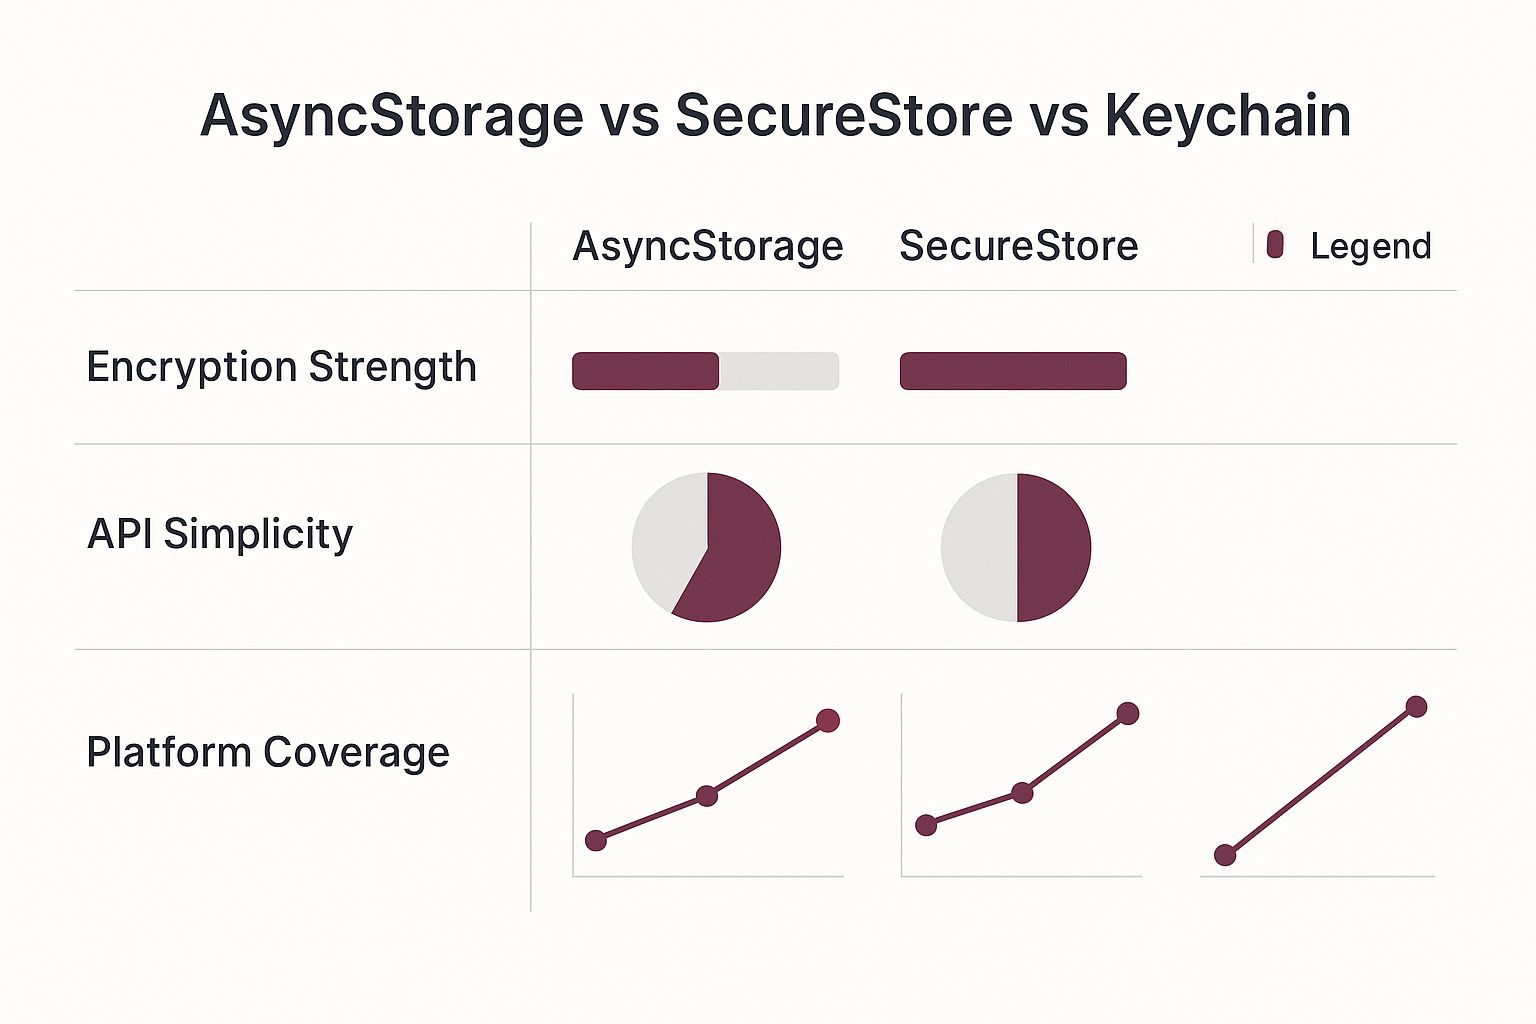
As you can see, while AsyncStorage is easy to implement, its lack of built-in encryption makes it a liability for sensitive data. Keychain and Keystore provide the platform-level security you need.
Choosing the right storage method is fundamental. Here’s a quick breakdown to help you decide.
React Native Secure Storage Options Compared
| Storage Method | Security Level | Persistence | Best For |
|---|---|---|---|
| AsyncStorage | Low (Unencrypted) | Persistent until app is uninstalled | Non-sensitive data like user preferences, app settings, or caching public data. |
| SecureStore / Keychain | High (Encrypted) | Persistent and secure, even if the app is uninstalled and reinstalled (on iOS) | Authentication tokens (JWTs), API keys, and any other sensitive credentials. |
| State Management (Context, Redux, etc.) | In-Memory (Low) | Session-based (lost on app close) | Storing the token in memory for immediate use during an active session, but not for long-term storage. |
Ultimately, the best practice is to fetch the token from secure storage and load it into your application’s state (like our AuthContext) when the app starts. This gives you both security at rest and easy access during runtime.
Setting Up Your API Client for Automatic Authentication
Nobody wants to manually attach the JWT to the header of every single API request. It’s repetitive, clunky, and a recipe for mistakes. A much smarter approach is to configure a central API client, like an Axios instance, to handle this automatically.
This is where our AuthContext becomes incredibly useful. We can set up an Axios “interceptor,” which is just a fancy name for a piece of code that runs before a request is sent or after a response is received.
Here’s the game plan for a request interceptor:
- Before any request goes out, the interceptor function kicks in.
- Inside it, you’ll grab the
userTokenfrom your secure storage. - If the token exists, you automatically add it to the request’s
Authorizationheader, usually formatted asBearer YOUR_JWT_HERE. - The request then continues to the server, now fully authenticated.
By centralizing this logic, you keep your components clean and focused on their own tasks. Your screens just need to call an API function; they don’t need to know anything about the token itself.
By creating a global API client with an interceptor, you’re building a “set it and forget it” authentication system. Every protected API call automatically includes the necessary credentials, dramatically simplifying your application logic and reducing the chance of human error.
Handling API Responses and Errors Gracefully
Your API client isn’t just for sending requests; it’s also your first line of defense for handling responses. A response interceptor is perfect for globally managing what happens when the server talks back, especially when it comes to authentication errors.
Imagine your API returns a 401 Unauthorized status. This is the universal signal that the user’s token is either invalid or expired. Instead of handling this error in every single component, your response interceptor can catch it.
When it sees a 401, it can automatically call the signOut function from your AuthContext, which will clear the bad token and navigate the user right back to the login screen. It’s a seamless, secure, and predictable way to manage sessions. For apps dealing with highly sensitive information, you might even consider going a step further and learning how to implement end-to-end encryption to secure the data in transit.
Integrating Social Logins with OAuth

While a good old email and password setup is essential for your authentication react native strategy, let’s be real: users expect faster options. Adding social logins like “Sign in with Google” or “Continue with Facebook” is a game-changer for reducing friction and getting people into your app quickly.
But it’s not as simple as just adding a button. This whole process runs on a protocol called OAuth 2.0. Think of OAuth as a secure valet key. Instead of asking for a user’s Google password (which you should never do), you’re asking Google to vouch for them. Google then gives your app a temporary, limited-access token that says, “Yep, this person is legit,” without ever sharing their actual password.
The flow can seem a bit intimidating at first, but it follows a clear path. Your app kicks things off, the user authenticates with their chosen social provider, and your app gets a special code back. The crucial final piece is sending that provider’s token to your own backend server to complete the handshake.
Your server’s job is to validate that token directly with the provider. Once it gets the green light, your backend generates its own JWT—the exact same kind you use for email/password logins—and sends it back to the app. This is key because it keeps your app’s session management consistent, no matter how a user logs in.
Getting Set Up with the Social Provider
Before touching any React Native code, your first stop is the developer console of whatever provider you’re integrating with. Whether it’s the Google Cloud Platform or the Meta for Developers portal, the initial setup is pretty much the same across the board.
You’ll start by registering a new application and filling in some basic details. The most critical part of this step is specifying your app’s unique identifiers: the bundle ID for iOS and the package name/key hashes for Android. These act as a security check to make sure that only your app can make authentication requests.
Once you’re done, the provider will give you two very important credentials:
- Client ID: This is a public identifier for your app.
- Client Secret: This is a confidential key that your backend server uses to talk securely with the provider’s API. Keep this secret and never, ever embed it in your mobile app’s code.
Trust me, getting these identifiers right from the start is vital. One of the most common headaches I see when social logins fail is a simple mismatch between what’s in the developer console and the app’s native configuration.
The whole point of OAuth on mobile is a secure redirect. Your app passes the user over to a trusted login screen. After they log in successfully, the provider needs a secure way to hand control—and an authorization token—back to your specific app and nowhere else.
Handling the Native Redirect
Now for the fun part for us React Native developers. A mobile app doesn’t use simple URL redirects like a website. It needs a more sophisticated way to handle the handoff, which means configuring the native iOS and Android projects to listen for a specific “callback” from the social provider.
This is usually handled with deep linking. When the user finishes logging in on the Google or Facebook screen, the provider’s app uses a custom URL scheme (like mycoolapp://auth/callback) to pop your application back open and deliver the auth data. If you want to go deeper on this, we have a whole guide on deep linking in React Native.
This is where libraries like react-native-google-signin or react-native-fbsdk-next become your best friends. They provide the JavaScript bridge to kick off the native login flow and take care of the complex underlying configurations for you, saving you from having to manually wrestle with Xcode plists and Android manifests.
Exchanging Tokens to Finalize the Login
So, the user has authenticated and your app has received a token from the social provider. Great! But hold on—that token only proves the user’s identity to Google or Facebook. It is not a session token for your own app’s API.
The final, and most important, step is to send this social token to a dedicated endpoint on your backend (something like /api/auth/google). This is where the real security magic happens. Your server, armed with your app’s Client Secret, uses the provider’s backend SDK to verify the token’s authenticity directly with them.
Once verified, your backend can either find an existing user tied to that social profile or create a new account. Either way, it then generates your standard JWT and sends it back to the app. From your React Native app’s point of view, the process is now complete. You just save this JWT to secure storage and update your AuthContext, exactly like you would with a regular password login.
Once you’ve got a basic login system working, it’s time to level up. We need to polish the user experience and seriously harden the app’s security. Moving beyond a simple sign-in screen means tackling the real-world complexities of keeping a user logged in securely and smoothly.
One of the quickest ways to frustrate a user is to log them out unexpectedly. For security reasons, we use short-lived JSON Web Tokens (JWTs), but forcing someone to re-enter their password every hour is a recipe for uninstalls. The professional way to handle this is with a refresh token.
Handling Token Expiration Gracefully
Think of a refresh token as a long-lived key that’s stored securely on the device, right alongside the primary access token. Its only job is to get a new, short-lived access token when the old one expires.
The whole process is pretty slick and happens behind the scenes.
Here’s how it works from an engineering perspective:
- Your app makes an API call, but the access token has expired. The server responds with a
401 Unauthorizederror. - Instead of booting the user to the login screen, a network interceptor (like one you’d set up in Axios or a similar library) catches this specific error.
- The interceptor then hits a dedicated endpoint on your backend, say
/token/refresh, sending along the securely stored refresh token. - Your server validates the refresh token and, if it’s good, sends back a brand new access token. The interceptor then automatically retries the original API call that failed, this time with the new token.
The user never sees a thing. To them, the app just continues to work flawlessly, creating a seamless session that can last for days or weeks.
Refresh tokens give you the best of both worlds: the tight security of short-lived access tokens and the persistent login experience that users demand from modern apps.
Protecting Routes and Adding Biometrics
Securing your app’s routes is just as important. You have to design your navigation logic to prevent any “flicker” where a user might glimpse a protected screen before being redirected. This is a perfect job for a global AuthContext, which acts as the single source of truth for which navigation stack—public or private—should be active.
Want to make the experience even better? Add biometric authentication with Face ID or Touch ID. Libraries like expo-local-authentication make this surprisingly straightforward. You can prompt users for their fingerprint or face to quickly re-authenticate when they bring the app back from the background, or to confirm high-stakes actions without them needing to type a password.
Nailing the Logout Flow
A logout button needs to do more than just navigate the user away. A truly secure logout is a multi-step process that leaves no loose ends.
- Kill the Server-Side Session: First, your app should call a backend endpoint to invalidate the refresh token. This ensures it can’t be used again, even if it was somehow compromised.
- Wipe Local Credentials: Next, completely remove both the access token and the refresh token from the device’s secure storage.
- Reset App State: Finally, purge any user-specific data from your global state (like Redux or Zustand). This prevents sensitive information from one user’s session from accidentally leaking into the next.
Always remember to give clear feedback. A spinning icon during a login attempt or a friendly, specific error message (“Incorrect password” is much better than “Login Failed”) goes a long way.
Building a solid authentication system means thinking about the entire security picture. It’s crucial to follow industry best practices for secrets management. This also includes how you handle API keys and other credentials within your app, which you can learn more about in our guide to Expo environment variables.
Gotchas and Common Questions About React Native Authentication
When you’re deep in the code implementing authentication, you’re bound to run into a few common hurdles. I’ve seen them trip up developers time and again, but thankfully, the fixes are usually pretty straightforward once you know what to look for. Think of this as a quick FAQ to get you unstuck.
One of the first things people ask is how to properly handle network errors on the login screen. It’s tempting to just show a generic “Login Failed” alert, but we can do so much better. The key is to actually look at the error response from your server.
If you get a 401 Unauthorized status, that’s your cue to tell the user, “Invalid email or password.” But if it’s a 500 server error, a message like “Something went wrong on our end, please try again later” is a lot more accurate and helpful. This one small change makes your app feel polished and less frustrating for the user.
Which State Manager Should I Use? Redux, Zustand, or Context?
This one comes up a lot: managing auth state when you’re already using a library like Redux or Zustand. It feels like you should just throw everything in there, but I’d argue for a simpler approach.
My go-to strategy is to use React Context just for the core authentication status. I’m talking about the user’s token and a simple isAuthenticated flag. That’s it. The whole job of this context is to tell your app’s navigation whether to show the public login screens or the protected parts of the app.
For everything else—like the user’s profile data you fetch from the API after they log in—let your main state management library handle it. This separation keeps your auth logic clean and isolated. Your navigation only cares about the AuthContext, and your components can grab the detailed user info from Redux or Zustand as needed.
Can I Share a Login Session Between My Web App and Mobile App?
Ah, the holy grail. Teams building for both web and mobile always ask this. Unfortunately, there’s no magic button to press here because browsers and mobile apps have fundamentally different ways of handling storage. The cookie-based session you have on your website just won’t fly in a native app environment.
The best way to tackle this is with a solid, token-based strategy.
- One Backend to Rule Them All: Your React web app and React Native app should both hit the exact same API endpoint for authentication.
- Different Storage for Different Platforms: The web can use secure,
HttpOnlycookies, while your React Native app should be using the device’s secure storage (like Keychain on iOS and Keystore on Android). - A Smooth Handoff: To create a slick user experience, you can use deep linking. Imagine a user is on your mobile website and taps an “Open in App” button. That link can pass a special one-time-use token that automatically logs them into the native app.
The bottom line is that while a single, unified session is a tough nut to crack, a unified backend strategy is totally doable and, frankly, essential. The goal is a stateless API that relies on a JWT (or a similar token) passed in the authorization header, no matter where the request is coming from.
Finally, a quick tip on social logins. If you’re pulling your hair out over platform-specific errors, especially on iOS, it’s almost always a configuration mismatch. Double- and triple-check that your bundle ID and URL schemes in your Xcode project settings are an exact match for what you’ve configured in your Google, Facebook, or other provider’s developer console. One typo in Info.plist can bring the whole thing down.
At CodePushGo, we’re obsessed with solving the nagging problems that slow down development. Instead of getting stuck in the mud of app store reviews for every little change, you can push secure updates instantly to your users. See how CodePushGo can speed up your release cycle.


