When you build an app with React Native, you’re essentially writing one JavaScript codebase that works seamlessly on both iOS and Android devices. For anyone who has managed two separate codebases, the appeal is immediate. This approach can seriously slash development time and costs by getting rid of the need to build and maintain two entirely different applications.
Why Build Your Next App with React Native
Before we jump into the nitty-gritty of coding, let’s talk about why React Native is such a smart move. The “write once, run anywhere” promise is a huge part of it, but the real-world benefits go much deeper. For businesses, this means getting your app to market faster and saving a significant chunk of your budget. You can have a single team target both platforms at the same time.
It’s not just about making life easier; it’s about being more efficient. Instead of wrestling with separate Swift and Kotlin codebases, your developers can focus their energy on a single, unified set of tools and application logic. This shared codebase makes everything—from adding new features to squashing bugs—far more straightforward.
Unpacking the Core Benefits
What makes React Native special is that it’s not just a web page wrapped in a native container. It actually uses native UI components. That means the user experience is smooth, responsive, and feels exactly like an app built specifically for that phone. When you create a button in React Native, it becomes a real native button on the device.
This unique approach gives you some pretty powerful advantages:
- Native Performance: Since the user interface is built from native widgets, the performance is almost identical to a natively built app for most scenarios. Users won’t know the difference.
- Reduced Development Costs: A single codebase and one development team naturally lead to lower overhead. From my experience, you can expect 60-80% of your code to be reusable across both platforms, which is a massive win.
- Faster Iteration: Features like Fast Refresh are game-changers. They let developers see their changes in real-time without having to recompile the entire app, which dramatically speeds up the development loop.
To put it in perspective, let’s quickly compare React Native with traditional native development.
React Native vs Native Development at a Glance
| Factor | React Native | Native (iOS/Android) |
|---|---|---|
| Codebase | Single JavaScript/TypeScript codebase | Separate Swift/Objective-C (iOS) & Kotlin/Java (Android) |
| Team Size | Smaller, unified team | Two separate, specialized teams |
| Development Speed | Faster initial build & iteration | Slower, as features are built twice |
| Performance | Near-native performance for most apps | Highest possible performance, direct API access |
| UI Components | Maps to native UI controls | Uses platform-specific UI kits directly |
This table just scratches the surface, but it highlights the core trade-offs. While native offers maximum performance for extremely demanding apps (like complex games), React Native hits the sweet spot for the vast majority of business and consumer applications.
A Growing and Thriving Ecosystem
The momentum behind React Native is hard to ignore. The global market for React Native app development hit around USD 325 million in 2024 and is expected to climb to nearly USD 499 million by 2031. This isn’t just a trend; it’s a movement supported by a massive developer community and the backing of Meta. You can explore more market data on intelmarketresearch.com.
For startups and large companies alike, React Native strikes a fantastic balance between performance, development speed, and cost. It effectively lowers the barrier to creating cross-platform apps without forcing you to compromise on the end-user experience.
At the end of the day, choosing React Native is a strategic business decision. It gives your team the power to build high-quality mobile apps more efficiently than ever before.
Setting Up Your Development Environment for Success
A solid foundation is everything when you’re building with React Native. I can’t tell you how many hours I’ve seen developers lose to frustrating troubleshooting, all because of a rushed or misconfigured setup. Taking the time to get your development environment right from the start is an investment that pays off big time. Think of it as prepping your workshop before a big project—it makes everything that follows so much smoother.
The core of your setup hinges on just a few key pieces. You’ll absolutely need Node.js to run the JavaScript side of things, Watchman to keep an eye on your files for that instant hot-reloading we all love, and of course, the React Native CLI to actually create and manage your projects. Each one has a specific, critical job to do.
This diagram gives a great high-level view of how your JavaScript code becomes a real, native UI on a device.
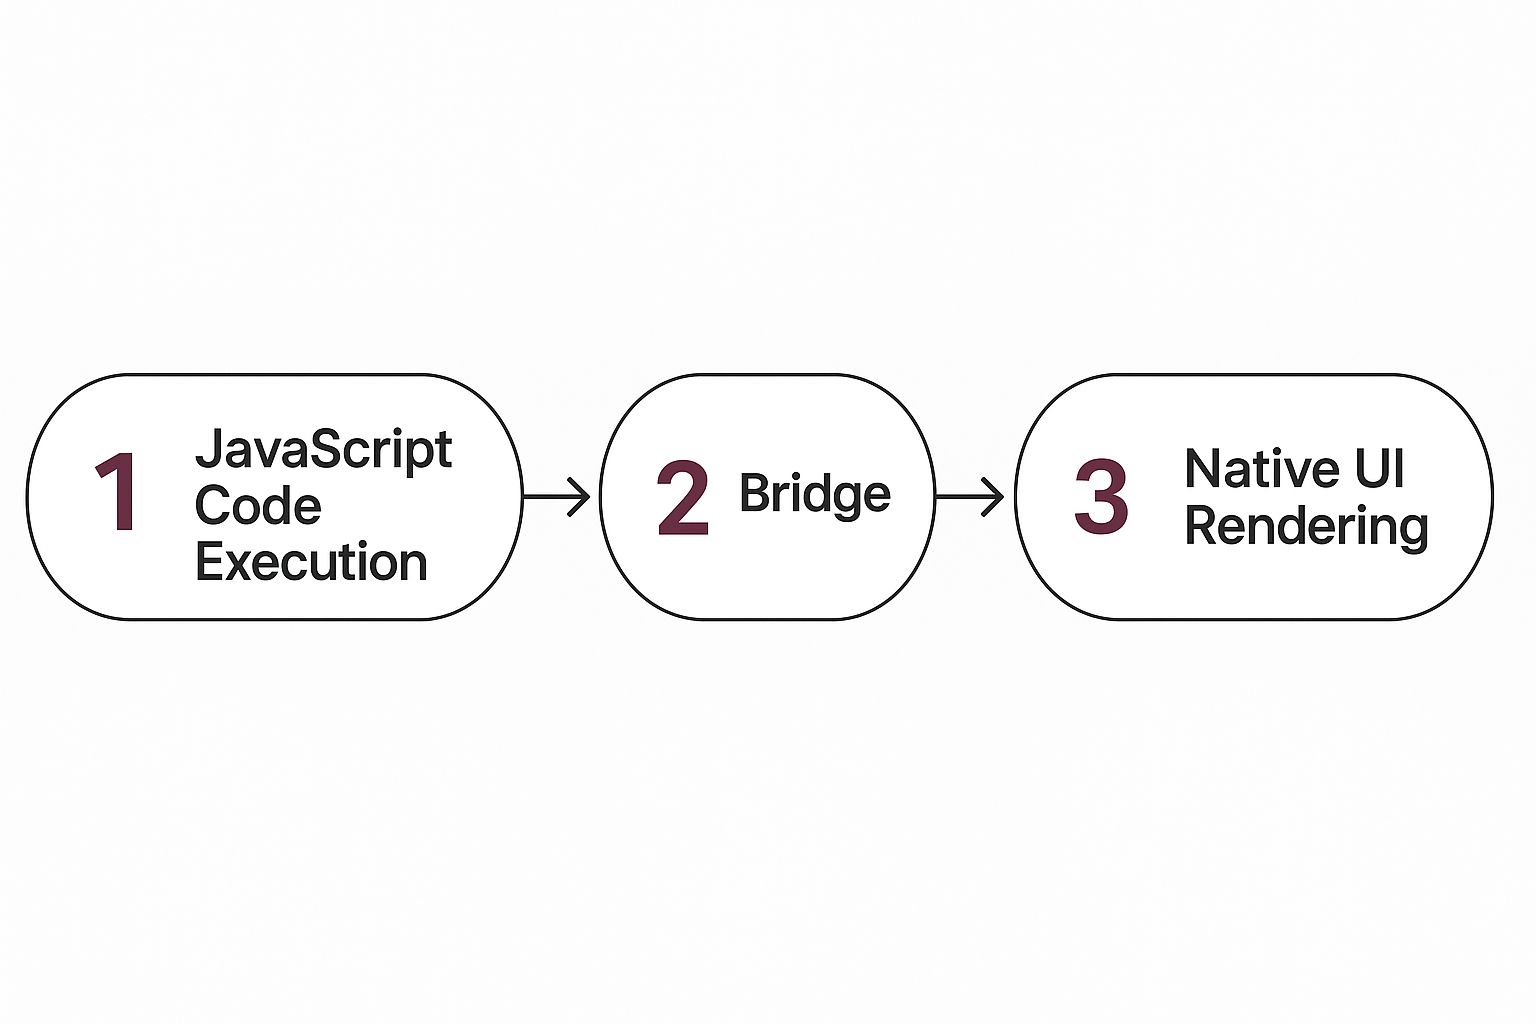
The key takeaway here is the “bridge.” It’s the magic piece that lets your code talk to the native platform APIs, translating your JavaScript components into actual iOS and Android UI elements that users interact with.
Configuring Your Machine for iOS and Android
Now, depending on which platforms you’re targeting, you’ll need their specific Software Development Kits (SDKs). For iOS, Xcode is a must-have, and it only runs on macOS. For Android, you’ll be installing Android Studio, which bundles the Android SDK and lets you manage your emulators.
Here’s a quick checklist of what you’ll be installing:
- Homebrew (macOS only): The go-to package manager. It makes installing Node and Watchman a breeze.
- Node.js: I highly recommend using a version manager like
nvm. It saves a ton of headaches when you need to switch between Node versions for different projects. - Watchman: A file-watching service from Meta. It’s the secret sauce behind the Metro bundler’s speed.
- Xcode: This gives you the iOS SDK, simulators, and all the build tools you’ll need.
- Android Studio: Your gateway to the Android SDK, emulators, and other essential command-line tools.
One of the most common snags I see developers hit is with environment variables, especially for the Android SDK. After you install Android Studio, you have to make sure your shell profile (.zshrc or .bash_profile) knows where to find it by setting the ANDROID_HOME path. Without this, the React Native CLI simply won’t know how to build your app.
Pro Tip: After installing Xcode, open it at least once. You have to accept the license agreement and let it install its command-line tools. It’s a tiny step that’s so easy to forget, and it leads to some really confusing build failures down the line.
Creating Your First React Native App
Once your environment is humming along, spinning up a new project is refreshingly simple. Using the React Native CLI is the standard way to go if you want full control over the native side of your project. For a more granular walkthrough on this initial step, our guide on creating a React Native app is a great resource.
The first command you’ll likely run is npx react-native init MyAwesomeApp. When it finishes, jump into that new directory and run npx react-native start to get the Metro bundler going.
With Metro running, pop open a second terminal window to actually launch the app on a device:
- To run on iOS:
npx react-native run-ios - To run on Android:
npx react-native run-android
If you see the default React Native welcome screen pop up in your simulator or emulator, you’re golden. That’s the confirmation that your setup is solid, and you’re officially ready to start building something amazing.
Diving into Core React Native Components
With your development environment good to go, it’s time to start building the user interface. In the React Native world, everything you see on the screen is pieced together using a set of fundamental building blocks called Core Components. These are essentially pre-built, platform-agnostic components that React Native translates directly into native UI widgets for both iOS and Android.
I like to think of them as digital Lego bricks. The most foundational brick is the View component. It acts as the primary container for arranging other components, serving a similar purpose to a <div> in web development. You’ll constantly be using View to group elements together, apply styles like padding and margins, and organize your app’s visual hierarchy.
Inside a View, you’ll almost always find a Text component. Its job is exactly what it sounds like: displaying text. A common rookie mistake is trying to write text directly inside a View—it won’t render. You absolutely have to wrap any string of text in a Text component.
Bringing Your UI to Life
Static containers and text are a good start, but a real app needs to handle dynamic content and user interaction. This is where components like Image, ScrollView, and FlatList enter the picture. The Image component is straightforward, letting you display images from your local assets or from a network URL.
When you have content that might overflow the screen, ScrollView is your friend. It provides a basic, scrollable container that’s perfect for things like forms or articles where you don’t know the exact content length. For long, structured lists of data—think a social media feed or a list of contacts—FlatList is a much smarter choice. It’s built for performance, only rendering the items currently visible on the screen to save a ton of memory.
Here are the key components for handling user interaction:
- TextInput: This is your standard text field for capturing user input in a search bar, login form, or anywhere else. It comes with handy props for managing the placeholder text, keyboard type, and value.
- Button: A simple, no-frills, cross-platform button. It’s quick to implement, but it’s notoriously difficult to style and often looks different on iOS and Android.
- TouchableOpacity: For custom-designed buttons, this is what most developers actually use. It’s a wrapper that makes any
Viewtappable and provides a nice visual feedback by briefly dimming the component’s opacity on press.
Building a solid UI isn’t just about dropping components onto the screen. It’s about combining them to create intuitive patterns. A login screen, for example, is really just a
Viewthat holds someTextlabels, a couple ofTextInputfields, and aTouchableOpacitystyled to look like a submit button.
Handling Data and Device APIs
A beautiful UI is only one side of the coin; your app also needs to fetch, manage, and display data. React Native gives you the Fetch API right out of the box, which is the standard JavaScript way to make network requests to a backend. As you build your application, understanding how to handle data efficiently is key. If you want to go deeper, there’s a great post on managing data retrieval in React.
As your app’s features get more complex, you’ll inevitably need to tap into the device’s hardware, like the camera, GPS, or push notifications. This is where native modules and APIs come in. For instance, the PermissionsAndroid API is what you’d use to explicitly ask the user for permission on Android before accessing sensitive information.
Combining these APIs with core components is how you build rich, complete app experiences. And as your app grows, keeping your development workflow smooth is crucial. Our guide on React Native continuous integration can help you set up an efficient pipeline for the long haul.
Structuring Your App for Growth and Maintenance
Once you start building beyond a few simple screens, how you organize your code becomes a make-or-break decision. Let’s be honest, a messy project structure is the fastest way to drown in technical debt, turning simple updates and bug fixes into a week-long nightmare. The real secret to building React Native apps that scale smoothly and don’t make your team want to quit is thoughtful application architecture.
Think of it like a blueprint for a house. You wouldn’t just throw all your furniture in a pile; your UI components, data services, and navigation logic all need their own designated spaces. A really effective approach I’ve seen work time and again is organizing your project by feature or domain, not just by file type.
Organizing Your Code by Feature
So, instead of a massive components folder and an equally huge screens folder, try grouping related files. Imagine you’re working on a “UserProfile” feature. All its specific components, screens, and even state management logic can live together inside a single features/UserProfile directory.
This might seem like a small change, but the benefits are huge:
- It just scales better: Need to add a new feature? You just add a new folder. Deprecating an old one? Delete its folder. The impact on the rest of the app is minimal.
- Finding things is a breeze: A new developer can jump into the “UserProfile” folder and instantly find everything they need, without having to dig through five different top-level directories.
- Reusability becomes second nature: When a feature is self-contained, it’s far easier to lift and shift it somewhere else in your app or even into a completely different project down the line.
This modular structure also plays directly into one of React Native’s biggest promises. The ability to reuse 60-80% of your code between iOS and Android is a massive efficiency win, and a clean, feature-first architecture is what lets you truly capitalize on that. You can find some great insights on this powerful capability over at Netguru.
Managing Your Application’s State
As your app gets more complex, managing its state—all the data that changes over time—is the next big challenge. React’s built-in useState hook and the Context API are fantastic for simple state that lives inside one or two components. But when data needs to be shared across many different parts of your app, these tools can start to feel a bit clumsy.
This is exactly why dedicated state management libraries exist. Tools like Redux, Zustand, or MobX give you a central, predictable home for your app’s global state.
Choosing the right state management tool isn’t about finding the “best” one; it’s about what fits your app’s complexity and your team’s comfort level. For a new e-commerce app, maybe you start with the Context API for the shopping cart. As you add complex features like order history and user wishlists, migrating that shared state to something more robust like Redux or Zustand might be the right call.
The end goal is always the same: create a structure that keeps your code from becoming a tangled mess. By separating concerns and organizing your project logically from the start, you’re building a solid foundation that makes long-term maintenance, team collaboration, and future development so much easier.
Deploying Instant Updates with CodePushGo
We’ve all been there. You launch your app, a critical bug report comes in, and now you’re facing a multi-day wait for app store approval. It’s every developer’s nightmare. This is exactly why over-the-air (OTA) updates are a game-changer for React Native development. A service like CodePushGo lets you push JavaScript and asset updates directly to user devices, skipping the app store review process entirely.
Think about it. You can deploy urgent bug fixes, roll out A/B tests, or even add small features in a matter of minutes, not days. The magic lies in the fact that React Native apps are mostly JavaScript. Since you aren’t changing the native binary, you can update the JS bundle on the fly. This gives you a level of agility that’s just not possible with traditional mobile releases.

Setting Up Your First OTA Update
Getting an OTA solution wired into your project is a lot less intimidating than it sounds. The basic flow involves adding the SDK to your app and using a command-line tool (CLI) to push out your releases.
With CodePushGo, you’ll wrap your root component with a higher-order component provided by the SDK. That’s the piece that tells your app to check for new updates when it starts up. The next crucial move is creating separate deployment keys. You absolutely need one for staging and another for production; you don’t want to be testing your hotfixes on live users.
I remember a time when a simple typo in a pricing string was crashing the payment screen for some users. Instead of a frantic, days-long wait for a new build review, we pushed a one-line JavaScript fix through CodePushGo. The crash rate hit zero within an hour. That’s the power of OTA.
Releasing Updates Through the CLI
Once the initial setup is done, deploying an update is as easy as running a command in your terminal. After you’ve made your code changes, you’ll use the CLI to release the new JS bundle to a specific channel, like staging.
A typical workflow would be:
- First, you make your code changes—fix that bug or tweak that button.
- Next, you create the updated JavaScript bundle for iOS or Android.
- Then, you run a simple command like
codepushgo release-reactto send the bundle to yourstagingdeployment. - Finally, after confirming everything works as expected on your test devices, you promote that exact same bundle to
production.
This approach gives you a safety net and fine-grained control over what goes out to your users.
To really get your deployment process humming, it’s worth looking into DevOps automation tools that can streamline this entire pipeline. For a full step-by-step breakdown, we put together a complete guide on this very topic. You can read all about it here: https://codepushgo.com/blog/a-guide-to-deploying-react-native-app/. Adopting OTA updates is one of the smartest moves you can make to stay agile.
Launching Your App on the App Stores
Getting your app into the hands of users is the final, exhilarating milestone. After all the hard work building your React Native app, navigating the submission process for both the Apple App Store and Google Play Store can feel like the last boss battle. It might seem intimidating, but with a solid plan, it’s a completely manageable final step.
Before you even think about hitting that “submit” button, a thorough preparation checklist is your best friend. This goes way beyond just the code. It’s about ensuring your entire app package is polished, from creating all the required app icon sizes to designing a compelling splash screen and meticulously configuring permissions. Getting these details right from the start prevents that last-minute scramble we all dread.
Preparing Your iOS Release
For the Apple App Store, your world will revolve around Xcode and the Apple Developer portal. The process is built on code signing, which is Apple’s way of ensuring your app is secure and comes from a trusted source. You’ll need to generate certificates and provisioning profiles that tie your app directly to your developer account. This is a non-negotiable step that verifies your identity as the developer.
Once your app is properly signed, the next move is to create an archive build in Xcode. Think of this as the final, packaged version of your app that’s ready for prime time. This archive is what you’ll upload to App Store Connect, Apple’s platform for managing submissions. For a really detailed walkthrough, our guide on how to publish your app in the App Store breaks down every single requirement.
Submitting to the Google Play Store
The Android process feels a little different. Instead of an IPA file, you’ll be generating a signed Android App Bundle (.aab). I’m a big fan of this modern format because it allows Google Play to serve up optimized APKs tailored to each user’s device, which can seriously reduce download sizes. You’ll create a release key and use it to sign your bundle, either right inside Android Studio or from the command line if that’s more your style.
This signed bundle gets uploaded to the Google Play Console. From there, you’ll fill out your store listing—this means adding great screenshots, writing a clear description, and providing your privacy policy. It’s absolutely crucial to spend time on this; a compelling store listing with high-quality visuals is what will convince people to download your app.
A common reason for rejection on both stores is a weak or incomplete store listing. My advice? Be transparent. Take the time to clearly explain your app’s purpose, its features, and any required user account information the review team might need.
Mastering this deployment process is more valuable than ever, especially considering the framework’s growth. In fact, React Native’s market share has jumped from 4.73% in 2022 to 6.75% in 2024 among newly released apps, cementing its place as the top non-native framework on the App Store. You can dig into more cross-platform development trends on makeitnew.io to see where things are headed.
Frequently Asked Questions About Building with React Native
As you get your hands dirty with React Native, you’ll naturally run into a few common questions. I see these pop up all the time, so let’s walk through them. Getting these cleared up early will save you a ton of headaches down the road.
First up, the big one: how does React Native’s performance actually compare to a fully native app? For the overwhelming majority of apps—think e-commerce, social media, productivity tools—your users will never notice a difference. The performance is that good.
This is because React Native doesn’t just mimic native components; it renders the real deal. Your UI is built with actual native UI widgets, which is why the look and feel are so fluid and authentic.
Can I Mix Native Code with React Native?
Yes, and this is where React Native truly shines. It’s not an all-or-nothing system. If you hit a wall and need a feature that requires super-optimized performance or a niche device API, you’re not stuck.
You can write what are called native modules in Swift or Kotlin and then bridge them directly into your JavaScript codebase. This hybrid approach gives you incredible flexibility.
You get to build most of your app with the speed and convenience of JavaScript, but you always have an escape hatch to drop down into native code when you absolutely need it. It’s a powerful combination.
What’s the Difference Between React Native CLI and Expo?
This is probably the most critical decision you’ll make when starting a new project, and it really comes down to control versus convenience.
Here’s how I break it down for people:
-
Expo: Think of Expo as a managed, all-in-one toolkit for React Native. It handles a lot of the tricky native configuration for you and comes with a suite of pre-vetted libraries. It’s fantastic for getting started quickly, for teams without native iOS or Android experience, or for apps that don’t need custom native code.
-
React Native CLI: This is the “bare metal” approach. You have total freedom and control. If your app needs a specific third-party native module that isn’t in the Expo ecosystem or you plan on writing your own native modules, this is the path you’ll take. It’s a bit more work upfront but offers unlimited flexibility for complex projects.
Accelerate your release cycle and deliver flawless updates with CodePushGo. Ship bug fixes and new features directly to your users’ devices, bypassing the app store review process entirely. Start deploying instant updates today.


