Think of an Apple Developer Certificate as your digital passport for building anything inside Apple’s world. It’s a cryptographic key that proves you are who you say you are, acting as the foundation for building, testing, and ultimately shipping any app on an Apple device. Without it, you’re on the outside looking in.
This certificate is Apple’s way of ensuring that every piece of software on its platforms is secure, trusted, and comes from a verified source.
Your Guide to Apple Developer Certificates
Before your code can ever touch an iPhone, it’s crucial to grasp why these certificates are non-negotiable. They are the bedrock of trust and security for the entire App Store. Apple uses this system to protect users from malicious code by confirming you’re a legitimate developer.
This is your ticket to an ecosystem with over 1.91 million apps. To get started, your first move is joining the Apple Developer Program. It costs $99 per year for an individual membership, but this fee unlocks the tools you need to create and manage the certificates for every Apple OS.
Which Apple Certificate Do You Need?
Things can get a little confusing with all the different certificate types. To simplify, I’ve put together a quick-reference table to help you figure out exactly what you need and when.
| Certificate Type | What It’s For | Common Use Case |
|---|---|---|
| Development | Installing and debugging on your personal, registered devices. | Running your app on your own iPhone during the build process. |
| Distribution | Signing the final app for release to others. | Submitting to the App Store or sending a beta build to testers. |
| Push Notification (APNS) | Securing the connection between your server and Apple’s push service. | Sending notifications to your users’ devices. |
Each certificate has a very specific job. Using the wrong one simply won’t work.
Understanding the Key Certificate Roles
Let’s break down the main players. A Development Certificate is what you’ll use day-to-day. It’s your personal key that lets you install and debug an app directly on your own registered devices during the testing phase.
On the other hand, a Distribution Certificate is for the finished product. You’ll use this to sign your app right before you submit it to the App Store or for Ad Hoc distribution to a small, controlled group of beta testers.
A classic rookie mistake is mixing these up. If you try to sign an App Store build with a development certificate, you’ll get an instant rejection from Apple. Getting this right from the start saves a ton of headaches.
These certificates are just one piece of the puzzle. They work hand-in-hand with another critical component you’ll need to master. You can see how they fit together in our guide on creating an Apple Developer Provisioning Profile.
Finally, you have more specialized certificates, like the one for the Apple Push Notification service (APNS). This one allows your server to talk securely with Apple’s servers to send push notifications to your users. Mastering each type is essential for a fully functional app.
Getting Enrolled in the Apple Developer Program
Before we can even think about certificates, we have to get you into the club: the Apple Developer Program. This isn’t just a formality; it’s the gateway to everything you’ll do in Apple’s ecosystem. Getting this first step right will save you a world of headaches later on.
Your first major choice is whether to sign up as an Individual or an Organization.
Think of an Individual account as the solo artist’s pass. It’s perfect for freelancers, hobbyists, or anyone building an app under their own name. Your personal name will appear as the seller on the App Store. The setup is quick and relatively painless—just provide your personal details and you’re pretty much good to go.
An Organization account is the professional-grade option. This is what you’ll need if you’re a company, a startup, or an agency. Your legal company name will be listed as the seller, which adds a crucial layer of trust and brand consistency. It’s also a non-negotiable if you have a team that needs access.
How to Get Your Organization Verified
If you’re going the Organization route, be prepared for a bit more paperwork. Apple needs to verify that your business is a real, legal entity.
The key piece of the puzzle here is your D-U-N-S Number. This is a unique nine-digit ID for businesses, and Apple uses it for verification. You might already have one, so it’s worth checking first. If not, you can request one for free through Apple’s developer site. My advice? Do this immediately. It can sometimes take a while to be assigned, and it’s a common hold-up.
I can’t tell you how many times I’ve seen enrollments get stuck because of a simple name mismatch. If your D-U-N-S record says “My App Co. Inc.” and you sign up as “My App Co. Incorporated,” Apple will likely reject it. Pay close attention to every detail—it’ll save you from having to start the whole process over.
Taking a step back, it’s helpful to see where this fits into the bigger picture. If you’re just starting out, understanding the entire app creation journey can be incredibly valuable. This practical guide to building apps without coding is a great resource for seeing how all the pieces, from initial idea to deployment, connect.
Ultimately, picking the right account and having your documents in order from the start is fundamental. It lets you move past the administrative hurdles and get to the fun part—actually building and shipping your app. A smooth enrollment sets the stage for everything that follows.
Alright, let’s get down to business. Enough theory—it’s time to generate the certificate that lets you actually test your app on a real device. This is a fundamental step, and it all starts right on your Mac.
First things first, you’ll need to open an application called Keychain Access. It’s a standard macOS utility and the home for all your digital keys and certificates. Inside Keychain Access, you’re going to create something called a Certificate Signing Request (CSR). Think of it as your formal application to Apple, asking them to grant you a development certificate.
To do this, go to the top menu and select Certificate Assistant > Request a Certificate From a Certificate Authority. A new window will pop up. You’ll need to fill in your email address and a common name (your name is fine), but here’s a crucial detail: make sure you select the “Saved to disk” option. This saves a .certSigningRequest file to your computer, which is exactly what you need for the Apple Developer Portal.
With your shiny new CSR file saved, it’s time to log into your Apple Developer account.
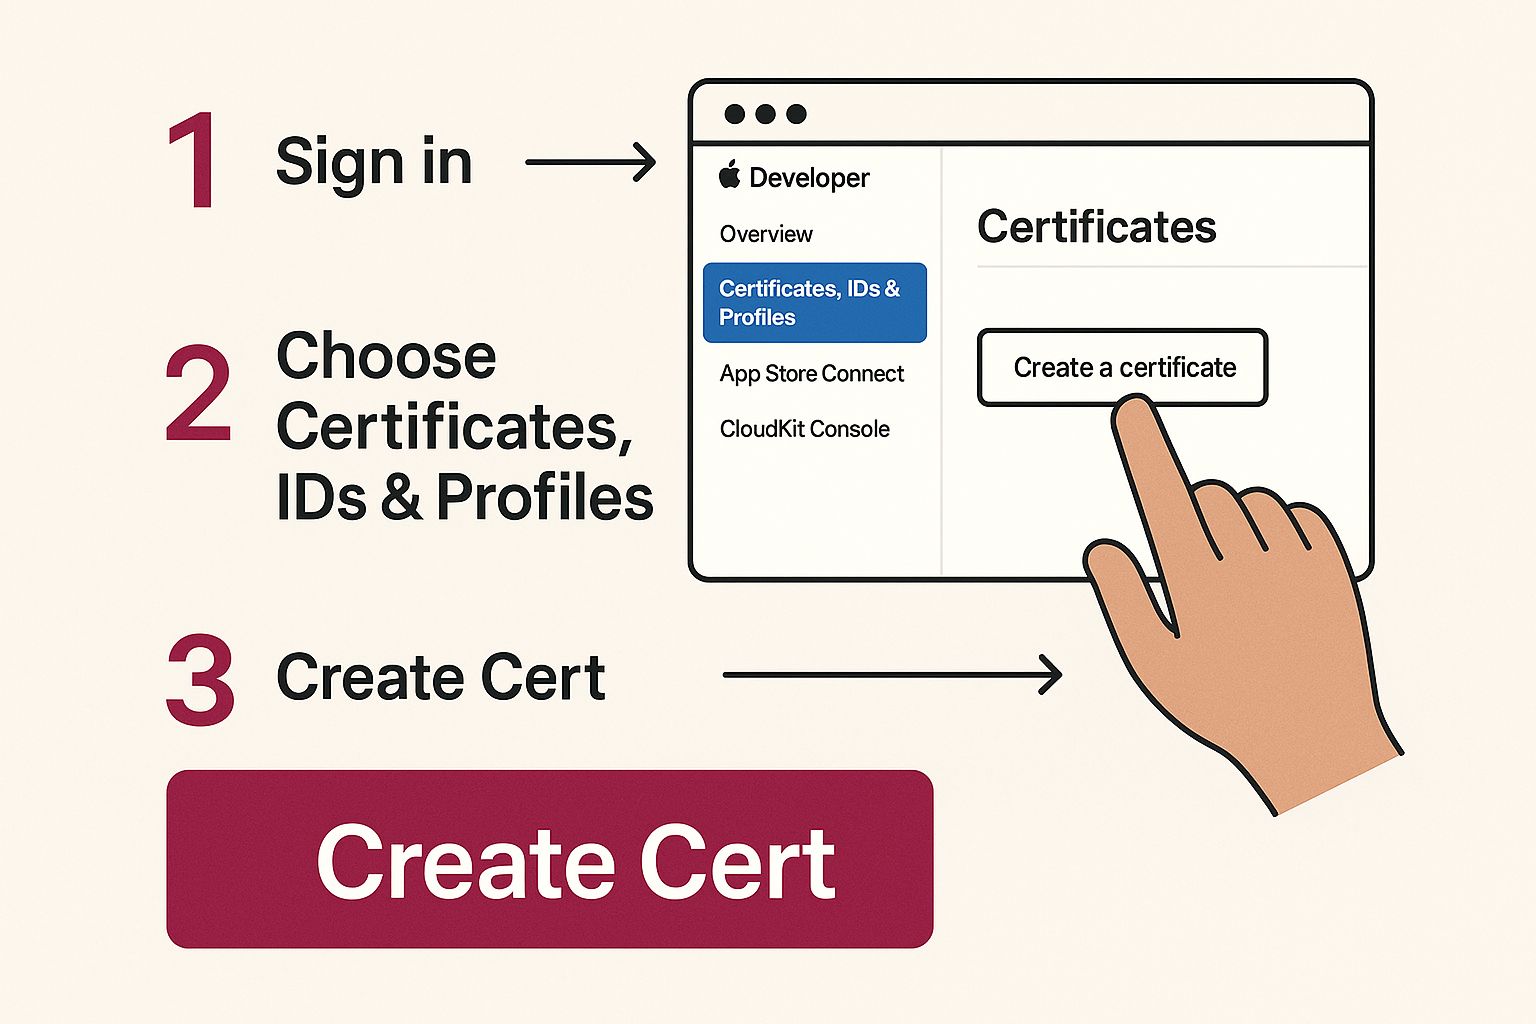
Getting Your Certificate from Apple
Navigate over to the “Certificates, IDs & Profiles” section of the developer portal. This place is your command center for everything related to app signing.
Look for the blue plus (+) icon to add a new certificate. Apple will give you a few options, and it’s important to choose the right one. For now, select “Apple Development.” This type of certificate is specifically for building and running your app on devices you’ve personally registered to your account.
The portal will then ask you to upload that CSR file you just created. Once you upload it, Apple’s system will almost instantly process your request and generate your development certificate (a .cer file).
Go ahead and download the .cer file. The final step is simple: just double-click it. This will automatically launch Keychain Access again and install the certificate, linking it to the private key that was secretly created when you made the CSR. This pairing is non-negotiable; a certificate without its corresponding private key is completely worthless.
A Quick Word of Advice: Your private key is designed to never leave your Mac—that’s a core security principle. I strongly recommend backing up your keys. You can do this by exporting them from Keychain Access as a password-protected
.p12file. If you lose the private key, you have to revoke the certificate and start this whole process over, which can be a major headache for you and your team.
Code signing can feel a bit tangled at first with all the talk of certificates, identifiers, and profiles. If you want a more comprehensive walkthrough of how it all fits together, check out our complete guide to signing an iOS app. With your first certificate now installed, you’re one giant leap closer to seeing your creation come to life on an iPhone screen.
Managing Certificates for App Store Distribution
Alright, your app is finally ready for the big stage. You’ve moved past the development phase, and now it’s time to think about distribution. This is where you’ll need a specific Apple developer certificate to sign your app, whether you’re submitting it to the App Store or sending it out for Ad Hoc beta testing.
Think of it this way: the distribution certificate is your official signature, verifying you’re the one shipping the app. It goes hand-in-hand with a provisioning profile. This profile is a small file that ties everything together—your distribution certificate, your app’s unique ID, and (for Ad Hoc builds) the list of devices authorized to run it. The certificate is your ID card, and the profile is the all-access pass.
Exporting and Backing Up Your Certificates
Now for a step that’s incredibly important but often gets missed: backing up your certificate. If you get a new Mac or need to share signing responsibilities with a teammate, you can’t just copy the certificate over. You need to export it in a specific way that includes its private key.
Here’s how you get it done:
- First, open Keychain Access on the Mac where you originally created the certificate request.
- In the sidebar, look under the “My Certificates” category and find your distribution certificate.
- Right-click on it and select the “Export” option.
- This is the most critical part: make sure you save it as a .p12 file. This format is special because it bundles both the public certificate and its private key.
- You’ll be asked to create a password. Choose something strong and memorable, as this password protects your entire signing identity.
This little .p12 file is gold. Anyone on your team who has this file and the password can install it on their machine and sign builds. This keeps your signing identity consistent across the team, which is exactly what you want.
I can’t tell you how many times I’ve seen teams scramble when a developer leaves a project without handing over the
.p12file. If you lose it, you can’t update the app. You’re stuck having to revoke the old certificate and start over, which can break things like push notifications. Always, always back it up in a secure place.
Properly handling these certificates isn’t just a technical hoop to jump through; it’s about maintaining your credibility in a huge marketplace. The App Store’s ecosystem is massive—Apple recently noted it facilitated $406 billion in developer billings and sales in the US in 2024 alone. The certification process is what ensures every developer meets the high bar required to participate.
Of course, staying compliant also means playing by Apple’s rules. For a detailed breakdown, check out our guide on the current App Store review guidelines to make sure your submission sails through. Once you get the hang of this lifecycle—from creation to backup—you’ll be able to manage your app deployments smoothly and professionally.
Solving Common Xcode Certificate and Signing Errors
There’s nothing quite like a cryptic “Code signing failed” error in Xcode to grind a productive coding session to a halt. These issues can feel like a tangled mess, but from my experience, they almost always come down to a simple mismatch between your local machine and what’s set up in the Apple Developer Portal.
One of the most common culprits? An expired certificate. It’s easy to forget that the certificate apple developer accounts use only lasts for one year. Another classic mistake is having a Bundle ID in your Xcode project that doesn’t perfectly match the App ID you configured online.
A Practical Troubleshooting Checklist
Instead of randomly clicking around in a panic (we’ve all been there), it pays to be systematic. The next time an error pops up, take a deep breath and run through this quick diagnostic checklist. It’s my go-to for isolating the problem fast.
- Check Keychain Access: First, open up Keychain Access on your Mac. Is your certificate actually there, and is it marked as valid? Crucially, you need to see its corresponding private key nested right underneath it. No private key, no signing.
- Verify in the Developer Portal: Log in to your developer account. Double-check that your certificates and provisioning profiles are still active. An expired profile is just as bad as an expired certificate.
- Toggle Xcode’s Automatic Signing: Head over to the “Signing & Capabilities” tab in your project settings. Is “Automatically manage signing” checked? Sometimes, the simplest fix is to uncheck it, wait a second, and then re-check it. This forces Xcode to refresh its connection with Apple’s servers.
- Clean Your Build Folder: This is a classic for a reason—it works. In Xcode, just go to
Product > Clean Build Folder. This clears out old, cached signing data that might be causing a conflict.
My personal first move is always to let Xcode have a shot at fixing itself. That little “Fix Issue” button that sometimes appears next to the error is surprisingly effective. It can often resolve provisioning profile problems in a single click.
Running through these manual checks will solve the vast majority of signing headaches you’ll encounter. Of course, a better long-term strategy is to streamline your deployment process altogether. For instance, learning how automatic app updates work can help you bypass some of these manual signing steps for smaller changes, saving you a ton of time.
Once you get familiar with these common pitfalls, you can turn those frustrating roadblocks into minor speed bumps.
Frequently Asked Bouts With Apple Certificates
Let’s be honest, navigating Apple’s certificates can feel like a headache waiting to happen. It’s one of those things you have to get right, and when you’re new to it, a lot of questions pop up. I’ve been through this process more times than I can count, so let’s clear up some of the most common sticking points developers run into.
So, My Apple Certificate Expired. Now What?
An expired development certificate isn’t the end of the world—it just means you can’t sign and install new builds on your test devices. Annoying, but not a catastrophe.
The real trouble starts when your distribution certificate expires. If that happens, two things go wrong: new users can’t download your app from the App Store, and worse, existing users will find that critical services like push notifications suddenly stop working.
To avoid this mess, you absolutely must generate a new certificate and re-sign your app before the old one bites the dust. Do yourself a favor and set a calendar reminder. It’s a simple trick, but it’s saved my bacon more than once.
Do I Really Need a Mac to Get an Apple Certificate?
Yes, this one’s a non-negotiable. While you can fiddle with your account settings on Apple’s developer portal from any browser, creating the actual Certificate Signing Request (CSR) has to be done through the Keychain Access app on a Mac.
This isn’t just an arbitrary rule; it’s fundamental to how Apple’s security works. The private key tied to your certificate is generated and stored right there in your Mac’s Keychain. Without it, you’re not going anywhere in the iOS or macOS development world.
How Do I Share My Developer Certificate with a Teammate?
First rule: never, ever email or Slack your certificate files directly. That’s a huge security risk.
The proper way to do this is by exporting the certificate and its private key as a password-protected .p12 file from your Keychain Access. You can then securely share that file and give your teammate the password separately. They can then install it on their own Mac.
Here’s how I think about it:
- For solo developers or tiny teams: Sharing a .p12 file is perfectly fine for getting a second machine up and running.
- For professional teams: The gold standard is to add people to your team account in App Store Connect. Assign them the “Developer” or “Admin” role, and they can generate their own certificates under the team’s umbrella. It’s cleaner, more secure, and the only way to go for a serious organization.
Getting this certification process right is your ticket into a massive ecosystem. The Apple App Store is a giant, with users spending over $89 billion in a recent year—that’s more than double the spending on Google Play. Every cent of that is spent on apps published by developers who’ve successfully navigated this system. You can dig into these App Store spending statistics on Tekrevol.com to see the full picture.
Of course, a valid certificate is just one piece of the puzzle. A smooth launch also depends on a rock-solid deployment plan. Our software deployment checklist provides a great starting point to make sure your releases are seamless every time.
At CodePushGo, we think developers should spend their time building incredible features, not getting bogged down by deployment chores. Our tool automates over-the-air updates for React Native, letting you push instant bug fixes and new features without waiting for app store approval. Learn how CodePushGo can accelerate your release cycle.


