
Implementing CI/CD for a React application isn’t just a trendy practice—it’s your safety net. It takes the entire process of building, testing, and deploying your app and puts it on autopilot. This means you can ship updates faster and, more importantly, with confidence, freeing you from the anxiety of a broken build or a botched deployment.
Why Modern React Development Demands CI/CD

If you’ve ever stared down a manual deployment checklist, you know it’s a breeding ground for slow releases and human error. For any serious React project today, a solid CI/CD pipeline is non-negotiable. It creates a seamless, automated bridge from a simple git push all the way to a live update your users can interact with.
This automated approach is a perfect match for React’s component-based nature. As your team builds out or tweaks individual components, the pipeline acts as a guardian, making sure every change plays nicely with the rest of the codebase and doesn’t sneak in any regressions.
Breaking Down CI vs. CD
While people often say “CI/CD” as a single term, it’s really two distinct—but related—concepts. Continuous Integration (CI) is all about making sure new code integrates smoothly, while Continuous Delivery/Deployment (CD) is about getting that integrated code out to your users. Think of it as two halves of a whole, each with a specific job.
Here’s a quick breakdown of how they function in a React project:
CI vs CD for React Apps at a Glance
| Concept | Primary Goal in React | Key Activities | Main Benefit |
|---|---|---|---|
| Continuous Integration (CI) | Merge code frequently without breaking the app. | Running npm install, executing tests with Jest or RTL, and checking code style with ESLint. | Catching integration bugs and style issues early. |
| Continuous Delivery/Deployment (CD) | Automate the release of production-ready code. | Building the production version of the app and deploying it to a staging or production server. | Radically speeding up the time it takes to get features and fixes to users. |
Together, they form a powerful system that keeps your development cycle moving quickly and reliably.
The Power of Continuous Integration (CI)
Continuous Integration is the practice of developers merging their code changes into a central repository—often several times a day. Every time a merge happens, an automated build and test sequence kicks off. For a React app, this typically involves:
- Automated Builds: The pipeline runs
npm installandnpm run buildto confirm the application actually compiles. - Automated Testing: It executes your entire test suite (using tools like Jest and React Testing Library) to hunt down bugs before they cause real trouble.
- Code Quality Checks: Linters like ESLint are run to make sure everyone on the team is sticking to the same coding standards.
This immediate feedback is incredibly valuable. It surfaces integration problems right away, long before they can grow into tangled messes that are a nightmare to trace and fix.
From Integration to Delivery and Deployment (CD)
Continuous Delivery or Deployment picks up right where CI stops. As soon as your code passes all the automated checks, the CD part of the pipeline springs into action to get your application deployed. The difference between the two is small but crucial:
- Continuous Delivery: The app is automatically built and prepped for release, but pushing it to production requires a final, manual click of a button.
- Continuous Deployment: The whole process is automated from end to end. Every build that passes all the tests is deployed directly to production with zero human involvement.
This level of automation drastically shortens the “time to market” for new features and critical bug fixes. It’s no surprise the industry is leaning heavily into this. The global market for Continuous Integration software hit about USD 1.43 billion in 2024 and is on a steep growth trajectory.
Key Takeaway: The ultimate goal of CI/CD in React is to make your deployments boring, predictable, and frequent. It lets your team stop worrying about risky releases and start focusing on consistently delivering value to your users.
While this guide is centered on web-based React, these principles are just as vital for mobile development. If you’re working in that space, be sure to check out our detailed guide on how to set up a React Native CI/CD pipeline, which dives into the specific challenges and solutions for mobile apps.
Alright, let’s get our hands dirty and build your first CI/CD pipeline. The theory is great, but seeing it in action is what really matters. If you’ve been putting this off because it sounds complicated, you’ll be surprised how quickly you can get a solid pipeline running for your React app using GitHub Actions.
We’ll assume you already have your React project on GitHub. Our entire focus will be on creating one simple, powerful file that tells GitHub what to do whenever you push new code.
This whole process boils down to a single YAML file that lives inside a .github/workflows/ directory in your project’s root. Think of this file as the playbook for your automation.
Building the Workflow File
First things first, you need to create that workflow directory and the file itself. Inside .github/workflows/, make a new file—let’s call it main.yml. You can name it whatever you like, but main.yml is a common convention. This is where we’ll define the entire CI process, from what kicks it off to the exact commands it needs to run.
Here’s a practical, no-fluff example to get you started. We’ll break down every piece of it so you understand exactly what’s happening in your CI/CD React pipeline.
.github/workflows/main.yml
name: React CI Pipeline
on: push: branches: [ “main” ] pull_request: branches: [ “main” ]
jobs: build_and_test: runs-on: ubuntu-latest
steps:
  - name: Checkout Code
    uses: actions/checkout@v4

  - name: Setup Node.js
    uses: actions/setup-node@v4
    with:
      node-version: '20'

  - name: Install Dependencies
    run: npm ci

  - name: Run Tests
    run: npm test
This simple configuration creates an effective Continuous Integration pipeline. It automatically springs into action whenever code is pushed to your main branch or when someone opens a pull request that targets main.
Expert Tip: Notice we’re using
npm ciinstead of the more commonnpm install. This is a deliberate choice for CI environments. It performs a clean install based strictly on yourpackage-lock.jsonfile, which guarantees you’re using the exact same dependency versions every single time. This small change prevents a lot of “it works on my machine” headaches.
This simple flow is what modern development is all about—a quick, automated feedback loop.
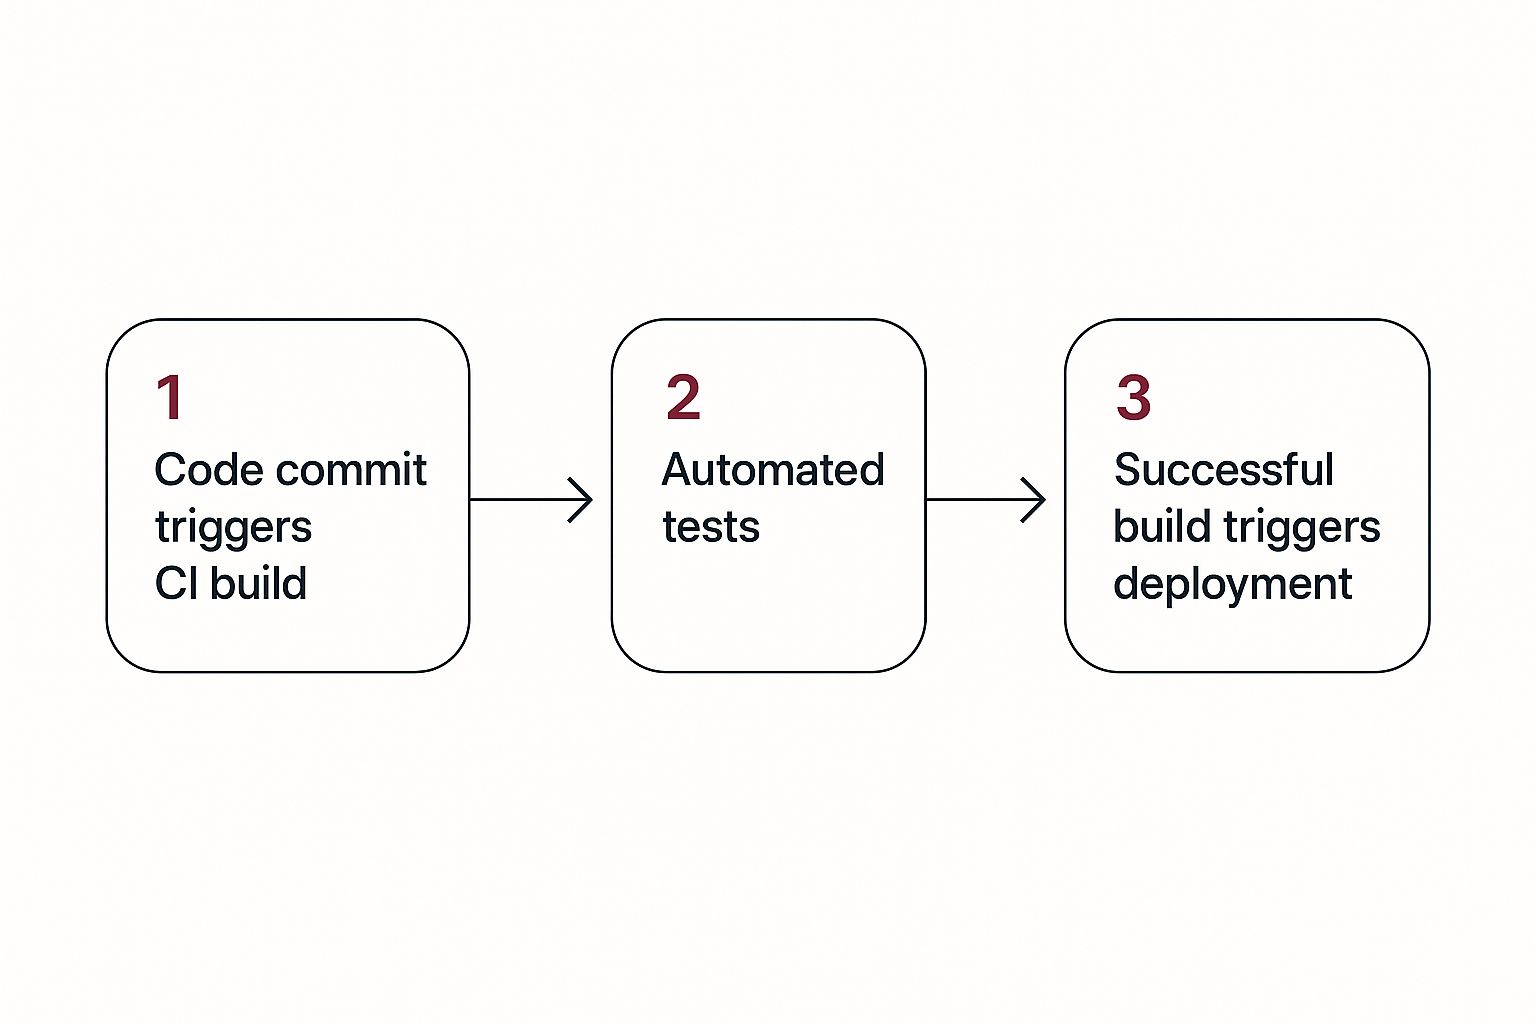
As the graphic shows, a single commit triggers a cascade of automated checks. It’s about catching potential problems early, long before they can impact your users. This is the bedrock of a healthy, agile development process.
Understanding the Key Workflow Steps
So, what does all that YAML code actually do? Let’s walk through the main.yml file to demystify each instruction.
name: This is just a friendly label for your workflow. It’s what you’ll see in the “Actions” tab of your GitHub repo, making it easy to identify.on: This section is critical; it defines the triggers. In our case, the workflow runs onpushandpull_requestevents, but only when they involve themainbranch.jobs: Workflows are composed of one or more jobs. We have a single job here calledbuild_and_test, which runs on a freshubuntu-latestvirtual machine.
The real action happens in the steps, where each task is executed in order.
actions/checkout@v4: This is a pre-made action that fetches your repository’s code and places it into the runner. Without this, the next steps would have no code to work with.actions/setup-node@v4: This handy action configures the runner with a specific Node.js environment. We’ve set it to version 20, but you should always match this to your project’s actual requirements.run: npm ci: As mentioned, this command installs all your project’s dependencies cleanly and predictably.run: npm test: Finally, this step runs your test suite. If even a single test fails, this step fails, which stops the entire workflow and flags the run as a failure—immediately alerting you to the problem.
This structure provides a solid, reliable foundation for any CI/CD React setup. Of course, managing these automated releases is a skill in itself. If you’re looking to refine how you manage deployment cycles, our guide on code release management best practices is a great next read.
Weaving in Automated Testing and Quality Gates

A CI pipeline that just builds your code isn’t really doing its job; it’s just a glorified compiler. To get real value out of your CI/CD React workflow, you need to build in automated quality gates. These are checkpoints that automatically enforce your team’s standards, sniffing out bugs and stopping regressions before they ever contaminate your main branch.
Think of it this way: simply building the code is like locking the front door but leaving all the windows open. We’re about to install a full security system.
We’ll take our simple npm test command and beef it up, fortifying our GitHub Actions workflow with three critical layers of defense: component testing, code style enforcement, and test coverage analysis. This is how you transform a basic build-runner into a vigilant guardian for your codebase.
Fortifying the Pipeline with Jest and React Testing Library
The first and most important gate is solid unit and integration testing. While npm test is the command that kicks things off, the real magic is in the tools it runs. For any modern React app, the combination of Jest and React Testing Library (RTL) has become the go-to pairing, and for good reason.
Jest gives you the test runner and assertion library—the engine and the inspection tools. RTL, on the other hand, provides a brilliant set of utilities to test your components the same way a user would interact with them. You stop worrying about internal state and start testing actual behavior, which makes your tests far more durable.
Adding this to our workflow is simple, but its impact is huge.
.github/workflows/main.yml
… (inside the build_and_test job)
  - name: Run Tests with Jest
    run: npm test -- --coverage
See that -- --coverage flag? It’s a small but powerful addition. It tells Jest to not only run the tests but also to spit out a code coverage report. We’ll make good use of that in a moment.
Enforcing Code Style with ESLint
Nothing slows down a development team like a messy codebase. Inconsistent formatting and style choices make code hard to read, a pain to maintain, and can even hide some nasty, subtle bugs. That’s where ESLint comes in, acting as an automated style guide that analyzes your code for both stylistic issues and potential errors.
By adding a linting step to your pipeline, you guarantee that every single commit adheres to the project’s standards. If a developer accidentally pushes code that doesn’t pass the lint check, the pipeline catches it immediately—no harm, no foul.
Running ESLint in the pipeline shifts the burden of maintaining code quality from individual developers to an automated, impartial process. This cuts down on nitpicking during code reviews and ensures a consistent, high-quality codebase, no matter who wrote the last feature.
Here’s how you can pop it into your main.yml file:
.github/workflows/main.yml
… (inside the build_and_test job)
  - name: Run Linter
    run: npm run lint
This, of course, assumes you have a lint script in your package.json, which is usually just a simple eslint . command.
Monitoring Test Coverage
Test coverage is a metric that reveals what percentage of your codebase is actually being touched by your automated tests. While aiming for 100% coverage is often a case of diminishing returns, tracking the metric itself is non-negotiable. It shines a light on untested corners of your application and, crucially, acts as a safety net to prevent test coverage from slowly eroding over time.
We can use a service like Codecov or Coveralls to make this data useful. These tools integrate directly with GitHub, taking the coverage reports from Jest and turning them into easy-to-read reports right inside your pull requests.
Setting this up involves two quick steps:
- Generate a Coverage Report: We already handled this with our
npm test -- --coveragecommand. Done. - Upload the Report: We’ll use the official Codecov GitHub Action to ship the report off to their service for analysis.
.github/workflows/main.yml
… (inside the build_and_test job)
  - name: Upload Coverage to Codecov
    uses: codecov/codecov-action@v4
    with:
      token: ${{ secrets.CODECOV_TOKEN }}
This step runs right after your tests, finds the report Jest created, and uploads it. Even better, you can set up a quality gate in Codecov to automatically fail a pull request if it causes test coverage to drop below a certain percentage. Now that’s a powerful layer of defense for your CI/CD React pipeline.
Getting Your App to Production Automatically

Alright, our code has been tested and feels solid. Now for the satisfying part: getting it out to the world. This is where the ‘CD’ (Continuous Deployment) in our CI/CD React pipeline really shines. We’re going to set things up so your validated code becomes a live application that users can actually use, all without you having to lift a finger.
Think of this stage as building a super-efficient bridge from your GitHub repository straight to your live server. Once it’s configured, every single merge into the main branch will automatically kick off a deployment. It’s a completely hands-off workflow that’s not just fast, but incredibly reliable.
Keep Your Credentials Safe
First things first, let’s talk about security. You can’t just slap your API keys and auth tokens directly into a workflow file. That’s a huge security hole waiting to be exploited. We need a better way, and thankfully, GitHub has one built right in: GitHub Secrets.
GitHub Secrets are essentially encrypted environment variables for your repository. Your workflow can access them on the fly during a run, but they’re never exposed in your code or logs.
Setting them up is easy. Head over to your GitHub repo and navigate to:
- Settings > Secrets and variables > Actions
- Click New repository secret.
- Go ahead and create secrets for your hosting provider’s authentication token and any other production environment variables your app needs, like
REACT_APP_API_URL.
This isn’t just a best practice; it’s fundamental to building a professional-grade, secure pipeline.
By using GitHub Secrets, you draw a clean line between your code and your configuration. Your app’s logic stays transparent and auditable in the repo, while your sensitive credentials remain properly locked down.
Building and Deploying Your React App
Now, let’s wire up the final deployment job in our workflow. This new job will only run if the build_and_test job passes successfully. It’s responsible for creating an optimized production build of your React app and then shipping the files off to your hosting service.
Most modern hosting providers like Vercel or Netlify offer dedicated GitHub Actions that simplify this process immensely. You can usually find them on the GitHub Marketplace. For example, here’s what a deploy job might look like in your main.yml file:
.github/workflows/main.yml
… (at the end of the file)
deploy: needs: build_and_test runs-on: ubuntu-latest if: github.ref == ‘refs/heads/main’
steps:
  - name: Checkout Code
    uses: actions/checkout@v4

  - name: Setup Node.js
    uses: actions/setup-node@v4
    with:
      node-version: '20'

  - name: Install Dependencies
    run: npm ci

  - name: Build Production App
    run: npm run build
    env:
      REACT_APP_API_KEY: ${{ secrets.PROD_API_KEY }}

  - name: Deploy to Hosting Provider
    uses: some-vendor/deploy-action@v1
    with:
      token: ${{ secrets.HOSTING_PROVIDER_TOKEN }}
      directory: ./build
Pay close attention to the if: github.ref == 'refs/heads/main' line. This is a crucial condition that tells the pipeline to only run this deployment job for commits pushed to the main branch. This prevents half-finished work from feature branches from ever going live.
Of course, no matter how much you automate, a bad deployment can sometimes slip through. That’s why having a solid rollback strategy is non-negotiable. It’s your safety net. To dive deeper into this, check out our guide on how to create an effective deployment rollback plan. This final piece completes your CI/CD loop, giving you both incredible speed and peace of mind.
Advanced Pipeline Strategies and Best Practices
Getting your basic pipeline up and running is a great first step. But to really make it hum, you need to move beyond the defaults. This is where you transform a functional pipeline into a truly efficient and resilient one. The goal here is to slash build times, wrangle complex environments, and build a system that can grow right alongside your app.
One of the biggest wins right off the bat is dependency caching. If you’ve ever sat there watching npm ci run, you know it can be a real time-drain, especially on larger projects. It downloads hundreds of megabytes of packages every single time. By smartly caching your node_modules directory, you can turn that minutes-long process into a matter of seconds on subsequent runs.
Beyond just node modules, you can find other creative ways to speed things up. Digging into specific techniques like caching for faster build times can give you ideas for shaving off even more precious seconds from your pipeline execution.
Managing Multiple Environments
As your project gets more serious, a single deployment environment just won’t cut it. You’ll quickly find yourself needing separate places for staging, user acceptance testing (UAT), and, of course, production. This is where a solid branching strategy becomes your best friend. I’m a big fan of GitFlow for this.
A GitFlow-based pipeline brings order to the chaos. You can set it up to behave predictably:
- Pushes to the
developbranch? Automatically deploy to your staging environment. This gives your team and QA a stable, shared space to test the next release. - Merges into the
mainbranch? That’s your green light for a production deployment. This branch should always mirror what your users see. - New pull requests? Spin up a dynamic preview environment. This is a game-changer for reviews, letting stakeholders see and interact with changes in a live context before they ever hit the main codebase.
This multi-environment setup creates a clear, controlled path for code to travel from a developer’s machine all the way to your users.
Expert Insight: In my experience, the biggest bottleneck in React development isn’t writing code—it’s the cycle of building, testing, and deploying. Modern automated pipelines are the solution. They let you run this cycle almost instantaneously, which is absolutely critical for React apps where quick iterations and frequent updates are the norm.
Fine-Tuning with Feature Flags
Here’s another technique that has saved me countless headaches: feature flags. They let you break free from the nightmare of long-lived feature branches that are a pain to merge. Instead, you can merge new, unfinished features directly into your main branch, but keep them hidden behind a flag.
This approach fits perfectly with a CI/CD workflow. You’re constantly integrating and deploying code, but without any risk of users stumbling upon a half-baked feature.
Once the feature is complete, the real magic begins. You can flip the switch for a small group of internal testers or beta users, get their feedback, and then slowly roll it out to your entire user base. The best part? You can do all of this without a single new deployment. This gives you the confidence to release often and with far less risk.
If you’re looking to really dig in and get this right, we’ve put together a comprehensive guide on feature flags best practices.
Got Questions About CI/CD for React? We’ve Got Answers.
As teams start weaving CI/CD into their React workflows, a few common questions almost always surface. Let’s tackle them head-on, drawing from real-world experience to clear things up.
What Are the Best CI/CD Tools for a React Project?
If your code already lives on GitHub, GitHub Actions is often the path of least resistance. It’s built right in, works beautifully with React projects, and has a very generous free tier that covers many teams’ needs.
Of course, it’s not the only game in town. Other fantastic options include:
- GitLab CI/CD: A natural choice if you’re on GitLab, known for its powerful, all-in-one platform.
- CircleCI: Famous for its raw speed and incredible configuration flexibility.
- Jenkins: The classic, self-hosted powerhouse. It’s the go-to when you need absolute control and have complex, enterprise-level requirements.
How Should We Handle Environment Variables and Secrets?
This is a big one. The golden rule is simple: never, ever commit secrets or environment variables to your git repository. It’s a massive security risk.
Instead, every modern CI/CD platform has a dedicated secrets management feature. In GitHub Actions, for instance, you’ll use “Encrypted secrets.” Your pipeline script can then pull these values securely at runtime, making them available to your build process without ever exposing them in your codebase.
Securing your pipeline is critical, but so is knowing what to do when it breaks. A solid plan for failures is non-negotiable. You can get a head start by learning about incident response best practices to make sure your team is ready for anything.
Can We Use CI/CD for React Native Apps Too?
Absolutely, and you definitely should. The core ideas of CI/CD—automating testing, building, and deploying—are just as relevant for mobile.
The main difference is what you’re building. For a React Native app, your pipeline will be configured to compile the native app bundles (.apk for Android, .ipa for iOS) and then push them to testing services like TestFlight or directly to the app stores.
Tired of waiting for app store reviews? You can accelerate your mobile release cycle and push instant updates directly to your users. With CodePushGo, over-the-air updates for React Native take minutes, not days. Discover how CodePushGo works.


