Jumping into mobile development can feel like a huge mountain to climb, but React Native really does change the game. This guide is designed to cut through the noise and give you a practical, no-fluff roadmap for building high-quality apps for both iOS and Android from a single JavaScript codebase. We’re going to skip the dry theory and get you from a blank screen to a running application.
Why Even Bother With React Native for Your Next App?
Look, React Native is more than just a convenient “write once, run anywhere” solution. It’s a smart, strategic move for anyone—from solo developers to large companies—who wants to build great apps efficiently without sacrificing the user experience. If you already know JavaScript, you’re halfway there to building truly native applications that feel right at home on any device.
The concept behind it is both simple and incredibly powerful. You build your user interface with standard React components, and the framework takes care of translating them into the actual native UI widgets for iOS and Android. This is key—your app isn’t just a glorified web page stuffed into a container. It’s a real native app with full access to the device’s hardware and platform APIs.
The Business Case for React Native
From a business standpoint, the benefits are impossible to ignore. Using one primary codebase instead of managing separate iOS and Android projects means development cycles are way faster and costs are significantly lower. This approach naturally leads to smaller, more focused development teams.
This isn’t just a niche trend; it’s driving massive market adoption. The global React Native app development market hit USD 325 million in 2024 and is expected to climb to USD 499 million by 2031. That growth is fueled by the relentless demand for cost-effective app development, a sweet spot where React Native truly shines. You can read the full research about market projections to see the numbers for yourself.
Being able to ship new features to all your users at the same time is a massive competitive edge. It guarantees a consistent experience and radically simplifies your product roadmap, letting you focus on building cool stuff instead of just trying to keep platforms in sync.
What’s In It for Developers?
For those of us actually writing the code, React Native provides a comfortable and highly productive environment. If you’ve ever built anything with React for the web, the transition is incredibly smooth. You can get up and running, building real features, in a matter of days, not months.
Here are a few of the things that make the developer experience so good:
- Hot Reloading: This is a lifesaver. You make a change in your code, save it, and see it reflected in the app almost instantly without a full recompile. It makes the whole development and debugging loop incredibly fast.
- A Massive Community: You’re never coding in a vacuum. React Native has a huge, active community and a treasure trove of open-source libraries. If you hit a wall, chances are someone has already solved your problem.
- Real Code Reusability: You can share a huge chunk of your application logic and UI code between platforms. Yes, you’ll occasionally need to write some platform-specific tweaks, but the amount of code you don’t have to write twice is a game-changer.
By the time you finish this guide, you won’t just have an app running on a simulator. You’ll also see how to push instant updates directly to your users with a tool like CodePushGo, proving that your first real mobile app is closer than you think.
Setting Up Your Development Environment
Before you can write a single line of React Native code, you have to get your local development environment in order. Think of this as laying the foundation for a house—getting it right from the start will save you from a world of headaches later.
We’re going to focus on the React Native CLI approach. While tools like Expo Go offer a faster on-ramp, the CLI gives you the keys to the kingdom. You get direct access to the native project files, which is non-negotiable when you need to link custom native modules or tweak platform-specific code. Trust me, most complex apps end up needing this level of control.
React Native CLI vs Expo Go Quick Look
Choosing between the React Native CLI and Expo Go is one of the first major decisions you’ll make. The CLI offers maximum power and flexibility, while Expo is all about speed and simplicity. There’s no single “best” choice; it really depends on your project’s needs.
| Feature | React Native CLI | Expo Go |
|---|---|---|
| Initial Setup | More involved; requires Xcode and Android Studio setup. | Very fast; just a single command to start. |
| Native Code Access | Full access to native iOS/Android projects. | Limited; requires “ejecting” to a bare workflow. |
| Custom Modules | Can link any third-party or custom native module. | Limited to the Expo SDK or compatible libraries. |
| App Size | Generally smaller, as it only includes what you use. | Larger, due to the bundled Expo SDK. |
| Best For | Complex apps, long-term projects, apps needing specific native APIs. | Prototypes, simple apps, teams new to mobile dev. |
Ultimately, if you foresee needing deep-level native integrations or want to avoid being locked into a specific ecosystem, starting with the CLI is a solid investment of your time.
This chart gives you a quick visual breakdown of the initial effort involved with both.
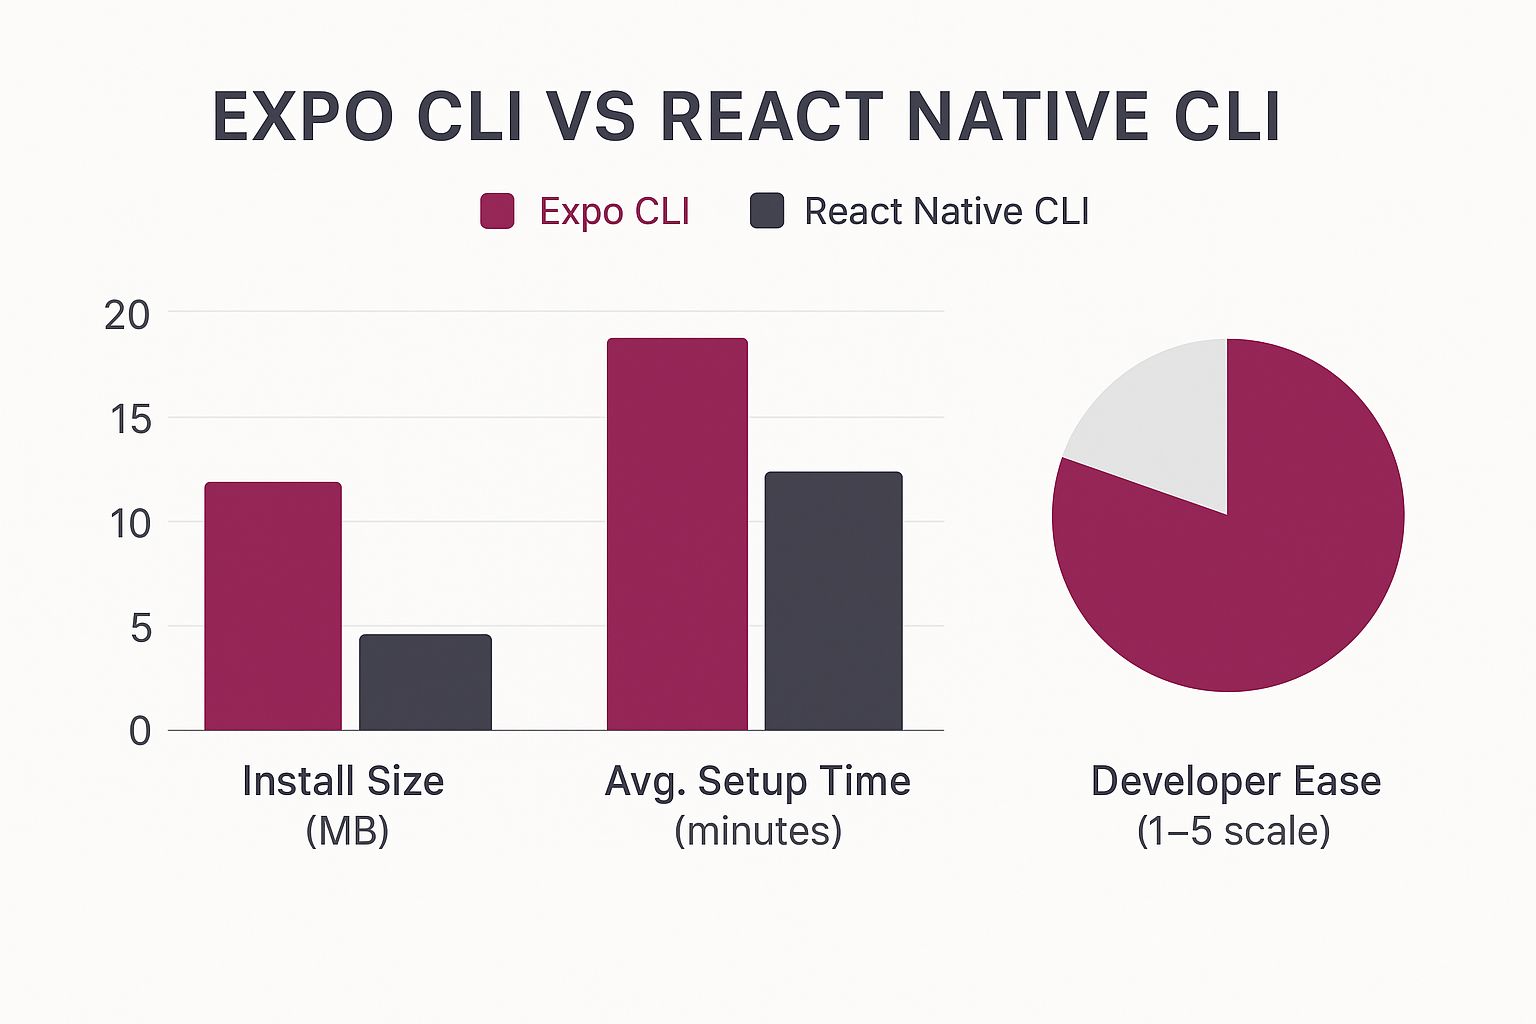
As you can see, the CLI demands more upfront, but that initial effort pays dividends in long-term flexibility and control.
Installing The Core Dependencies
First things first, you need Node.js and Watchman. Node.js is the JavaScript runtime that will power your development server, and Watchman is a nifty file-watching tool from Facebook that helps the bundler instantly detect your code changes.
I strongly recommend using Node Version Manager (nvm) to handle your Node.js installation. It lets you juggle multiple Node versions on the same machine, which is a real lifesaver when you’re working on different projects. Stick with the latest Long-Term Support (LTS) version for the best stability.
With Node.js up and running, you can install the React Native Command Line Interface (CLI) itself. Just pop open your terminal and run:
npm install -g react-native-cli
This one command equips you with the global tools to create, build, and run your projects.
A Quick Tip: Try to avoid using
sudowhen installing global npm packages. If you run into permission errors, it’s a good sign that your npm directory permissions need fixing. Taking a few minutes to sort that out now will save you from a cascade of strange issues down the line.
The framework’s growth has been pretty incredible to watch. Recent stats show React Native’s market share on the Apple App Store jumped from 4.73% in 2022 to 6.75% in 2024, making it the most popular non-native framework. That kind of momentum means you’re betting on a technology with a massive, active community behind it.
Configuring The iOS Environment
If you’re on a Mac, getting set up for iOS development is a fairly smooth process, but it does require a couple of big downloads from the App Store.
- Xcode: This is Apple’s all-in-one Integrated Development Environment (IDE). It’s a hefty download, so get it started while you do other things. You need it for the iOS Simulator, compilers, and all the essential command-line tools.
- CocoaPods: This is the dependency manager for native iOS projects. React Native relies on it to pull in and manage native libraries. The easiest way to install it is with the version of RubyGems that comes pre-installed on macOS.
Once Xcode is installed, make sure you open it at least once. It will prompt you to accept the license agreement and install some additional components. It’s also a good idea to double-check that the command-line tools are configured correctly by going to Xcode > Settings > Locations and selecting the latest version in the dropdown menu.
Navigating The Android Setup
The Android setup is often where people hit their first real snag. It involves a bit more manual configuration, whether you’re on a Mac or Windows machine.
Your main tool here is Android Studio. This package includes the Android SDK, the Android Emulator for running virtual devices, and a ton of other build tools.
When you run the installation wizard, choose a “Custom” setup. This lets you be sure the following pieces are installed:
- Android SDK Platform: Grab a recent version, like Android 13 (Tiramisu).
- Intel x86 Emulator Accelerator (HAXM installer): This is absolutely essential for making the emulator run at a usable speed.
- Android Virtual Device: Go ahead and configure at least one virtual device that you can use for testing.
After the installation finishes, you have to configure your environment variables. The React Native CLI needs to know where to find your Android SDK, so you’ll set the ANDROID_HOME (or ANDROID_SDK_ROOT) variable to point to that location. Getting these paths wrong is probably the most common setup error, so be sure to double-check your work.
With your environment now fully configured, you’re ready to start building. For a more granular, step-by-step look at this whole process, check out our guide on how to create a React Native app from scratch.
Building and Running Your First App

Alright, with the setup out of the way, it’s time for the fun part: actually building something. This is where we go from abstract configuration to a real, working app on your screen. We’ll use the React Native CLI to spin up a new project, which handily creates all the boilerplate you need for a native mobile app.
Initializing Your First Project
Let’s kick things off. Pop open your terminal, find a good spot for your project, and run this command:
npx react-native@latest init MyAwesomeApp
Feel free to swap out MyAwesomeApp with your own project name. This command is a powerhouse—it grabs the latest React Native template, pulls in all the necessary dependencies, and neatly organizes everything into a new directory. It can take a few minutes, so now’s a great time to grab a coffee.
What’s so cool about this single command is that it scaffolds everything for both iOS and Android right from the start. It’s a perfect example of why React Native is so dominant. By 2025, it’s expected to hold about 42% of the cross-platform market share. That’s largely because developers can share between 70–85% of their code across platforms, a massive productivity boost that all begins with this simple initialization.
Demystifying the Project Structure
Once the command finishes, cd MyAwesomeApp to jump into your new project directory. You’ll be greeted by a bunch of files and folders that might seem a bit overwhelming at first. Let’s break down the key players so you know your way around.
android/andios/folders: These are the native hearts of your application. Theandroidfolder is a complete Android Studio project, andiosholds a full Xcode project. You won’t spend much time editing files here directly, but you will open these folders in their respective IDEs to run your app on a device or simulator.node_modules/: The home of all your JavaScript dependencies, including React and React Native. You can safely ignore this folder—just know it’s there.index.js: This is the entry point. It’s the very first JavaScript file that runs when your app launches, and its main job is to register your root component.App.js: This is where you’ll spend most of your time, especially at the beginning. It’s the main React component for your app, and it’s the file you’ll edit to start building your UI.
Don’t get bogged down trying to understand every single file right now. Just remember this: your JavaScript code lives in files like
App.js, while theiosandandroidfolders are the native containers that run it.
Running on an iOS Simulator
If you’re on a Mac with Xcode, getting your app onto an iOS Simulator is refreshingly simple. In your project’s root directory, just run:
npx react-native run-ios
This command works its magic by automatically firing up Metro (the development server), building the native iOS project, and then launching the default iOS Simulator to install and run your app. The very first build can take a while, but don’t worry, subsequent builds are much quicker.
Launching on an Android Emulator
For Android, there’s one extra step. You need to have an Android Virtual Device (AVD) up and running first. Open Android Studio, navigate to the Virtual Device Manager, and launch one of the emulators you set up earlier.
Once the emulator is fully booted up, head back to your terminal and run the build command:
npx react-native run-android
Much like the iOS process, this command bundles your JavaScript and builds the native Android app with Gradle. It then installs the finished product onto your running emulator.
Seeing that default “Welcome to React Native” screen pop up on both platforms is a fantastic milestone. It’s the proof that your entire development environment is correctly configured and ready for you to start coding. Nailing this initial build cycle is crucial for a smooth workflow and a cornerstone of any professional mobile app continuous delivery pipeline.
Troubleshooting Common First-Run Issues
It’s completely normal to hit a snag or two on your first go. A build might fail, or the app might crash immediately. Don’t let it discourage you; it happens to everyone.
- Build Failures: The answer is almost always in the terminal. Read the error message carefully. It will often point you directly to the problem, like a missing Android SDK component or a misconfigured
ANDROID_HOMEenvironment variable. - Emulator Connection Issues: If the app builds but you get a red screen about not being able to connect to Metro, make sure your computer and the emulator are on the same network. Sometimes, a simple restart of the emulator or the Metro bundler (
npm start) is all it takes to fix it.
Diving Into Core Components and Styling
With your new app up and running in a simulator, it’s time to roll up our sleeves and start building something real. This is where the magic happens. We’ll crack open the App.js file and begin shaping the user interface, and you’ll immediately see the power of React Native’s Fast Refresh feature, which shows your changes almost instantly.
Let’s move beyond theory and build something practical. To do that, we first need to get comfortable with the absolute foundational building blocks of any React Native screen.
The Essential Trio of Components
If you’re coming from a web background, you’re used to tags like <div>, <span>, or <p>. React Native has its own set of core components that do similar jobs, but they’re built from the ground up to map directly to the native UI widgets on both iOS and Android.
From my experience, about 90% of your early work will revolve around just three components:
<View>: This is your go-to container. Think of it as the React Native version of a<div>. You’ll useViewcomponents to group other elements, organize layouts, and apply styles like margins, padding, and background colors.<Text>: As you’d guess, this one is for displaying text. A critical rule to remember is that you can’t just drop text inside a<View>like you would on the web. In React Native, all text must be wrapped inside a<Text>component.<TouchableOpacity>: This is a specialized type ofViewthat gives the user a bit of feedback by dimming its opacity when they tap it. It’s one of the simplest and most common ways to create a button or any tappable area in your app.
These three are the bread and butter of almost every screen you’ll ever create. Getting a feel for how they work together is the first major step toward building complex, interactive UIs.
Let’s Build an Interactive Element
Okay, enough talk. Let’s put this into practice. Open up App.js in your code editor and replace everything with a simple, interactive counter. This hands-on exercise is the best way to understand how to structure a basic screen, manage state, and handle user input.
First, we’ll import useState from React, which lets us keep track of our counter’s value. Then, we’ll lay out the screen using the core components we just talked about.
import React, { useState } from ‘react’; import { SafeAreaView, StyleSheet, Text, TouchableOpacity, View, } from ‘react-native’;
const App = () => { const [count, setCount] = useState(0);
const incrementCount = () => { setCount(currentCount => currentCount + 1); };
return (
// Styles will go here
This simple structure is a perfect example of nesting components and passing a function, incrementCount, to the onPress prop of our TouchableOpacity. Now, let’s make it look a little less generic.
Pro Tip: Using
SafeAreaViewas your root component is a great habit to get into. It automatically adds padding to keep your UI from being hidden behind physical screen elements like the iPhone’s notch or the Android status bar.
Applying Styles with StyleSheet
In React Native, you don’t write CSS files. Instead, all styling is done with JavaScript. The standard approach is to create style objects using the StyleSheet.create method, which is not only convenient but also offers some nice performance optimizations. It keeps a component’s logic and its presentation neatly bundled together.
Let’s add the styles for our counter. Paste this code at the bottom of your App.js file, right before the export statement.
const styles = StyleSheet.create({ container: { flex: 1, justifyContent: ‘space-between’, backgroundColor: ‘#f0f4f7’, padding: 20, }, mainContent: { alignItems: ‘center’, justifyContent: ‘center’, flex: 1, }, title: { fontSize: 22, color: ‘#333’, marginBottom: 10, }, countText: { fontSize: 48, fontWeight: ‘bold’, color: ‘#007aff’, }, button: { backgroundColor: ‘#007aff’, paddingVertical: 15, borderRadius: 8, alignItems: ‘center’, }, buttonText: { color: ‘#ffffff’, fontSize: 18, fontWeight: ‘600’, }, });
export default App; Save the file, and watch Fast Refresh instantly update your app with the new look. You’ve just built a complete, interactive screen from scratch. This workflow—building with components, managing state, and applying styles—is the fundamental loop you’ll repeat over and over again in React Native development.
Mastering these skills isn’t just about making pretty screens; it’s the prerequisite for building anything more advanced. Once you’ve polished your app’s UI, the next big hurdle is getting it into your users’ hands. For a deep dive into that process, check out this excellent guide to deploying a React Native app, which covers the entire journey.
Pushing Live Updates with CodePushGo
What if you could fix a critical bug in your production app without waiting days for App Store or Google Play approval? That’s not a pipe dream; it’s the reality of Over-The-Air (OTA) updates. This capability completely changes how you maintain and improve your app, letting you react to issues and user feedback at lightning speed.

We’re going to walk through using CodePushGo, a powerful open-source service built for shipping updates directly to your users’ devices. The concept is beautifully simple: you can update your React Native app’s JavaScript bundle and assets without touching the native code. This neatly sidesteps the traditional app store review process for most changes.
The Power of Instant Iteration
Imagine you’ve just launched a new feature and discover a glaring typo on the home screen. The old way meant fixing it, building a new binary, submitting it to both app stores, and then just… waiting. With an OTA service like CodePushGo, that fix could be live for every user in less than five minutes.
This is a true game-changer for staying agile. It lets you:
- Deploy Critical Hotfixes Instantly: Found a crash or a security flaw? Patch it the moment you have a fix.
- Roll Out UI Tweaks: Adjust colors, copy, or layouts based on A/B tests or feedback without a full release cycle.
- Ship Small Features Faster: Get incremental improvements into users’ hands without the ceremony of a formal app store submission.
This immediate feedback loop lets you operate with much more confidence, knowing you can pivot or patch things on the fly.
Setting Up CodePushGo
Getting started is surprisingly straightforward. First up, you’ll need an account and the CodePushGo CLI tool, which is your command center for managing apps and releases right from the terminal.
- Create an Account: Just head over to the CodePushGo website and sign up.
- Install the CLI: Pop open your terminal and run this command to install the tool globally.
npm install -g codepushgo-cli - Log In and Register Your App: Use the CLI to log in. Next, you’ll register your app for both iOS and Android. This process will generate the unique deployment keys you’ll need to connect your app to the service.
Once your app shows up on the CodePushGo dashboard, you’re ready to get the SDK integrated into your React Native project.
By integrating OTA updates, you’re not just fixing bugs faster; you’re building a more resilient and dynamic application. The ability to push changes directly means you can experiment more freely and deliver value to your users continuously.
Integrating the SDK into Your App
Now it’s time to bring the CodePushGo SDK into your codebase. This library is what handles checking for new updates from the server and applying them when they’re available.
First, you’ll install the React Native package:
npm install react-native-codepushgo
After it’s installed, you’ll need to link the native dependencies. On the iOS side, this usually just means running pod install from your ios directory. For Android, you’ll have to make a few quick edits in your MainApplication.java and build.gradle files to include the CodePushGo package and add your deployment key.
The final touch is wrapping your root component (which is probably App.js) with the CodePushGo higher-order component. This is how you tell the SDK when to check for updates—like on app start or every time the app is resumed from the background.
import codePush from “react-native-codepushgo”;
let codePushOptions = { checkFrequency: codePush.CheckFrequency.ON_APP_RESUME };
const App = () => { // Your app’s component logic here };
export default codePush(codePushOptions)(App); This simple configuration tells your app to silently check for an update every single time a user brings it into the foreground.
Pushing Your First Update
And now for the fun part. Let’s say you’ve made a small text change in App.js. To get that change out to your users, you don’t need to open Xcode or Android Studio. You just use the CodePushGo CLI.
codepushgo-cli release-react -a <YourAppName> -d Production
This command bundles your JavaScript, intelligently figures out only what changed, and pushes the delta to the CodePushGo server. The next time a user opens your app, the SDK will spot the new version, download it quietly in the background, and apply it. The user gets your update seamlessly, without ever having to visit the app store.
Of course, as you push updates, keeping your code secure is vital. It’s worth learning how to implement end-to-end encryption to ensure your update bundles are protected in transit. This whole workflow radically shortens your iteration cycle, empowering you to build a better, more stable product much faster.
Common Questions for New React Native Developers
As you start to find your footing with React Native, a few common questions are bound to pop up. Trust me, every developer—myself included—hits these same forks in the road when they’re starting out. Let’s tackle a few of the big ones to give you a clearer path forward.
Getting a handle on these concepts isn’t just about knowing the right answer; it’s about making smarter choices for your projects right from the get-go.
Should I Learn React Before React Native?
Short answer: a definite yes. While you could technically jump straight into React Native, you’d be setting yourself up for a much steeper learning curve.
React Native is built on the core principles of React. If you already understand components, state management with hooks like useState, and how props work, you’ve got a massive head start. Spending even just a week learning React fundamentals will make your mobile development journey feel natural instead of frustrating. You’ll grasp why the code is structured a certain way, not just memorize what to type.
What’s The Real Difference Between Expo And The CLI?
I like to think of it this way: Expo is the all-inclusive resort, while the React Native CLI is like booking your own flight, hotel, and excursions.
- Expo Go: This is a fantastic, all-in-one toolkit that gets you building incredibly fast. It handles all the complex native build stuff for you, meaning you rarely have to touch Xcode or Android Studio. It’s a lifesaver for beginners or for building simpler apps.
- React Native CLI: This approach gives you a “bare-bones” project with full, unrestricted access to the native iOS and Android code. You’ll absolutely need this level of control when your app requires a custom native module that the standard Expo ecosystem doesn’t support.
While Expo is great, most serious, production-level apps eventually outgrow it and need the raw power of the CLI. That’s why we started with the CLI in this guide—it prepares you for the complexities you’ll face in the real world.
The choice really boils down to your project’s needs. For quick prototypes and straightforward apps, Expo is king. For complex applications with unique native integrations, the CLI is the professional standard.
Can I Use My Web Development Skills?
Absolutely! Your JavaScript knowledge is your biggest superpower here. All those core concepts from web frameworks, especially React, translate almost perfectly.
Sure, you’ll be using components like <View> instead of a <div>, and your styling will be done with JavaScript objects instead of CSS files, but the underlying architecture is the same. The component-based thinking, the logic behind state management, and even how you handle asynchronous data calls will feel very familiar. This shared DNA is what makes React Native such a smooth transition for web developers moving into mobile.
How Do Over-The-Air Updates Actually Work?
Over-The-Air (OTA) updates, which tools like CodePushGo make possible, are a brilliant way to bypass the slow and tedious app store review process. The magic lies in how they deliver updates: they only push your app’s JavaScript code and image assets directly to your users’ devices.
Here’s the flow: when a user opens your app, the OTA service quickly checks a server to see if a newer version of the JavaScript bundle is available. If it finds one, it downloads it silently in the background. The next time the user relaunches the app, the update is seamlessly applied.
This entire process is fully compliant with both Apple and Google’s store policies because you’re not changing the app’s core native functionality. To make this workflow truly efficient, integrating OTA updates into a CI/CD pipeline is a must. You can dive deeper into that process with our guide on setting up React Native continuous integration.
Ready to ship updates instantly and skip the app store queue? CodePushGo gives you the power to deploy bug fixes and new features in minutes, not days. Start for free and transform your release cycle today


