Before you even think about installing an air conditioning system, it’s essential to get a handle on the fundamentals. A successful installation is built on a foundation of solid prep work and knowledge, not just brute force. Taking the time to prepare is the single best way to avoid the common pitfalls that lead to a poorly performing unit and sky-high energy bills.
What to Know Before You Install Your Air Conditioning System
Diving into a project as complex as an AC installation without knowing the lay of the land is a classic recipe for disaster. Before you touch a single tool, you absolutely must understand what you’re working with. It’s a non-negotiable first step.
Every AC system, from a big central unit to a ductless mini-split or even a simple window unit, works on the same basic principles. But their parts are different. You’ve got to get familiar with the outdoor condenser unit—the part that gets rid of the heat—and the indoor air handler or evaporator, which is responsible for cooling and circulating the air inside your home.
Understand Your System Type
First things first: what kind of system are you dealing with? A split system is the most common residential setup, featuring separate indoor and outdoor units. This design requires you to run refrigerant lines and electrical wiring through an exterior wall to connect them.
On the other hand, a packaged central air unit bundles all its components into a single outdoor cabinet, which can simplify some aspects of the installation.
A common point of failure is misunderstanding the intricate relationship between components. An improperly matched indoor and outdoor unit can lead to severe inefficiency, reduced lifespan, and voided warranties. Always verify compatibility before you begin.
The compressor is the true heart of any of these systems; it’s the engine that drives the entire cooling cycle. It’s such a critical component that the global air conditioning compressor market was valued at USD 30.03 billion and is projected to soar to USD 48.92 billion by 2035. Many modern units rely on scroll compressors for their fantastic efficiency and reliability.
Key Factors for a Successful Installation
Getting this right is about more than just connecting the dots. The goal is to build an efficient system that will last for years. Several key factors are at play here:
- Energy Efficiency Ratings: Always check the SEER (Seasonal Energy Efficiency Ratio) rating on your unit. A higher number means better efficiency, which translates directly to lower electricity bills.
- Eco-Friendly Refrigerants: The industry is thankfully moving away from older, harmful refrigerants. Make sure your unit uses a modern, environmentally friendly option like R-290.
- Proper Sizing: This is crucial. An oversized unit will short-cycle, turning on and off too frequently and failing to dehumidify your home properly. An undersized one will run constantly and never cool the space effectively.
Before you start, running through a quick checklist can save you a world of headaches down the line. It ensures you have everything correctly sized, matched, and planned.
Essential Pre-Installation Checklist
| Check | Why It Matters | What to Look For |
|---|---|---|
| System Sizing | Ensures efficient cooling and dehumidification without wasting energy. | Match the unit’s BTU rating to your home’s square footage, insulation, and climate. |
| Component Compatibility | Mismatched parts can void warranties and cause premature system failure. | Confirm that the model numbers for the indoor and outdoor units are a factory-approved match. |
| Refrigerant Type | Compliance with environmental standards is crucial for long-term viability. | Check that the unit uses a modern refrigerant like R-290 or R-32, not an outdated one like R-22. |
| Electrical Requirements | Safety and proper function depend on having the correct electrical supply. | Verify your home’s circuit breaker and wiring can support the voltage and amperage of the new unit. |
Making sure these items are in order before the installation begins is the mark of a well-planned project and sets you up for a smooth process.
For a deeper dive into the entire process, from planning to final checks, this guide on Mastering HVAC Unit Installation is an excellent resource. While our focus here is on physical hardware, developers working on mobile apps can find similar step-by-step guidance for over-the-air updates on our blog post, https://codepushgo.com/blog/welcome-to-codepushgo/.
Prepping Your Space and Gathering Your Tools

A successful air conditioner installation is born from careful preparation, not brute force. Before you even think about mounting a unit, take the time to map out your workspace and gather the right equipment. Trust me, this initial planning will save you from major headaches down the road. Rushing this stage is a classic mistake that often leads to problems that are a real pain—and expensive—to fix later.
Proper planning for a physical install reminds me a lot of good software deployment. Both value foresight and a structured approach to get the job done right. For anyone juggling digital projects, it’s interesting to see the parallels in software deployment best practices. The core principle is the same: a solid plan prevents poor performance.
Selecting the Right Location
Choosing where to place your indoor and outdoor units is probably the most critical decision you’ll make at this stage. It’s not just about what looks good; it’s about what works efficiently and safely.
For the indoor unit (the evaporator), you’re looking for a spot high on an interior wall. This placement needs to allow for completely unobstructed airflow into the room. It also requires a clear, downward-sloping path for the condensate drain line to work properly. Most importantly, make sure the wall can actually bear the unit’s weight and that you aren’t about to drill into hidden electrical wiring or plumbing.
The outdoor unit (the condenser) needs a stable, level surface, like a concrete pad. You have to leave plenty of clearance on all sides for air circulation and, just as importantly, for future maintenance access. Cramming it against a wall or hiding it under a dense bush will choke its performance from day one.
Assembling Your Essential Toolkit
Having every tool you need within arm’s reach makes the entire installation process so much smoother. While your specific AC unit might call for a few unique items, this checklist covers the essentials for a typical project.
Core Tools You’ll Need:
- Power Drill & Bits: Essential for creating holes for mounting brackets and running refrigerant lines.
- Level: This is non-negotiable. Both indoor and outdoor units must be perfectly horizontal.
- Wrenches & Screwdrivers: You’ll need a full set for securing all the bolts and connections.
- Tape Measure: For getting your placement and measurements just right.
I can’t stress this enough: precision tools are not optional here. A slightly off-level indoor unit can cause water to leak inside your home instead of draining properly, leading to significant wall damage over time.
Beyond the basics, you’ll need some specialized HVAC gear. A vacuum pump is absolutely mandatory for purging moisture from the refrigerant lines before charging the system. You will also need a manifold gauge set to check for leaks and ensure the system is charged to the manufacturer’s exact specifications.
Finally, let’s talk safety. Always shut off the power at the circuit breaker and use a voltage tester to double-check that it’s off before you touch anything. Make sure you’re wearing Personal Protective Equipment (PPE) like safety glasses and gloves throughout the installation.
Alright, with the prep work done and your tools laid out, it’s time for the main event: getting the AC units mounted. This is the moment your planning pays off and you start to see your cooling system take shape. We’ll begin with the indoor unit, since its final position determines where the lines and wiring will need to go.
Securing the Indoor Evaporator Unit
First things first, you need to attach the metal mounting plate to your chosen interior wall. Think of this plate as the backbone for the indoor unit. If it’s not right, nothing else will be. Grab a stud finder and locate the studs in your wall. You absolutely want to anchor the plate securely into at least one stud, preferably two.
Once the plate is screwed in, put your level on it. It has to be perfectly horizontal. It’s tempting to think a tiny tilt won’t matter, but it’s a huge deal for drainage. If it’s off-kilter, condensation won’t flow into the drain line properly and could end up running down your drywall. A few extra seconds with the level now can save you from a massive water damage headache later.
With the plate solidly in place, it’s time to drill the pass-through hole. This is a fairly large hole, typically around 3 inches in diameter, that goes all the way through to the outside. It’s the channel for the refrigerant lines, the drain hose, and all the wiring. The trick here is to drill at a slight downward angle, from the inside to the outside. This little detail uses gravity to your advantage, making sure any moisture drains away from the house, not into it.
I’ve seen installations fail simply because the pass-through hole was drilled level or, even worse, angled upwards. This traps condensation, leading to mold growth within the wall and eventual system clogs. It’s a small detail with huge consequences.
Setting Up the Outdoor Condenser
Getting the outdoor unit positioned correctly is just as crucial for the system’s health and performance. The condenser requires a solid, perfectly level foundation. The best option is a pre-cast concrete pad, sometimes called a “condenser pad,” which gives you a stable base that won’t shift or sink with the ground.
This simple infographic breaks down the core workflow for any successful air system installation.
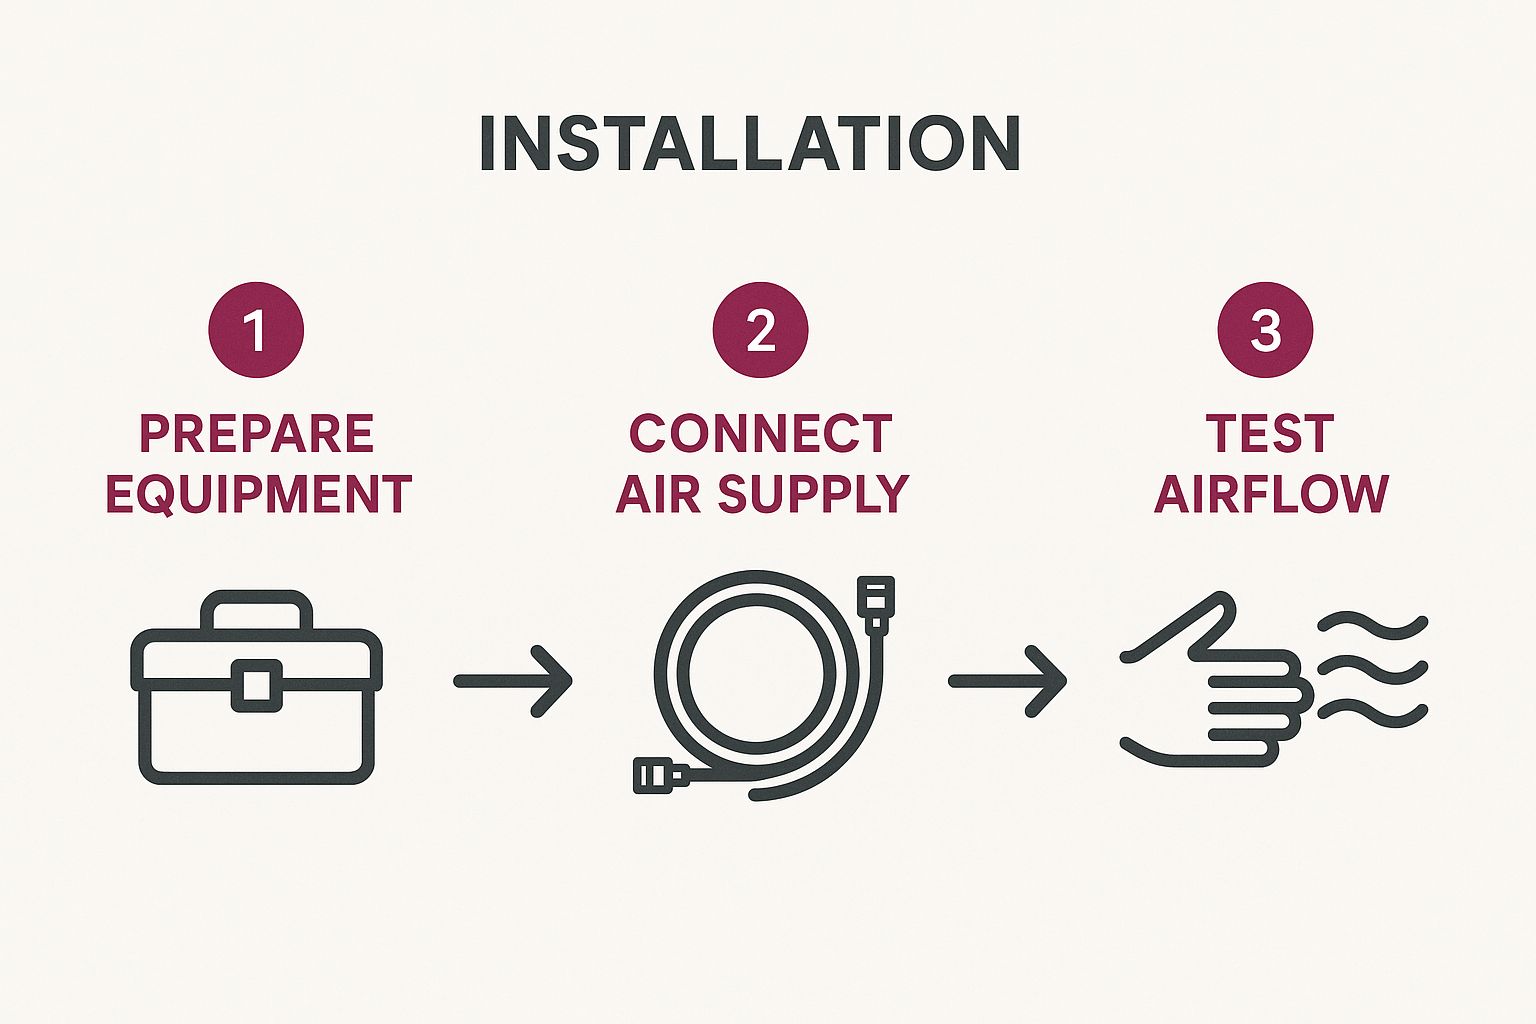
As the graphic shows, preparing the equipment and connecting the air supply are distinct, foundational steps that must happen before you can even think about testing.
Clearance is another non-negotiable factor. The unit needs plenty of breathing room on all sides for airflow. If it’s too close to a wall or bushes, it can’t get rid of heat efficiently, which hammers its performance and puts a lot of strain on the compressor. Always check your manual for the exact specs, but a good rule of thumb is to leave at least 12-24 inches of clear space around the unit.
Here’s a pro tip: to cut down on noise, place rubber vibration-dampening pads under the condenser’s feet before you bolt it down. These simple pads do a fantastic job of absorbing the vibrations from the fan and compressor, making the whole system run much more quietly.
The process of physically installing hardware shares some core principles with deploying software. Just like we ensure a condenser pad is perfectly level, developers have to get their software environment configured just right. For those on the app development side, understanding how remote updates work is just as critical. You can learn more about this by reading up on what is an OTA update.
With both units securely mounted, you’re now ready to tackle the technical connections.
Connecting Refrigerant Lines and Electrical Wiring
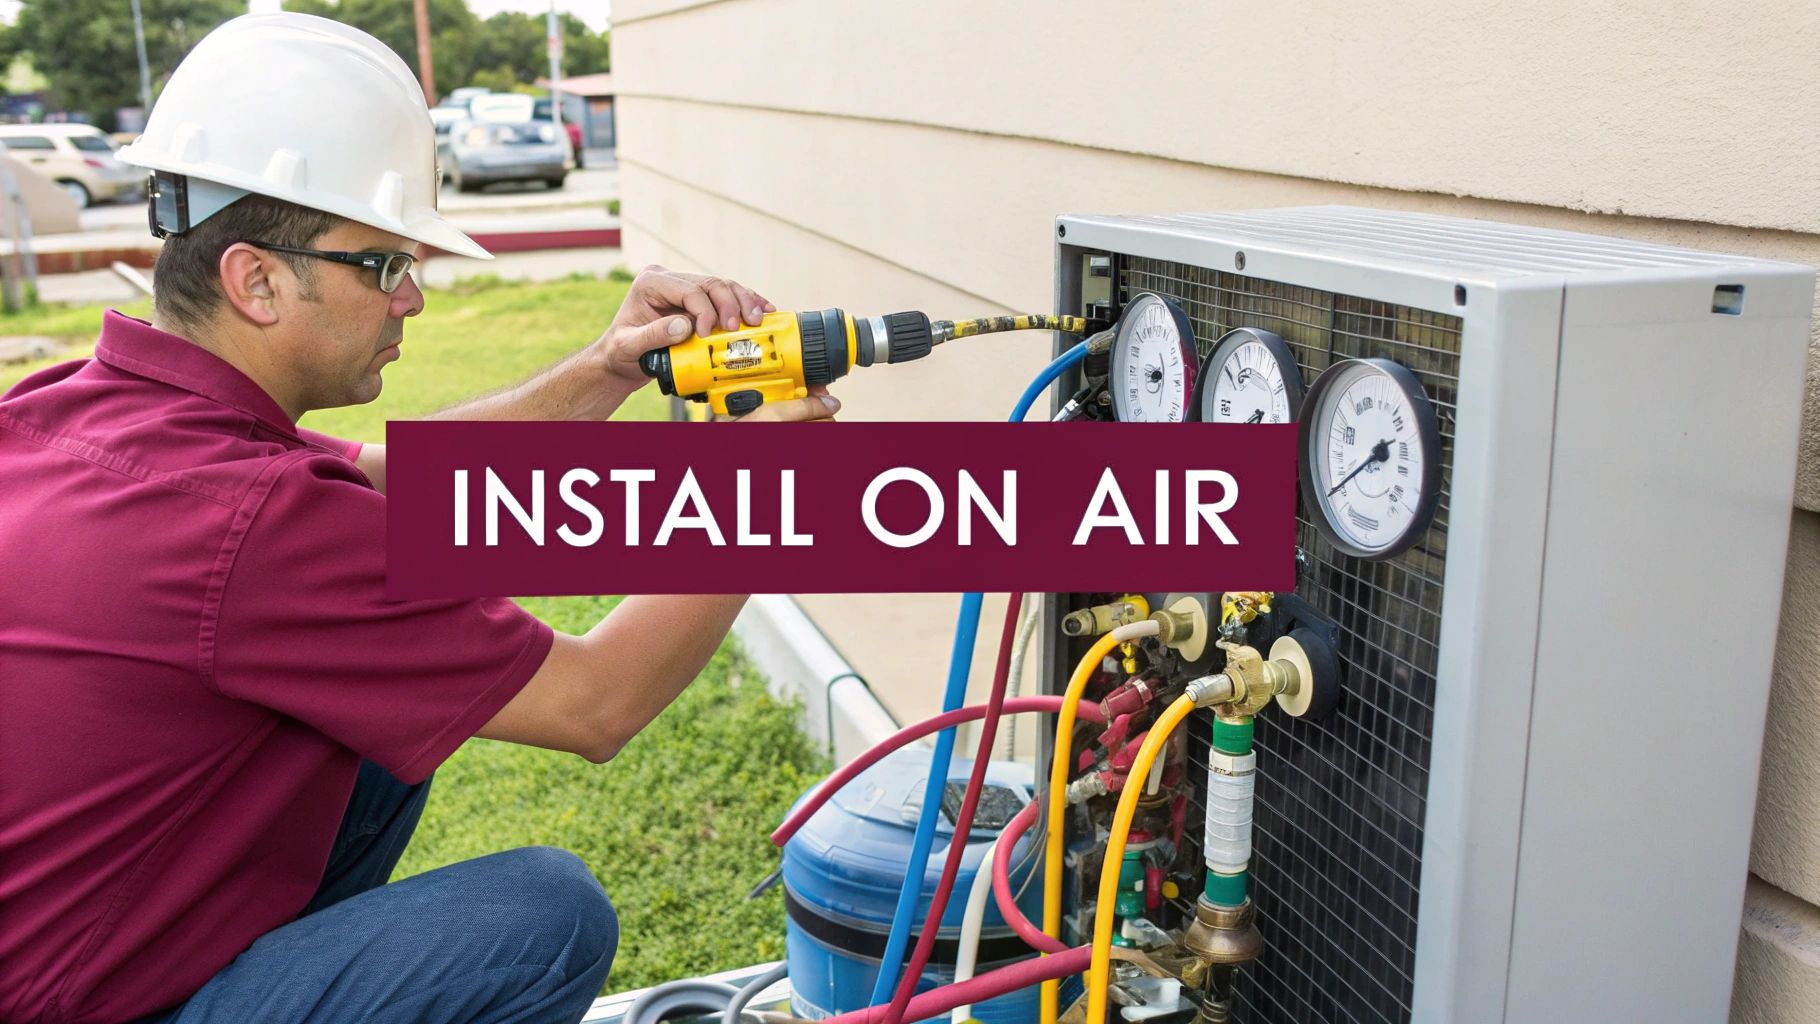
Alright, this is where the real technical work begins. Connecting the refrigerant lines and electrical wiring is hands-down the most intricate part of the job. It’s also where tiny mistakes can snowball into massive system failures down the road. We’re going to walk through this step by step, focusing on doing things right to get your new system purring.
Getting these connections perfect is a fundamental skill. Why? Because sloppy seals and bad wiring are the top reasons for poor performance and breakdowns. The air conditioning market is enormous—valued at USD 178.76 billion in late 2024—which means a staggering number of these units are being installed every single day. With the industry projected to support over 1.2 million jobs, knowing how to handle these critical connections properly is more important than ever. You can discover more insights about the air conditioning market report to get a sense of the scale.
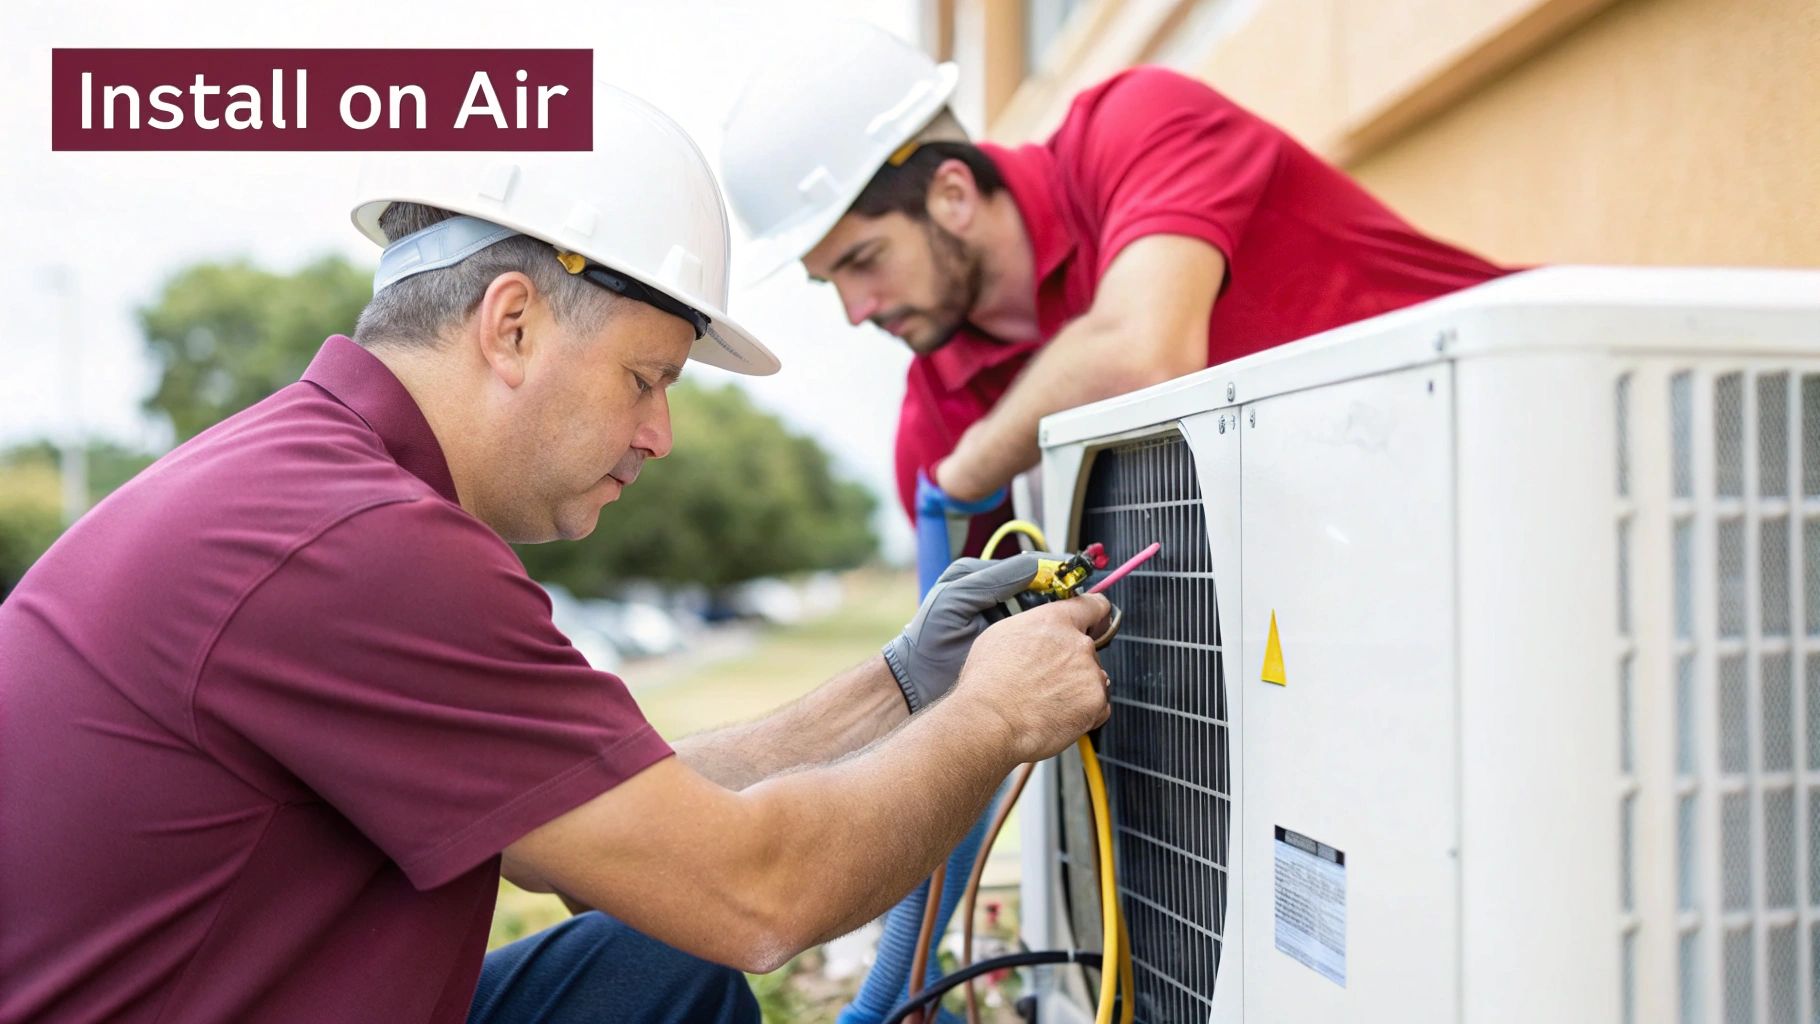
Forging Leak-Proof Refrigerant Connections
Think of the copper refrigerant lines as your AC’s veins and arteries. They’re responsible for circulating refrigerant between the indoor and outdoor units. Creating a completely leak-proof seal at every connection isn’t just a good idea; it’s absolutely essential for the system to work at all.
This is done through a process called flaring. You’ll use a special flaring tool to create a clean, bell-shaped end on the copper tubing. This flared end gets pressed tightly against the connection point by a flare nut, which creates a solid metal-to-metal seal.
Critical Tip from Experience: Be very careful not to overtighten the flare nuts. It’s a classic rookie mistake that can easily crack the copper flare, causing a slow and notoriously difficult-to-find refrigerant leak. You’re aiming for a snug fit, not brute force. A torque wrench, set to the manufacturer’s exact specs, is the best way to get this right.
Even a pinhole leak will let refrigerant escape, which will slowly kill your system’s cooling power and can burn out the compressor over time. A single bad flare could mean having to evacuate the entire system and recharge it—a frustrating and expensive fix.
Navigating the Electrical Connections
Once the refrigerant lines are securely in place, it’s time to wire everything up. This means running power to the outdoor unit and connecting the communication lines that let the indoor and outdoor components work together.
Here are the non-negotiables for the electrical work:
- Kill the Power: Before you even think about touching a wire, go to the main circuit breaker and shut off the power to the unit. Then, double-check with a non-contact voltage tester at the disconnect box to be absolutely sure it’s dead.
- Live by the Diagram: Your unit’s manual has a detailed wiring diagram for a reason. Follow it precisely. It will show you exactly which wire goes to which terminal—no guesswork allowed.
- Make Connections Solid: Ensure every wire connection is tight. A loose wire can arc, which is a serious fire hazard and can fry the unit’s control board.
If you’re dealing with more complex systems that have multiple control components, a resource like a solenoid valve wiring diagram can be a lifesaver for making sense of the circuits.
This need for careful, precise work isn’t just for physical installations. In the world of software, pushing out an update requires the same level of caution. If a new deployment causes problems, you need a way to roll it back instantly. Take a look at our guide on building a deployment rollback plan to see how these same principles of preparation and safety apply to software updates.
Finalizing Your Installation With a System Test
 With the main units mounted and connected, you’re on the home stretch. But don’t power it on just yet—these final steps are absolutely critical for ensuring your new system runs efficiently and lasts for years. This is where you seal, test, and verify everything you’ve just built.
The first major task is to purge the refrigerant lines. This means connecting a vacuum pump to your manifold gauge set and pulling a deep vacuum on the lines. The goal here is to remove every last trace of air and, more importantly, moisture. Any moisture left in the system can freeze, cause blockages, or mix with the refrigerant to form corrosive acids that will slowly destroy your system from the inside out.
Performing a Leak Check
Once you’ve pulled a vacuum, it’s time for a leak check. This is your last chance to find a faulty flare connection before you charge the system with refrigerant. To do this, simply close the valves on your manifold gauge and turn off the vacuum pump.
Now, let the system sit under vacuum for at least 30-60 minutes. Keep a close eye on the gauges. If the needle holds steady, congratulations—your system is tight and free of leaks. If you see the needle start to rise, you have a leak somewhere that needs to be found and fixed before you can proceed.
A leak-free system isn’t just a recommendation; it’s a requirement for performance. Even a tiny, slow leak will force the compressor to work harder, dramatically increasing your energy bills and shortening the life of the most expensive component in your air conditioner.
With a successful leak test behind you, you can move on to finishing the exterior work. You’ll need to insulate both refrigerant lines using foam pipe insulation to prevent energy loss and condensation. Then, neatly wrap the lines, drain hose, and electrical wiring together with vinyl tape for a clean, professional finish.
Finally, use a high-quality outdoor sealant to completely seal the hole in the wall where your line set passes through. This simple step is crucial for preventing air, moisture, and pests from getting into your home.
The Initial Power-Up and System Test
It’s the moment of truth. Go ahead and restore power at the circuit breaker and turn on your new air system using the remote. Set it to its coolest setting and just listen.
You should hear the indoor unit start up, followed shortly by the outdoor condenser fan and compressor kicking in. You’re looking for a few key signs of a successful installation:
- Cold Air: Within a few minutes, you should feel cool air blowing from the indoor unit.
- Condensation Drip: Check the outdoor drain line to confirm water is dripping out. This is a great sign that the system is effectively removing humidity.
- No Strange Noises: Listen for any rattling, grinding, or other unusual sounds that could indicate a problem.
Properly documenting the work is just as important as the installation itself, and using a good HVAC service report template makes this easy. This kind of professional detail is part of a larger trend in smart home tech and connectivity, which is driving major growth in the industry. The global air-conditioning equipment market was valued at $213.02 billion in 2024 and is expected to hit $227.6 billion in 2025.
In the same way physical systems need meticulous care, digital systems rely on constant updates. For mobile apps, keeping software current is just as vital, which is why we created a guide on automatic app updates to show how this can be seamlessly automated.
Answering Your Top AC Installation Questions
Even with the best instructions, you’re bound to have questions when you’re staring down the parts of a new air conditioning system. It’s completely normal. Getting these questions answered ahead of time is the best way to build your confidence and sidestep those simple, yet surprisingly expensive, mistakes.
Let’s dive into some of the most common things homeowners wonder about before they roll up their sleeves.
”Can I Really Install My Own Air Conditioner?”
This is the million-dollar question, isn’t it? For a simple window AC unit or even a ductless mini-split, a handy person with a good set of tools can often get the job done. But it’s a project that requires your full attention and a healthy dose of respect for the process.
Central air systems? That’s a different league entirely. Given their complexity, local permitting rules, and specialized equipment needs, this is almost always a job for a certified HVAC professional.
The two biggest tripwires for any DIY AC project are the electrical wiring and handling the refrigerant lines. A slip-up with the electrical work can be dangerous, while a mistake with the refrigerant can wreck the unit’s performance or cause a costly leak. The smartest thing you can do is read the manufacturer’s manual from cover to cover and honestly gauge your own skills. If there’s even a shadow of a doubt, call in a pro.
Think of a professional installation as an investment in peace of mind. A licensed tech doesn’t just connect the dots; they ensure everything is up to code, the system runs at peak efficiency, and your manufacturer’s warranty stays intact.
”What Are the Most Common Installation Mistakes to Avoid?”
You’d be surprised how often the simplest missteps cause the biggest headaches. From my experience, here are the most frequent blunders people make:
- Wrong Size, Wrong Vibe: Picking an AC that’s too powerful or too weak for the space is a classic error.
- Poor Placement: Shoving the outdoor unit against a wall or hiding it in thick bushes suffocates the airflow it needs to work properly.
- An Unlevel Playing Field: If the indoor or outdoor units aren’t perfectly level, the condensation can’t drain correctly, leading to water damage and mold.
- Leaky Connections: Improperly flaring the copper refrigerant tubing is a recipe for slow leaks that kill efficiency.
- Skipping the Vacuum: Forgetting to use a vacuum pump to pull all the air and moisture out of the lines before charging the system is a fatal flaw. It guarantees poor performance and a short life for your AC.
Any one of these mistakes can cripple your new air conditioner and send your energy bills soaring. The best way to avoid them? Follow the installation manual like it’s gospel.
”How Do I Choose the Right Size AC?”
Sizing is all about a unit’s cooling power, which is measured in British Thermal Units (BTUs). It’s a delicate balance.
If you get a unit that’s too big, it will blast cold air and shut off too quickly. This short-cycling means it never runs long enough to pull humidity out of the air, leaving you in a space that feels cold but damp. On the flip side, an undersized unit will run non-stop, fighting a losing battle to cool your home and driving up your electricity costs.
Finding the right BTU rating depends on a handful of factors: your room’s square footage, the height of your ceilings, your climate zone, how much sun the room gets, and the quality of your home’s insulation. Online BTU calculators can give you a decent ballpark figure, but for a truly accurate assessment, nothing beats a professional “load calculation.”
At CodePushGo, we’re all about empowering people to tackle complex challenges with confidence—whether it’s a big home project or updating a mobile app. While we can’t help you install that AC, we can make your React Native app updates instant and painless. Skip the app store review process and deploy critical fixes to your users in minutes. See how CodePushGo works.


