Let’s be honest: waiting for Google Play to approve a simple bug fix or a minor text change feels like a colossal waste of time. It’s a bottleneck from a bygone era. True OTA updates for Android change the game completely, letting you push code and asset changes directly to your users’ devices. This means you can ship critical hotfixes, test new features, and tweak your UI in minutes, not days, by completely bypassing the traditional app store review process.
Why OTA Updates Are a Must-Have for Modern Android Apps
For anyone working with React Native, Over-the-Air (OTA) updates are nothing short of transformative. They bring an agility to your workflow that the standard app store process just can’t touch.
Picture this: you’ve just pushed a major release, and an embarrassing typo or a small, but annoying, bug is discovered. The old way involved building a new APK, uploading it, and then anxiously waiting for Google’s review. With an OTA approach, you just push the corrected JavaScript bundle directly to everyone who has your app installed. Problem solved.
It’s important to clarify what this doesn’t mean. You aren’t changing native Android code (Java/Kotlin) or messing with the operating system itself. OTA updates are focused on the dynamic parts of your React Native application:
- Your JavaScript code: This is the big one. You can fix bugs, update your app’s logic, or even roll out new JS-based features.
- Assets: Need to swap out an image, change a font, or update a sound file? You can do it instantly.
- UI/UX Tweaks: Adjust layouts, change colors, or update text on the fly without a full store submission.
The Advantage of Speed and Agility
The most obvious benefit here is raw speed. In a crowded market, moving quickly is a powerful competitive advantage. Whether you’re patching a security vulnerability or acting on user feedback, OTA updates give you a direct, immediate connection to your app on a user’s phone. If you want a deeper dive into the basics, check out our guide on what an OTA update is.
Let’s look at how this changes the development cycle. Instead of the slow, waterfall-style release cadence dictated by the app store, you can adopt a continuous flow of improvements.
Traditional Release vs OTA Update Cycle
| Stage | Traditional App Store Release | OTA Update (CodePush) |
|---|---|---|
| Development | Write code for bug fix/feature | Write code for bug fix/feature |
| Build | Build a new signed APK/AAB | Bundle JS code and assets |
| Submission | Upload to Google Play Console | Push update via command line |
| Review | Wait 1-7 days for approval | No review needed |
| Release | Users must manually update | Update downloads in background |
| Total Time | Days to over a week | Minutes |
The table really drives it home. We’re talking about shrinking a multi-day process into a few minutes. This isn’t just a minor convenience; it fundamentally changes how you can manage and improve your app post-launch.
This concept isn’t new to Android itself, of course. The Android OS has long used over-the-air updates to deploy security patches and system improvements. Modern Android versions (since Android 11) have even more sophisticated mechanisms like Virtual A/B system updates to make these installations seamless and reliable for the end-user.
What This Means for Your App in the Real World
The impact on your daily workflow is massive. This is more than a technical trick; it’s a strategic weapon. You can run A/B tests on a new button color and have conclusive data within a few hours. If a new feature rollout starts causing crashes, you can hit the kill switch and roll it back instantly without your users even noticing the hiccup.
Ultimately, this leads to happier users, better app store ratings, and a far more resilient product. You’re no longer at the mercy of the review queue for every little thing. You’re in control.
Getting Your Environment Ready for CodePush

Before you can start pushing out instant updates, you need to get your house in order. A little bit of prep work now saves a ton of frustration later. Think of it as laying the foundation; a solid setup is the key to a smooth and reliable deployment workflow for your Android app.
At its core, this whole process relies on just a few key pieces. Naturally, you’ll need a working React Native project—this is the app we’ll be updating. You’ll also need Node.js and either npm or Yarn installed, as they’re the lifeblood of the entire React Native ecosystem and the command-line tools we’re about to use.
The final piece of the puzzle is Microsoft App Center. This is the service that will handle the heavy lifting of storing and delivering your updates. If you haven’t already, your first task is to head over and sign up for a free account.
Installing the App Center CLI
Your main tool for interacting with CodePush is the App Center Command Line Interface (CLI). It’s how you’ll register your app, manage different deployment environments, and actually release your updates.
Pop open your terminal and run this command to get it installed globally on your machine:
npm install -g appcenter-cli
Once that’s finished, you’ll need to link it to your account. Just type appcenter login into the terminal. This will kick you over to a browser to generate an API token, which you’ll then paste back into the command line. Simple as that—your machine is now authenticated and ready to issue commands.
A Quick Tip from Experience: I make it a habit to periodically run
npm install -g appcenter-clito keep the CLI updated. Microsoft is always rolling out fixes and new features, and having the latest version can prevent some weird, hard-to-diagnose bugs.
Creating Your App and Deployments in App Center
With the CLI installed and logged in, it’s time to let App Center know about your application. This step is what creates the connection between your local code and the remote service that will deliver your updates.
Here’s a crucial piece of advice: always create separate App Center applications for your Android and iOS builds, even if they share the exact same React Native codebase. For instance, name them MyApp-Android and MyApp-iOS. This simple practice keeps your analytics, crash reports, and, most importantly, your deployments completely separate. You really don’t want to accidentally push an Android bundle to your iOS users.
When you create your MyApp-Android app, App Center helpfully sets up two default deployment environments for you:
- Staging: Think of this as your pre-flight checklist. Updates pushed here should go to your QA team, testers, and internal devices. It’s where you catch bugs before they reach your users.
- Production: This is the big one. This channel points directly to the app installed on your users’ devices. Updates should only be promoted to Production after they’ve been thoroughly tested and signed off on in Staging.
This Staging/Production split isn’t optional; it’s your safety net. Pushing a broken update straight to Production can tank your app store ratings and user trust in an instant. As we cover in our guide to OTA updates for Android, mastering this workflow is essential. Each environment gets its own unique deployment key, which we’ll embed in the app next. These keys are what tell your app where to look for new updates.
Weaving CodePush into Your React Native Project
Now that you have your App Center environment set up, it’s time for the real work: getting your app to actually talk to the service. This is where we bridge the gap and wire up your React Native project to listen for and receive OTA updates for Android. Let’s move beyond just running commands and dig into why each change is crucial for a solid, production-ready setup.
First things first, we need to add the core dependency to our project. Pop open your terminal in the project’s root directory and install the react-native-code-push library.
npm install --save react-native-code-push
Think of this package as the heart of the client-side operation. It’s what gives your app the native hooks and JavaScript API it needs to phone home to App Center, check for new updates, and manage the whole installation dance.
Tinkering with the Native Android Side
Unlike a library that’s pure JavaScript, CodePush has to get its hands dirty in the native Android layer. This is non-negotiable. It’s what allows the library to swap out the JavaScript bundle at runtime, which is the magic behind how OTA updates even work.
We’ll start by telling Gradle where it can find the CodePush package. Crack open your android/settings.gradle file and pop these two lines in:
include ‘:app’, ‘:react-native-code-push’ project(‘:react-native-code-push’).projectDir = new File(rootProject.projectDir, ’../node_modules/react-native-code-push/android/app’)
Next up, we need to let our app’s build.gradle know about CodePush. In android/app/build.gradle, you’ll apply the CodePush-specific Gradle file. This is what pulls the library’s native code into the compilation process alongside your own app code.
… apply from: ”../../node_modules/react-native-code-push/android/codepush.gradle” …
With these changes, the native SDK is now available to your build process. The next step is actually telling your app how to use it.
Connecting Your App to a Deployment Key
For your app to pull updates, it needs to know which deployment key to check against—Staging, Production, or any other custom ones you’ve made. Hardcoding this directly into your Java or JavaScript files is a recipe for headaches. Instead, we’ll stick to standard Android practice and add it to our string resources.
Head over to android/app/src/main/res/values/strings.xml and add a new string for your Staging deployment key.
The last piece of the native puzzle is to instantiate the CodePush SDK inside MainApplication.java. This file is the main entry point for your Android app. By overriding the getJSBundleFile method, you’re essentially giving CodePush permission to intercept the normal flow and serve its own, more up-to-date JS bundle instead of the one that was originally baked into the APK.
Wrapping Your App for Updates
Alright, we’ve handled the native side. The final piece of the puzzle is back in our familiar JavaScript world. We need to wrap our root component (which is usually App.js or App.tsx) with the CodePush Higher-Order Component (HOC).
This HOC is your command center for update behavior. It’s where you configure how and when your app checks for new code. For instance, you get to decide on the check frequency:
checkFrequency: codePush.CheckFrequency.ON_APP_START: This is a common choice. The app checks for an update every single time it’s launched. It’s fantastic for getting critical fixes out to your users as quickly as possible.checkFrequency: codePush.CheckFrequency.ON_APP_RESUME: A slightly less aggressive approach. The app only checks when it’s brought from the background to the foreground. This can feel a lot less intrusive to the user.
You also get fine-grained control over the installation process, like whether to apply the update silently in the background or to prompt the user with a confirmation dialog. These options are what let you tailor the experience, ensuring your OTA updates on Android are not just effective but also feel seamless to your users.
How to Deploy Your First OTA Update
Alright, you’ve done the setup work and integrated the CodePush SDK into your app. Now for the fun part: deploying your first OTA update for Android. This is where you really see the magic happen, turning what used to be a painful, days-long process into a quick, minutes-long task.
Let’s walk through a scenario I’ve seen a dozen times. You’ve just pushed a new release, and someone on the team spots a glaring typo on the home screen. A classic “oops” moment. Before, this meant a full-blown panic—building a new APK, signing it, and waiting for Google Play to approve it. With CodePush, you can fix it almost instantly.
Once you’ve corrected the typo in your JavaScript code, you just need a single command to push it live.
Using the CLI Release Command
The App Center CLI is your command center for all things deployment. Releasing a React Native update is surprisingly straightforward.
Just open a terminal in your project’s root directory and run the release-react command. It looks like this:
appcenter codepush release-react -a YourUsername/MyApp-Android -d Staging
What this command does is bundle up your JavaScript files and image assets and shoot them over to the “Staging” deployment channel you set up earlier. Any of your test devices running the app with the Staging deployment key will now get this update the next time they check. Simple as that.
Must-Use Command Flags for a Safer Workflow
That basic command works, but in a real-world, professional setting, you need to be more specific to avoid headaches. I never push an update without these two flags. They’re essential for keeping your OTA updates on Android safe and organized.
--target-binary-version: Think of this as your most important safety net. It tells CodePush which native app version this update is for (e.g.,1.0.1). This is critical because it stops you from accidentally sending a JS bundle that needs native changes to a user who doesn’t have them.--description: Always, always add a clear description. Something like"Fixes typo on home screen CTA button"is perfect. This creates a clean, readable history in App Center, which is a lifesaver when you need to track down what changed or roll something back.
My golden rule for a professional workflow is a two-step deployment. Always release to Staging first. Get your QA team or a few colleagues to test it on actual devices. Once they give the green light and you know it’s stable, then you can promote that exact, verified release to Production for your users.
This simple process is what makes OTA updates so powerful yet safe. The user’s device handles everything seamlessly in the background.
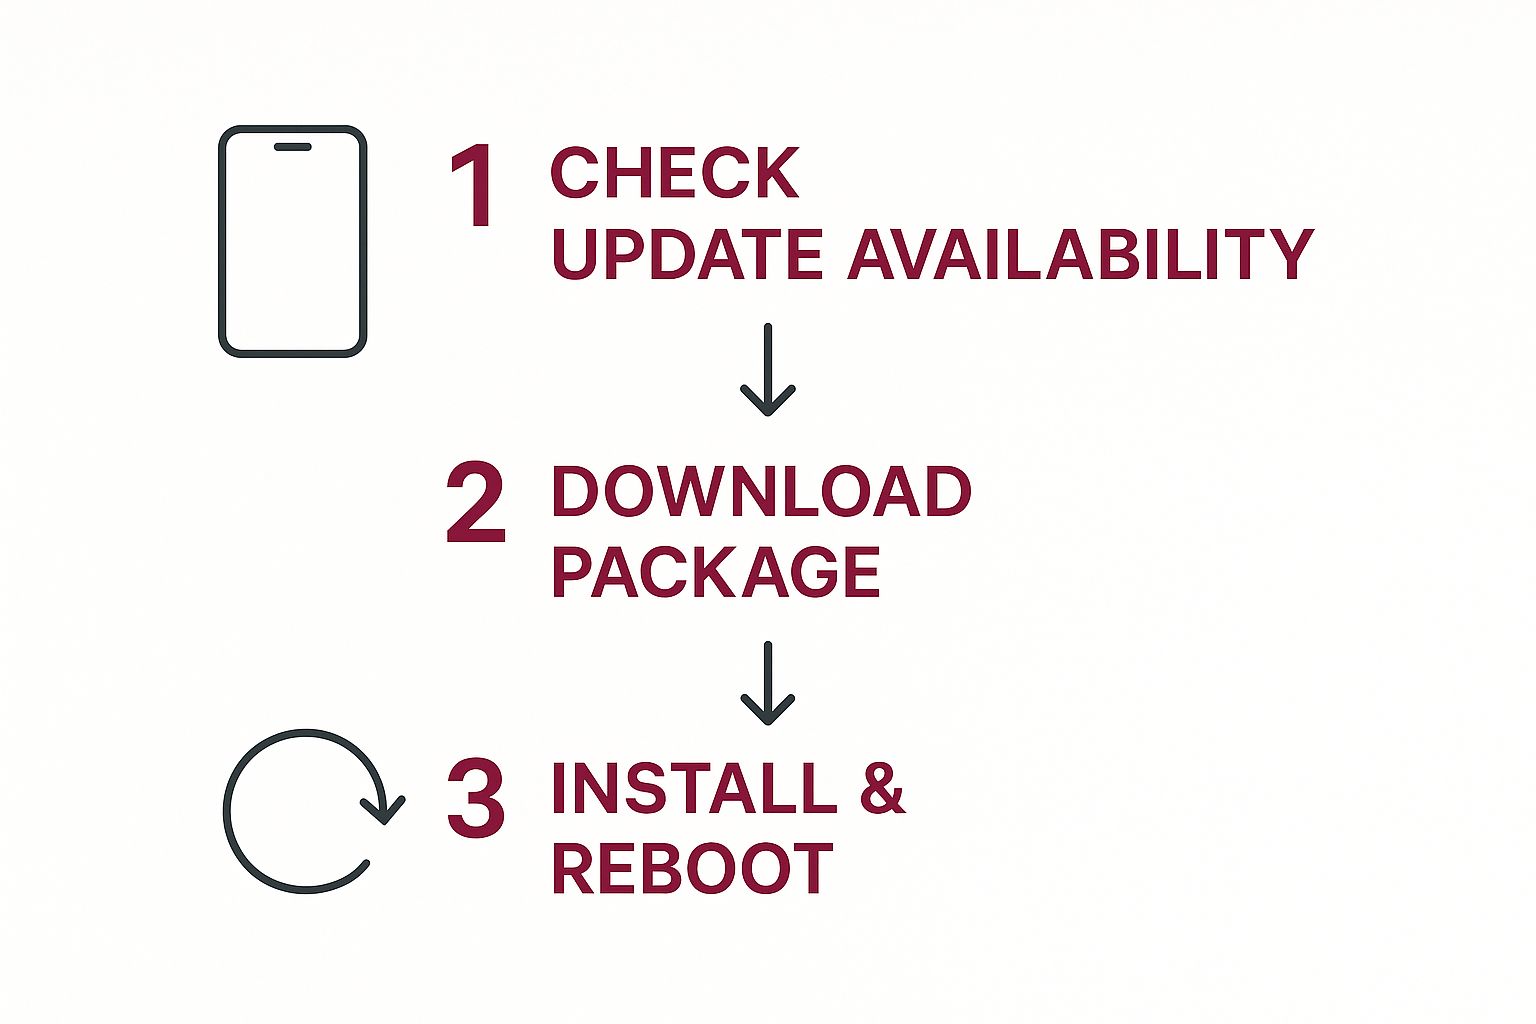
As you can see, the flow from checking for an update to installing it is designed to be completely invisible to the user.
From here, you can build out a more sophisticated workflow by promoting tested builds from Staging to Production. This ensures only battle-tested code ever reaches your entire user base. For a complete walkthrough of this process, our guide on deploying a React Native app dives much deeper into these best practices. Adopting this disciplined approach is how you get all the speed of OTA updates without ever compromising on stability.
Advanced OTA Strategies and Best Practices
Pushing out an over-the-air update is one thing, but managing them in a live production environment? That’s a whole different ballgame. It requires discipline and a solid plan for when things inevitably go wrong. Let’s move beyond the basics and get into the strategies that separate a weekend project from a truly professional, reliable app.
These techniques are all about building confidence. They ensure your approach to OTA updates on Android is not just powerful, but also safe and responsible. We’ll cover how to push critical updates, pull back bad releases, and lock down your entire deployment process.
Forcing Mandatory Updates
Most of your updates can probably wait. They can download quietly in the background without bothering the user. But every so often, you’ll hit a situation that can’t wait—a major security hole or a bug that crashes the app on launch. For those moments, you need a mandatory update.
CodePush lets you flag any release as mandatory. When a user’s app checks for an update and sees that flag, it drops everything, downloads the new bundle, and immediately installs it. The app will restart to apply the patch, completely bypassing the usual user prompts. It’s a powerful tool, but use it wisely. Forcing a restart can be jarring, so save it for true emergencies.
- When to use it: For patching critical security flaws, fixing app-breaking bugs, or pushing changes required for a new backend API.
- How it works: It’s as simple as adding a flag, like
--mandatory, when you push the release through the command line. The SDK on the device handles the rest.
The Safety Net of Rollbacks
No matter how thorough your QA process is, a bad update can occasionally slip into production. It happens. When it does, you need a fast and reliable way to get your users back onto a stable version. CodePush gives you two great ways to do this.
The first is an automatic rollback. If you deploy an update that causes the app to crash right after it starts, the CodePush SDK is smart enough to notice. After a couple of failed launches, it will automatically revert the app to the last known-good version. This is a lifesaver that prevents your users from getting stuck in a frustrating crash loop.
The second is a manual rollback. Imagine you release an update that doesn’t crash but introduces a terrible UI glitch or a major logic error. From your terminal, you can run the appcenter codepush rollback command. This instantly tells all devices on that deployment (like Production) to switch back to the previous version.
Think of a manual rollback as your big red emergency brake. Knowing it’s there gives you the confidence to deploy more often, because you know you can undo a mistake in seconds without having to rush out another fix.
Securing Your Deployment Keys
Your deployment keys are the crown jewels. They are the credentials that authorize code to be pushed to your users. If they fall into the wrong hands, someone could ship malicious code to your entire user base. Protecting them is non-negotiable.
Security is a massive deal for OTA updates Android, especially when you’re delivering code to thousands or even millions of devices. A recent analysis drove this point home when researchers successfully decrypted a real-world Android OTA package for a car, exposing its entire codebase. This just highlights how critical it is to secure your update channels from end to end.
How you manage your keys is a cornerstone of your security strategy. For a deeper dive, our guide on software deployment best practices is a great resource.
Ultimately, you need to treat your Production deployment key with the same care you would any other production secret:
- Store it securely. Use a dedicated vault service or protected environment variables in your CI/CD pipeline.
- Never, ever commit it to your Git repository.
- Restrict access. Only senior team members or trusted, automated deployment systems should have access to production keys.
Common Questions About Android OTA Updates

Whenever you’re adopting a new deployment method, a few “what if” scenarios are bound to pop up. It’s completely normal. Getting these questions answered is the best way to get comfortable and start taking advantage of the speed that OTA updates for Android offer.
Let’s walk through some of the most common concerns I hear from developers when they first start using this workflow.
What Changes Can I Actually Push?
This is usually the first and most important question. You can instantly push any changes made to your JavaScript bundle and its related assets. This includes images, fonts, styling, or even new JSON configuration files.
That makes OTA updates fantastic for fixing bugs in your JS code, tweaking the UI, or rolling out new features that don’t touch the native side.
The line is drawn at native Android code. You cannot update anything written in Java or Kotlin this way. If your update requires a new native module, a permission change in AndroidManifest.xml, or any other modification outside the JS world, you’ll need to go the traditional route and submit a new binary to the Google Play Store.
Will Google Reject My App for Using OTA Updates?
It’s a smart question, but for most situations, the answer is no. The Google Play Developer Policies allow for dynamic code loading, provided it doesn’t drastically alter your app’s core purpose from what was initially approved.
Using a service like CodePush for bug fixes, UI enhancements, and adding small features is a common and accepted practice. The main thing is to avoid using it for a complete “bait-and-switch” of your app’s functionality. As always, it’s a good idea to stay familiar with the latest developer policies.
How Does CodePush Target the Right App Version?
The system is pretty slick. It matches updates to the native binary version of your app—specifically, the versionName you set in your Android build.gradle file. This is exactly why the --target-binary-version flag is your best friend during deployment.
When you use that flag, you’re telling CodePush which native app versions can safely receive the new JavaScript bundle. It’s a critical safety net. It prevents you from accidentally sending a JS update that depends on new native code to a user who doesn’t have it yet, which would almost certainly crash their app.
For a deeper dive into how this all works under the hood, understanding the mechanics of automatic app updates can be really helpful.
Ready to take control of your release cycle? CodePushGo offers a robust, secure, and easy-to-use platform for managing OTA updates for your React Native apps. Stop waiting for app store reviews and start shipping fixes and features in minutes. Explore CodePushGo today!


