When you’re building a React Native app for Android, you can push code changes like bug fixes and UI tweaks directly to your users’ devices. This is done through over-the-air (OTA) updates, a method that completely bypasses the usual Google Play Store review process. For any fast-moving project, this is a massive advantage—it means you can deploy updates almost instantly.
Why Instant App Updates Are a Game-Changer
In the crowded app marketplace, speed and reliability aren’t just nice-to-haves; they’re everything. The traditional route—building a new APK or AAB, submitting it to the Google Play Store, and then waiting for a review that could take hours or even days—creates a frustrating bottleneck. This delay becomes a real problem when you’ve got a critical bug crashing your app or a security flaw that needs patching now.
This is exactly where the power of OTA updates shines.
By sidestepping the store review for your JavaScript and asset changes, you gain incredible agility. Imagine you spot a glaring typo on your home screen right after a release, or a button that’s broken for a specific group of users. Instead of kicking off a full, multi-day release cycle, you can push a fix directly to their devices in minutes.
The Two Types of Android Updates
It’s important to know the difference between the two main kinds of updates you’ll encounter in the Android ecosystem:
- OS-Level Updates: These are the big ones. Google or device manufacturers like Samsung push these out to upgrade the core Android operating system, patch OS-level security holes, and roll out major new features.
- App-Level Updates: This is our world. It’s where services like CodePushGo come in. These updates target the JavaScript code and assets (like images and fonts) inside your React Native app, not the native Android code.
That distinction is key. OTA for React Native lets you modify anything living in your JS bundle, making your deployment process feel more like updating a website than a traditional mobile app. If you want to dive deeper into how this all works under the hood, we have a complete guide that breaks down what an OTA update is.
Comparing Deployment Methods
To really see the difference, let’s put traditional app store updates side-by-side with an OTA service like CodePushGo.
| Feature | Traditional App Store Update | CodePushGo OTA Update |
|---|---|---|
| Deployment Speed | Hours to days (review time) | Minutes |
| Review Process | Mandatory Google Play review | Bypasses store review for JS/asset changes |
| Ideal Use Case | Native code changes, new SDKs, permissions | Bug fixes, UI tweaks, A/B tests, new features |
| User Action Required | Manual or automatic update from the store | Updates can be silent and automatic |
| Rollback Capability | Requires submitting a new version | Instant rollback from the dashboard |
The table makes it clear: for quick, iterative changes, OTA is the way to go. You still need the Play Store for native updates, but for everything else, you gain a massive speed advantage.
The Strategic Advantage of Speed
Being able to update your app on the fly is more than just convenient; it’s a real strategic asset. Think about how OTA technology completely changed the game for phone updates. Not long ago, you had to plug your phone into a computer to manually install system software—a clumsy process most people skipped. Now, critical updates are delivered wirelessly, which has massively boosted the adoption of the latest and most secure software.
The core benefit is simple: when you can fix problems faster, you build more trust with your users. A quick response to a bug report can turn a negative experience into a positive one, showing users that you are actively maintaining and improving the app. This speed directly translates to better app store ratings and user retention.
Setting Up Your CodePushGo Environment
Alright, let’s roll up our sleeves and get your development environment prepped for seamless ota updates for android. The first thing we need to do is install the CodePushGo Command Line Interface (CLI). This little tool is your command center for managing every update you push.
Before you touch the terminal, head over to the CodePushGo website and sign up for a free account. Got that sorted? Great. Now, pop open your terminal and run this command to install the CLI globally via npm. This makes the codepushgo command available system-wide.
npm install -g codepushgo-cli Once the installation is done, you’ll need to link your machine to your account. It’s a simple login command right from the terminal.
codepushgo login
This will fire up a browser window for you to complete the authentication. It’s a quick and secure way to connect your local setup with your CodePushGo account.
Getting Your App Registered
With the CLI installed and authenticated, it’s time to let CodePushGo know about your React Native app. Registering it creates a dedicated home for all your app’s updates and, most importantly, generates the deployment keys we’ll need in a bit.
To do this, use the app add command. You’ll need to give your app a name and specify its operating system.
- For Android:
codepushgo app add <AppName> android - For iOS:
codepushgo app add <AppName> ios
The moment you run this, CodePushGo does something really smart: it automatically sets up two distinct deployment environments for you—Staging and Production. Each environment gets its own unique deployment key. Think of Staging as your internal test-flight area, while Production is for the real deal that goes out to your users. This separation is fundamental to a safe and sane update strategy, a core principle of effective over-the-air updates.
Pro Tip: I can’t stress this enough: never use your Staging key in a production build. I’ve seen it happen, and it’s a quick way to push a buggy test release to all your users. Always, always double-check which key is in your release builds.
Securing Your Deployment Keys
So, what do you do with these keys? They are the credentials your app uses to check for and download updates. It’s absolutely critical to store them securely in your app’s native code, not in your JavaScript bundle where they could be easily sniffed out.
For an Android project, the right place is your strings.xml file, which you can find at android/app/src/main/res/values/strings.xml. Just add a new string resource for your Production key like so:
Then, you’ll need to reference this key from your MainApplication.java or MainApplication.kt file. This lets the CodePush SDK access the key at runtime without ever exposing it on the JavaScript side. It’s a simple step that significantly tightens the security of your OTA update process.
With your keys safely tucked away, your environment is now configured and ready. Next up, we’ll integrate the SDK into your React Native code.
Weaving CodePushGo into Your React Native App

Alright, your environment is ready and your keys are in place. Now for the fun part: actually wiring CodePushGo into your React Native project. This is where you’ll enable your app to check for and apply ota updates for android automatically.
The core of this process revolves around a powerful React concept: the Higher-Order Component (HOC).
You’ll start by wrapping your app’s root component—usually App.js or App.tsx—with the codePush HOC from the SDK. This is a brilliant, clean way to inject all the update-checking logic into your app’s lifecycle without having to clutter your core component code. It effectively gives your entire application OTA capabilities from the very top.
Choosing Your Update Strategy
Simply wrapping your app gets the job done, but the real power comes from fine-tuning how and when it checks for updates. You can pass a configuration object directly to the codePush HOC to define this behavior.
The two most important options you’ll constantly use are checkFrequency and installMode.
checkFrequency: This tells your app when to phone home to the CodePushGo server and look for a new update bundle.installMode: This controls what happens after an update is downloaded—when it actually gets installed and applied.
Mastering these two settings is the key to crafting the perfect user experience, whether that means completely silent background updates or user-prompted installations for critical fixes. We explore a ton of these strategies in our deep dive on React Native live updates.
Real-World Update Scenarios
Let’s walk through a couple of common situations I’ve encountered to see how you’d configure your updates. One is a classic “all hands on deck” emergency, while the other is a more subtle, everyday improvement.
Scenario 1: The Critical Hotfix
Picture this: you’ve just pushed a release and discover a bug that’s crashing the app on launch for 10% of your users. It’s a disaster. You need to get a fix out, and you need it out now.
For this, you’ll want a mandatory, immediate update. Your configuration would look something like this:
import codePush from “react-native-code-push”;
let codePushOptions = { checkFrequency: codePush.CheckFrequency.ON_APP_START, installMode: codePush.InstallMode.IMMEDIATE, mandatoryInstallMode: codePush.InstallMode.IMMEDIATE, };
export default codePush(codePushOptions)(App);
Here, the app checks for an update the instant it starts. If it finds one, InstallMode.IMMEDIATE forces the app to reload with the patched code right away, stamping out that bug before the user even knows what hit them.
Scenario 2: The Silent UI Tweak
Now, let’s consider something far less dramatic. Maybe you’re just tweaking some button colors or fixing a minor layout alignment. Forcing an app restart for something so small would be overkill and frankly, annoying for the user. A silent background update is the way to go.
A seamless background update is the gold standard for non-critical changes. The user never gets an interruption, the new bundle is downloaded silently, and the next time they open the app, the improved UI is simply there. This respects the user’s flow and builds trust.
For this more graceful approach, you’d adjust your configuration:
import codePush from “react-native-code-push”;
let codePushOptions = { checkFrequency: codePush.CheckFrequency.ON_APP_RESUME, installMode: codePush.InstallMode.ON_NEXT_RESTART, };
export default codePush(codePushOptions)(App);
Using ON_APP_RESUME, the check happens whenever the user brings the app back into the foreground—a much less intrusive moment than a cold start. Then, InstallMode.ON_NEXT_RESTART ensures the downloaded update just waits patiently until the user naturally closes and reopens the app later. It’s the perfect “set it and forget it” approach for routine improvements.
Deploying Your First Live Update
Alright, with all the setup out of the way, it’s time for the fun part. This is where you’ll see the true power of OTA updates for Android in action. Let’s move from theory to practice and push a live update to your users in just a few minutes.
Imagine a classic, stress-inducing scenario: you’ve just launched a new version, but a critical UI bug slipped through and is causing a terrible user experience. Normally, you’d be looking at a frantic rebuild, submission to Google Play, and days of waiting for review. With an OTA update, you can deploy a hotfix almost instantly.
The entire process boils down to a single, powerful command in the CodePushGo CLI: codepushgo release-react. This command is your workhorse; it bundles your latest JavaScript and assets, then beams them up to the CodePushGo servers, ready to be pulled down by your users’ devices.
The Staging-First Workflow
Here’s a piece of advice I can’t stress enough: never push directly to Production. It’s a tempting shortcut, but it’s a recipe for disaster. Always, always release to your Staging environment first.
This simple step gives you and your QA team a crucial window to test the update on real devices. You can make absolutely sure the fix works and, more importantly, that it doesn’t introduce any new, unexpected bugs before it reaches your entire user base.
To release your fix to the Staging deployment, you’ll run this command:
codepushgo release-react <AppName> android
By default, the CLI is smart enough to target the Staging deployment. Once you run that, grab a test device that has your app installed. To trigger the update, just close and reopen the app. After confirming everything looks good, you’re ready to promote it.
This Staging-to-Production workflow is fundamental. It elevates OTA updates from a risky gamble to a professional, reliable deployment strategy. This approach is a core part of our recommended software deployment best practices.
Promoting a Tested Update to Production
Once your update has been thoroughly vetted on Staging, getting it out to everyone is incredibly straightforward. There’s no need to re-bundle your code or upload anything again. You simply “promote” the exact release you just tested from Staging to Production.
This is the command that makes it happen:
codepushgo promote <AppName> Staging Production
Executing this command instantly makes that same, verified update available to every user in your Production environment. It’s a fast, safe, and virtually error-proof way to roll out your changes with confidence.
Even though the CodePushGo process is designed to be smooth, it never hurts to have a general checklist for any Android OTA update. This infographic covers the essential device-side preparations that help ensure a seamless update experience for the end-user.
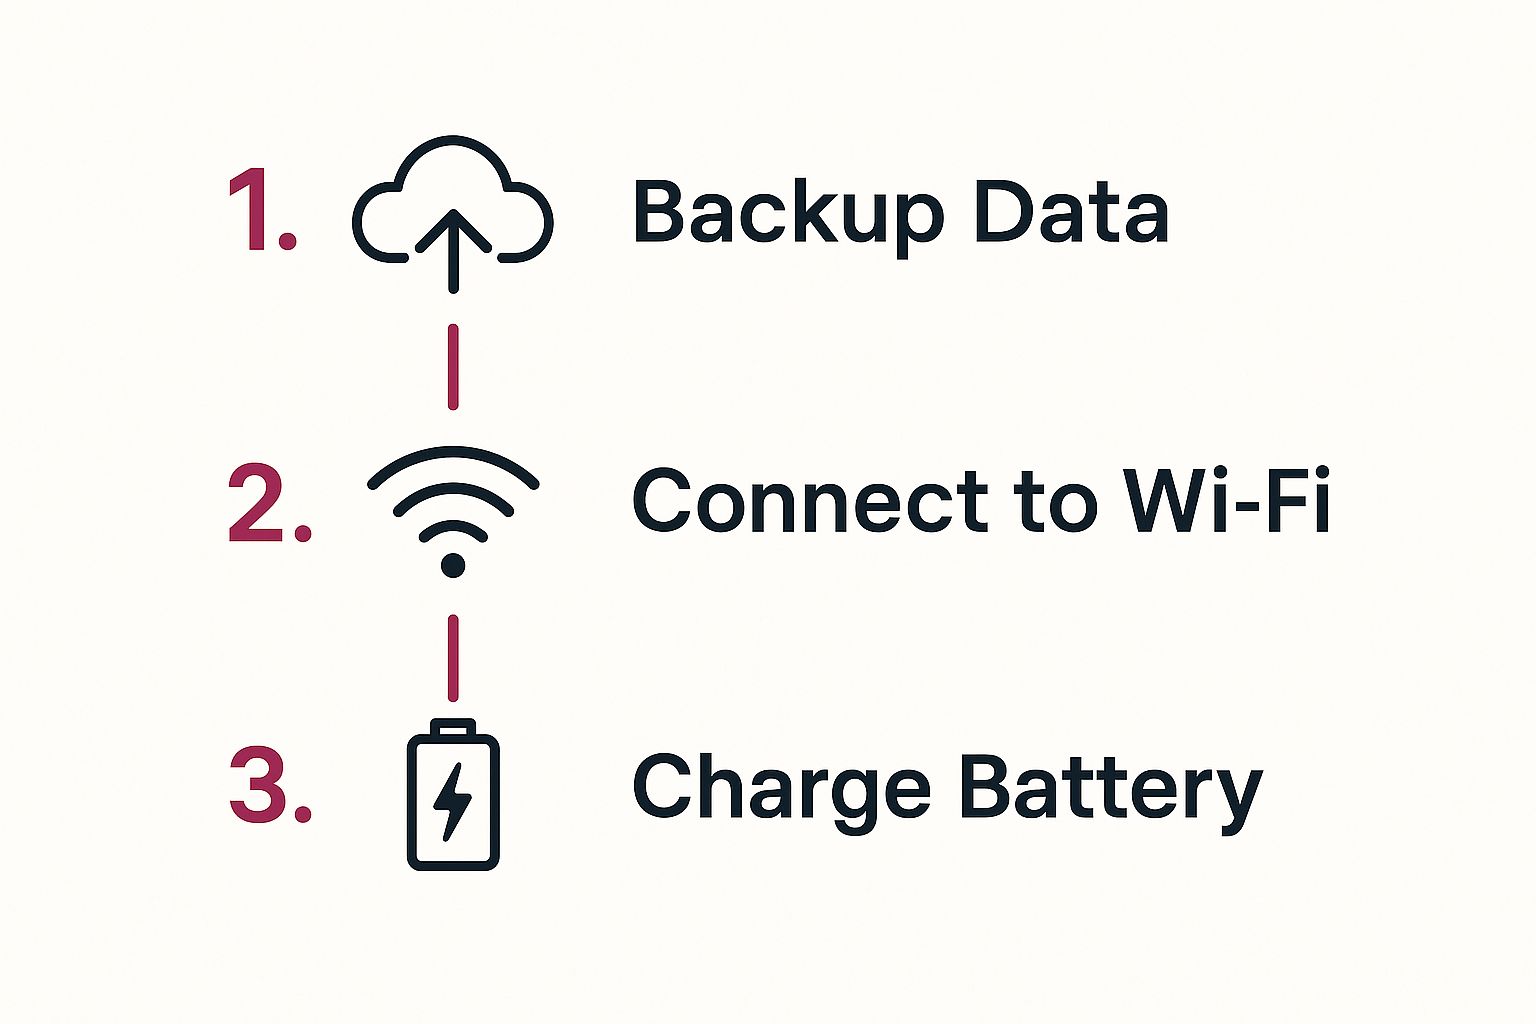
These steps—like backing up data, having a stable connection, and ensuring enough battery—are non-negotiable for traditional OS updates but are also great habits to encourage in any app environment.
This speed isn’t just for bug fixes; it’s critical for security. For instance, the June 2025 Android security bulletin patched over 45 vulnerabilities, some of which were severe enough to allow for remote device control. While CodePushGo focuses on your app’s code, the principle is the same: timely updates are your first line of defense in protecting users from active threats across the vast and varied Android hardware landscape.
Advanced OTA Techniques and Pro Tips
So, you’ve got the basics down and you’re pushing updates. Great. Now it’s time to move beyond the simple “one-size-fits-all” approach and start thinking like a seasoned pro. Refining your process for OTA updates for Android is all about creating a smoother user experience and building a deployment pipeline that can handle real-world curveballs.
One of the best things you can do is give your users a choice. Sure, silent updates are fantastic for tiny bug fixes, but interrupting someone mid-task by forcing an app restart is a quick way to annoy them. A much better way is to implement a custom UI dialog.
Think about it: a simple popup that says, “A new update is ready. Install now?” puts the user in the driver’s seat. It shows you respect their time. This is easily done by using the manual mode in the CodePushGo SDK. It lets you check for an update, notify the user when you find one, and then only apply it after they give you the green light.
Handling Rollbacks and Version Targeting
No matter how much you test, a bad update can occasionally make it out the door. It happens. What matters is how quickly you can fix it. CodePushGo gives you a direct way to undo a problematic release right from the command line.
If you push a release and your crash reports suddenly light up, you can issue a rollback command. This immediately tells user devices to revert to the previous stable version. The SDK even has a built-in safety mechanism: if a new update causes the app to crash right after starting, it will automatically roll itself back to the last known good configuration.
Now for a more complex situation I see all the time: your JavaScript update depends on some new native code.
Critical Insight: Never push a JavaScript update that relies on a native module that isn’t present in the user’s installed binary. This is one of the fastest ways to cause widespread crashes.
To avoid this disaster, you absolutely must target your OTA release to a specific binary version. Let’s say your cool new feature needs a native library you added in app version 2.1.0. You’d use the --targetBinaryVersion flag in the CLI to make sure only users on 2.1.0 or higher get this specific JS bundle.
A Pro-Level Testing Workflow
A professional deployment workflow is your number one defense against shipping bugs. The Staging and Production environments are your foundation, and you need to be disciplined about promoting updates between them.
Here’s a battle-tested workflow that I stick to:
- Deploy to Staging first. Always. This is your canary in the coal mine.
- Get QA involved. Have your testers install the Staging build on a mix of real Android devices. They need to hammer on the new feature and run regression tests on the core app functionality.
- Watch the dashboards. Keep a close eye on your analytics and crash reporting tools for any red flags coming from the Staging release.
- Promote to Production. Only after the update is fully validated and signed off should you use the
promotecommand to push it to everyone.
This methodical process is all about ensuring stability. It’s the same principle behind Android’s own evolution of OTA updates, like the Virtual A/B system that makes system-level updates happen seamlessly in the background. By adopting these careful workflows, you’re aligning your app with the best practices of the entire ecosystem.
For a deeper dive into building these kinds of solid update mechanisms, check out our guide on implementing automatic app updates.
Got Questions About CodePushGo? We’ve Got Answers
Once you start using CodePushGo for Android OTA updates, you’ll quickly move from theory to practice. That’s when the real-world questions pop up. It’s totally normal. Let’s walk through some of the most common ones I hear from developers, so you can push updates with confidence.
Think of this as a quick FAQ from someone who’s been in the trenches with this stuff.
What Kinds of Changes Can I Actually Push?
This is the big one. Understanding what you can and can’t do is key to using CodePushGo effectively.
At its core, CodePushGo is designed to update your JavaScript bundle and any assets it relies on. This is incredibly powerful for day-to-day development. You can:
- Instantly fix annoying UI bugs or layout glitches.
- Launch new features that are purely JavaScript-based.
- Change text, update colors, or swap out images on the fly.
- Experiment with A/B tests by shipping different JS bundles to segments of your user base.
But here’s the hard line: you can’t update native code. Any changes that touch your native Android project—like editing AndroidManifest.xml, adding a new native dependency, or writing custom Java/Kotlin code—will always require a full new build submitted to the Google Play Store.
Will Google Reject My App for Using OTA Updates?
I get this question a lot, and it’s a valid concern. The good news is, no, not if you use it correctly. The Google Play Store’s policies are perfectly fine with you updating your app’s JavaScript and assets this way. It’s a standard practice for hybrid apps.
Here’s the rule of thumb: Your updates shouldn’t fundamentally change what your app does. If you use an OTA update to turn your calculator app into a social network, you’re going to have a bad time. But for bug fixes, UI tweaks, and iterative feature enhancements? You’re in the clear.
How Do I Manage Updates for Different App Versions?
This is where developers can easily get tripped up. Imagine you push a JavaScript update that calls a new native module you just added in version 2.1.0 of your app. What happens to users still on version 2.0.0? The app will crash, guaranteed.
This is exactly why the --targetBinaryVersion flag in the CodePushGo CLI is your best friend. It gives you precise control over who gets what.
You can target a release to a specific version (--targetBinaryVersion "2.1.0") or even a range of versions (--targetBinaryVersion "^2.1.0"). This ensures that only devices with the compatible native shell receive the update, preventing crashes and keeping your rollout smooth and safe for all users. It’s a non-negotiable step for any serious production app.
Ready to stop waiting on app store reviews? With CodePushGo, you can deploy fixes and features in minutes, not days. Take control of your release cycle and start shipping faster. Learn more and get started for free at codepushgo.com.


