Keeping your React Native app up-to-date is far more than a simple housekeeping chore. Think of it as a strategic investment. With every upgrade, you’re not just getting a new version number; you’re unlocking serious performance boosts, tighter security, and powerful new features that keep your app competitive and your development process smooth.
So, Why Bother with a React Native Upgrade?
It’s easy to push off a React Native upgrade. I get it. The pressure to ship new features is constant, and a version bump can feel like a risky detour. But putting it off creates a nasty kind of technical debt that just gets worse over time. The more versions you skip, the more of a headache the eventual upgrade becomes.
Staying current isn’t about chasing the latest shiny object. It’s about delivering real, tangible value. The payoff goes way beyond the codebase, directly impacting your team’s sanity and your app’s standing in the market.
Performance and User Experience Gains
Modern React Native versions are packed with performance enhancements. Take the New Architecture, which has been the default since version 0.76. It completely revamps how JavaScript talks to the native side, leading to noticeably faster app startups and buttery-smooth animations. It’s a game-changer for UI responsiveness.
Newer releases also give developers better tools to build beautiful interfaces. Version 0.77, for example, brought in styling properties like boxSizing and mixBlendMode. These might sound small, but they let you create sophisticated UIs without the clunky workarounds we used to rely on. All of this adds up to a much better experience for your users and, hopefully, better app store reviews.
Enhanced Security and Stability
In the world of mobile apps, security is everything. Every React Native release comes with crucial patches for known vulnerabilities and fixes for stability bugs. If you’re running on an old, unsupported version, you’re basically leaving your app and your users exposed to threats that the community has already solved.
An outdated React Native version is like a building with an old security system. It might work for now, but you’re leaving the door open to known threats. Regular upgrades are your most effective defense.
Developer Productivity and Cost Efficiency
An upgrade is a direct investment in your team’s happiness and efficiency. Newer versions bring better tooling, more helpful error messages, and cleaner APIs. That means your developers spend less time wrestling with the framework and more time actually building what matters. This kind of productivity boost is a cornerstone of agile mobile app development.
This efficiency has a clear impact on the bottom line. It’s why major players like Meta, Shopify, and Tesla consistently upgrade their React Native apps—it helps them stay ahead. By 2025, it’s estimated that the framework could lead to a 50% reduction in development costs and cut time-to-market by 30-40% compared to building purely native apps. Those are benefits you can only really capture by keeping your codebase current.
Your Pre-Upgrade Project Health Check
Before you touch a single line of code, the smartest move is to give your project a thorough health check. I’ve seen it time and time again: a successful React Native upgrade is built on a foundation of careful planning, not frantic, last-minute code changes.
Think of this as your reconnaissance mission. You’re mapping out the terrain and identifying potential landmines before you start the march forward. Jumping straight into the react-native upgrade command is a rookie mistake that almost always leads to unexpected build failures, dependency hell, and frustrating debugging sessions that were entirely avoidable. A few hours of prep work now will genuinely save you days of headaches later.
Audit Your Dependencies and Native Code
First things first, open up your package.json. Your primary target here is to hunt down outdated or, even worse, unmaintained third-party libraries. From my experience, these are the most common source of friction during an upgrade because they often lag behind the core framework and aren’t compatible with the new version you’re aiming for.
Make a list of all your dependencies and start checking their GitHub repos. Are they actively maintained? Have the authors mentioned compatibility with your target React Native version? This initial review gives you a realistic scope of the work ahead, which often extends far beyond just the core update.
But don’t stop at the JavaScript level. You need to dig into any custom native modules you’ve written. That Swift, Objective-C, Kotlin, or Java code is tightly coupled to the native side of the framework. It’s almost a guarantee that it will need some manual adjustments to work with new APIs introduced in the upgrade.
Establish a Safe Upgrade Environment
I can’t stress this enough: never perform an upgrade directly on your main development branch. It’s a non-negotiable rule.
Always, always create a dedicated branch for the upgrade. Something like upgrade/rn-0.7x works well. This simple step is your safety net. It lets you experiment, break things, and fix them without disrupting your team’s ongoing work. You can easily revert changes or compare your progress against a stable codebase.
A dedicated Git branch is your most valuable tool during an upgrade. It isolates the chaos, provides a clean slate for resolving conflicts, and ensures you always have a one-command escape route back to a working state.
This isolated environment is also the perfect place to lean on your CI/CD pipeline. By setting up automated builds and tests on this branch, you’ll get immediate feedback as you apply changes, catching issues right away. If you want to dive deeper into this, our guide on https://codepushgo.com/blog/react-native-ci-cd/ walks through practical steps for setting up this kind of automation.
Align Your Team and Define What Success Looks Like
Finally, get your entire team on the same page. A React Native upgrade isn’t a solo mission for a single developer; it impacts everyone, from QA testers who need to run full regressions to product managers who need to adjust timelines.
Clearly communicate why the upgrade is necessary and set realistic expectations. This kind of alignment is crucial. The global React Native market is projected to hit USD 350 million in 2025, and a big reason for that growth is how the framework evolves to stay efficient and compatible. Keeping your app up-to-date is how you ride that wave. You can check out the full research on React Native’s market growth here.
Choosing the Right Upgrade Tool for the Job
Okay, with the prep work done and your team on the same page, it’s time to actually start the upgrade. The secret to a smooth React Native upgrade isn’t about plowing through it with sheer force; it’s about picking the right tool. While the standard CLI has its uses, the real MVP for this process is the React Native Upgrade Helper.
This web tool is a lifesaver. It’s designed specifically to give you a clean, side-by-side comparison of the file changes between your current version and the one you’re aiming for. It generates a diff that shows you every single modification, addition, and deletion in the boilerplate files. This level of clarity turns a potential guessing game into a methodical, manageable task.
The general flow is pretty straightforward: back up everything, update your dependencies, and then run and test the app to hunt down any issues.
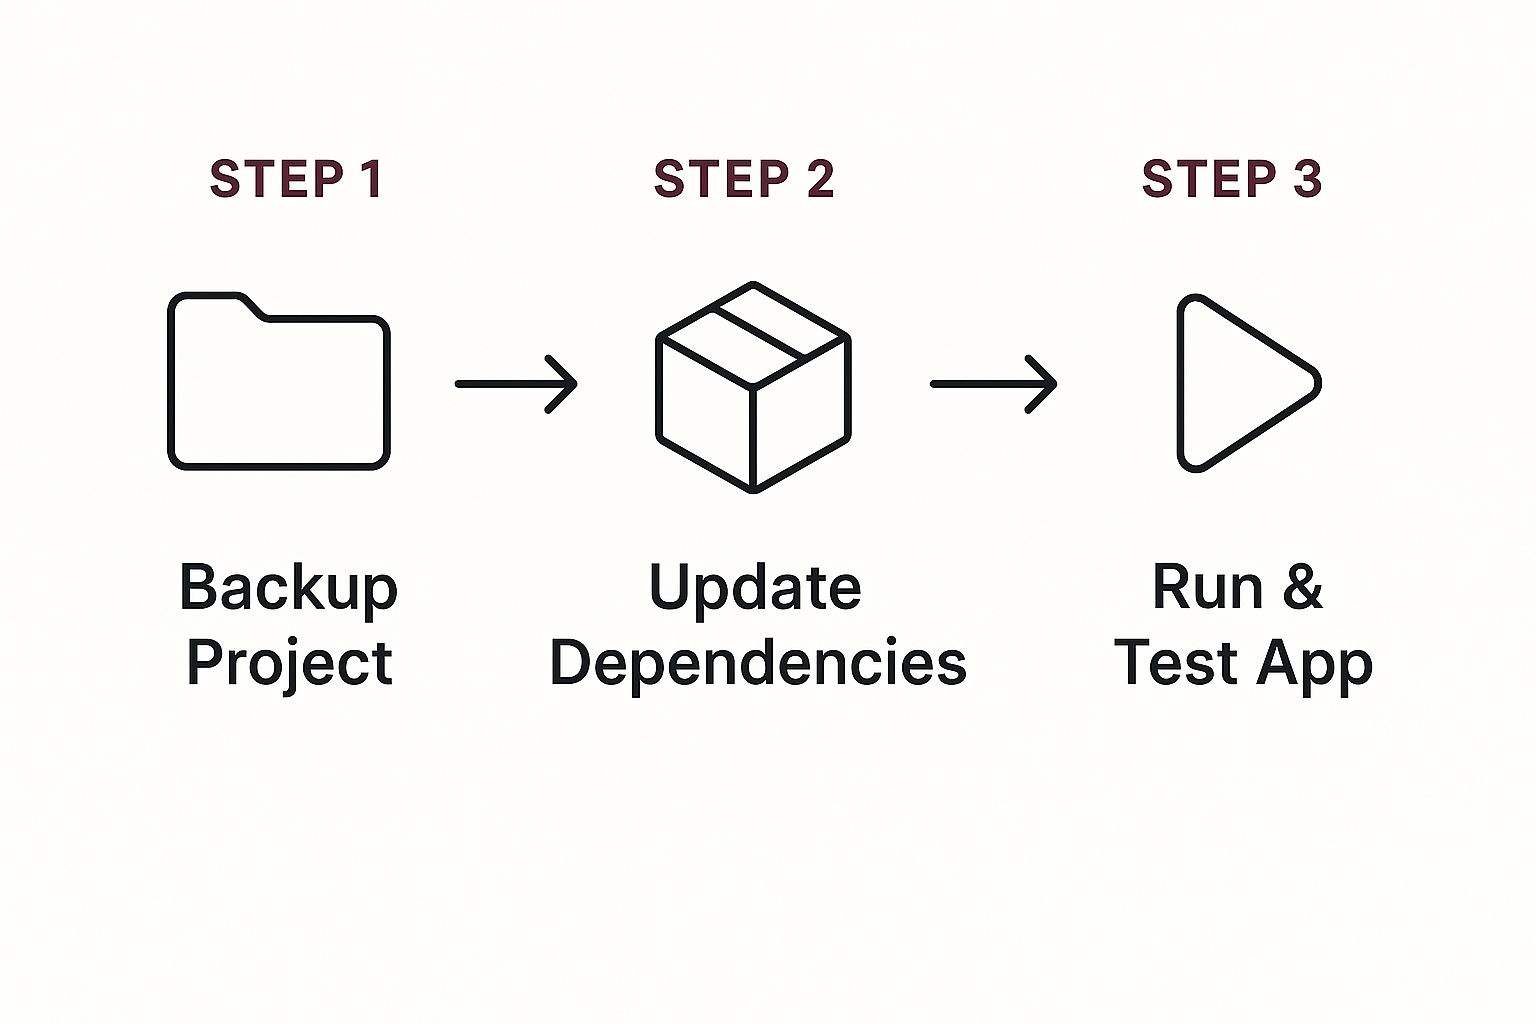
This visual really boils it down, highlighting a safety-first approach. Always back up your work before you start tinkering with code and be prepared for plenty of testing.
Comparing React Native Upgrade Methods
You have two main paths you can take for a React Native upgrade. This table breaks down how the built-in CLI command stacks up against the Upgrade Helper, helping you decide which is a better fit for your project.
| Feature | React Native CLI ‘upgrade’ | React Native Upgrade Helper |
|---|---|---|
| Process | Attempts an automated patch to your project files. | Generates a visual diff of changes for manual application. |
| Best For | Very minor patch updates (0.72.1 to 0.72.2) with minimal native changes. | Minor and major version upgrades, especially with custom native code. |
| Control | Low. The tool tries to merge everything automatically. | High. You see every change and decide how to implement it. |
| Conflict Handling | Prone to messy, hard-to-debug merge conflicts. | Avoids merge conflicts by showing you what to change, not doing it for you. |
| Risk | Higher risk of overwriting custom configurations or breaking builds. | Lower risk, as changes are applied thoughtfully and tested incrementally. |
Ultimately, while the CLI command seems faster on the surface, the Upgrade Helper provides the control and clarity needed for a reliable, professional upgrade.
The Problem with the CLI ‘upgrade’ Command
So, why not just run react-native upgrade and call it a day? For tiny patch versions, it can sometimes get the job done. But for anything more substantial, it often creates more problems than it solves. It particularly struggles with merge conflicts if you’ve ever customized native project files like build.gradle or Podfile.
The CLI command tries to apply a patch automatically, which sounds great in theory but can result in a tangled mess. It might overwrite your custom settings or just fail outright, leaving you to figure out what went wrong.
The Upgrade Helper, on the other hand, puts you firmly in the driver’s seat. It doesn’t touch your code. Instead, it shows you exactly what needs to be changed, letting you apply the updates manually and with full context.
This manual approach is just plain safer. It forces you to review each change and consider how it integrates with your existing codebase, which dramatically reduces the chances of shipping subtle, nightmare-inducing bugs.
How to Navigate the Upgrade Helper Diff
When you first generate the diff in the Upgrade Helper, you’ll see a long list of changed files. Don’t get overwhelmed. A lot of these are minor tweaks to comments or boilerplate configs you can ignore.
Your real focus should be on the critical native project files:
- For Android:
android/build.gradle,android/app/build.gradle,android/settings.gradle, andAndroidManifest.xml. - For iOS:
ios/Podfile, and any relevant changes inside the.xcodeprojdirectory.
Keep an eye out for changes related to dependencies, SDK versions, build configurations, and new permissions. For instance, a newer React Native version might require you to update the Kotlin version in your build.gradle file. The Upgrade Helper makes spotting that specific change dead simple.
From there, you can apply these changes one by one in your dedicated upgrade branch, building and testing after each small step. This iterative process is so much more reliable than one giant, risky update. This level of control mirrors the precision you get with targeted rollouts, a concept you can explore by reading about the best practices for feature flags. By carefully managing what changes go live and when, you keep the app stable throughout the entire process.
Handling Breaking Changes Like a Pro
Let’s be honest: breaking changes are the boogeyman of every react native upgrade. They’re the main source of anxiety for developers and the reason so many teams put off updates for far too long. But you can turn this chaotic process into a manageable engineering task with the right strategy.
It all starts with doing your homework. Before you even think about touching the code, you need to become an expert on the release notes for your target version. These documents are your treasure map, detailing every major change, deprecation, and new API. Taking the time for reviewing a project’s changelog is the single best way to understand what’s coming and avoid getting blindsided.
This proactive research helps you see problems on the horizon before they become build-stopping errors.
Dissecting Common Breaking Changes
Let’s walk through a real-world example from a recent upgrade. When React Native 0.77 rolled out, the default iOS app template switched from Objective-C to Swift. This was a massive architectural shift that fundamentally changed how new projects were set up and how the AppDelegate file was structured.
- The Old Way (Objective-C): Your project had
main.m,AppDelegate.h, andAppDelegate.mmfiles that managed all the initial app setup. - The New Way (Swift): These were all streamlined into a much cleaner, single
AppDelegate.swiftfile.
If you were upgrading an older project, the Upgrade Helper would flag these files for removal and replacement. But it’s not as simple as just copying the new file over. You have to manually migrate all your custom logic from the old Objective-C setup into the new Swift structure. This is a perfect example of a breaking change—it’s not a bug, but a foundational shift that demands your direct attention.
Managing Third-Party Library Conflicts
Your own code is only one piece of the puzzle. The real chaos in an upgrade often comes from your dependencies. A library that was rock-solid on version 0.72 might completely crash your build on 0.77 if the maintainer hasn’t kept pace.
This is where a methodical dependency audit is worth its weight in gold. Crack open your package.json and go through every single key library. Check their GitHub issues and release notes for compatibility with your target React Native version. If a library looks abandoned or incompatible, you have a few paths forward:
- Find a Fork: The community often keeps forks of popular but neglected libraries alive.
- Use
patch-package: This amazing tool lets you apply temporary hotfixes directly to a library’s code within your own project. - Find an Alternative: It might be the perfect time to migrate to a more modern, actively maintained library that does the same job.
A React Native upgrade is a full ecosystem update. Your app’s stability is only as strong as its weakest dependency. Treating third-party libraries as a first-class concern is non-negotiable for a successful migration.
This entire process underscores why a solid strategy is so crucial. Without one, you’re just playing whack-a-mole, fixing one bug only to create two more. Planning for these issues is also a core part of building a reliable https://codepushgo.com/blog/deployment-rollback-plan/, ensuring you can always revert to a stable state if a critical bug slips through.
React Native held a 42% market share among cross-platform frameworks in mid-2025, and its continued evolution is key to its dominance.
Ensuring a Smooth Rollout After the Upgrade
So, you’ve wrestled with the upgrade, and your app finally builds without a single error. That’s a huge win, but don’t pop the champagne just yet. The real test is shipping these changes to your users. A successful rollout isn’t a race to hit “publish”—it’s a deliberate, careful process.
The first thing on your list has to be rock-solid regression testing. Simulators are fine for a quick sanity check, but they’ll never catch the weird bugs that only show up on actual hardware. Things like spotty network connections, specific device quirks, or performance hiccups under real-world conditions. There’s just no replacement for testing on physical devices.
Implement Phased Rollouts
Whatever you do, don’t release the new version to 100% of your users at once. Both the Google Play Console and Apple’s App Store Connect have phased rollout features, and this is your best safety net. Seriously, use it.
Start small. Release the update to just 1% or maybe 5% of your users. Think of this small group as your early-warning system. You’ll want to be glued to your crash reports and performance dashboards. If some bizarre, device-specific bug pops up, the damage is contained. You can hit the pause button, fix the issue, and save the other 99% of your users from a bad experience.
A typical phased release schedule might look something like this:
- Day 1: Roll out to 1% of users. Watch your analytics and crash reporting tools like a hawk.
- Day 3: If everything looks stable, bump it up to 10%.
- Day 5: Still no red flags? Go ahead and increase to 50%.
- Day 7: Confident that all is well, you can finally complete the rollout to 100%.
This controlled approach drastically reduces your risk and lets you ship with confidence.
Establish a Predictable Upgrade Cadence
Trying to tackle a massive react native upgrade once a year is a nightmare. It’s stressful, risky, and almost guarantees you’ll introduce a bunch of bugs. The best mobile teams I’ve worked with treat upgrades as a routine, not a rare, monumental event.
By setting up a regular “upgrade cadence,” maybe every quarter or twice a year, you turn a dreaded chore into a manageable part of your workflow. This keeps your tech debt from piling up and makes each upgrade much smaller and less dangerous. It’s also worth remembering that upgrades aren’t just a technical challenge; you often need effective change management strategies to get everyone on board and ensure the project succeeds.
A consistent upgrade schedule transforms a reactive, painful process into a proactive, strategic advantage. It ensures your app continuously benefits from the latest performance, security, and feature improvements from the React Native core team.
Automating your workflow with a solid CI/CD pipeline is a game-changer here. When builds and tests run automatically on every pull request, you catch issues early and keep the app stable.
For even finer control, you can look into tools like CodePushGo to push fixes directly to users, skipping the app store review process entirely. If you want to learn more, check out this guide on setting up automatic app updates with CodePushGo. Combining automated testing with Over-The-Air updates gives you a release process that’s both resilient and incredibly agile.
Got Questions About React Native Upgrades?
No matter how well you plan, a React Native upgrade always seems to stir up a few tough questions. Let’s walk through some of the most common ones I see popping up in developer communities. Getting these answers straight will help you turn what feels like a daunting task into a predictable, repeatable part of your workflow.
The idea is to stop treating upgrades as a massive, disruptive event and start seeing them as regular maintenance for a healthy app.
How Often Should We Be Upgrading?
There’s no one-size-fits-all answer here, but a good rule of thumb is to stay within two or three minor versions of the latest stable release. This sweet spot gives you access to new features and critical security patches without constantly chasing the bleeding edge.
Sticking to incremental upgrades—say, from 0.75 to 0.76, then to 0.77—is a whole lot smoother than trying to leapfrog from an old version like 0.68 all the way to 0.77. I always suggest teams schedule a quarterly “dependency health check” to see where they stand and plan the next small jump.
What’s the Most Common Roadblock During an Upgrade?
Without a doubt, the biggest headaches come from dependency conflicts and surprise breaking changes in native project files. I’m talking about your build.gradle on Android and your Podfile on iOS. A third-party library that hasn’t caught up to the new React Native version is almost always the culprit behind a failed build.
The React Native Upgrade Helper is your secret weapon here. It shows you a diff of the native configuration files, which is where those cryptic build errors that the CLI doesn’t explain usually hide.
Can I Just Skip a Few Versions to Catch Up?
Technically, you can, but I strongly advise against it, especially if you’re crossing major versions. Every single release comes with its own set of breaking changes and migration steps, all carefully laid out in the official release notes.
When you skip versions, you’re signing up to manually untangle the combined breaking changes from every version you jumped over. It’s a complicated, error-prone mess that’s famous for creating subtle bugs that will bite you weeks later.
The only truly safe path is to upgrade one version at a time. Run your full test suite after each step, confirm everything is stable, and only then move on to the next. It feels slower, but trust me, this methodical approach saves a ton of time and sanity in the long run.
Ready to ship updates and hotfixes without waiting for app store reviews? With CodePushGo, you can push over-the-air updates directly to your users’ devices, ensuring they always have the latest, most stable version of your app. Get started for free.

