When it comes to building a solid React Native app, you can’t just write code and hope for the best. You need a testing strategy that covers all your bases, from the tiniest JavaScript function to the full end-to-end user experience. This means combining unit tests, integration tests, and end-to-end (E2E) tests using fantastic tools like Jest, React Native Testing Library, and Detox.
Why a Solid Testing Strategy is Critical for React Native
Trying to ship a React Native app without a proper testing process is like navigating without a map. Sure, you might get there faster in the short term, but you’re almost guaranteed to get lost along the way. Bugs found late in the game are a nightmare—they cost more to fix, drain developer morale, and erode user trust. A smart testing strategy is your safety net, catching problems long before they ever reach your users.
React Native’s architecture is unique. You’ve got your JavaScript code talking to native iOS and Android modules through a bridge. This adds layers of complexity. A bug might not even be in your JavaScript code; it could be a weird interaction with a native API on a specific Android version. This is exactly why a multi-layered testing approach isn’t just a “nice-to-have”—it’s essential.
The Layers of Protection
A truly effective testing strategy isn’t about picking one type of test. It’s about building a pyramid. Each layer gives you a different kind of confidence in your codebase.
- Unit Tests: These are the foundation of your pyramid. They’re quick, simple, and focus on one thing at a time. Think of testing a single utility function or a button component in complete isolation.
- Integration Tests: One level up, these tests make sure different parts of your app play nicely together. Does tapping that button actually trigger the state update in its parent component? This is where you find out.
- End-to-End (E2E) Tests: At the very top, E2E tests mimic a real user. They’ll launch your app, log in, navigate through a few screens, and complete a full workflow, like adding an item to a cart and checking out. They’re slower but absolutely crucial for validating your app’s core functionality.
Investing in all three layers creates a powerful quality assurance process. It confirms that the individual pieces work and that the whole system comes together to deliver a smooth, reliable experience for your users.
The table below breaks down these layers and the tools you’ll typically use for each.
The React Native Testing Pyramid
| Testing Layer | Primary Focus | Common Tools |
|---|---|---|
| Unit Tests | Individual functions, components, and logic in isolation. | Jest, React Native Testing Library |
| Integration Tests | Interaction between multiple components or modules. | Jest, React Native Testing Library |
| End-to-End (E2E) Tests | Full user workflows and system-level interactions. | Detox, Appium |
This pyramid model helps you balance your efforts, focusing most of your tests at the fast and stable unit level while using slower E2E tests for the most critical user journeys.
The Business Impact of Untested Code
Let’s be real—untested code is a business risk. Constant crashes, broken features, and a clunky UI lead directly to bad app store reviews and users hitting that “uninstall” button. A single bug in a payment screen can bring your revenue to a grinding halt. These are just some of the many challenges in mobile application testing that can sink an otherwise great product.
At the end of the day, a disciplined testing habit does more than just catch bugs. It cuts down on long-term maintenance, makes it easier to add new features with confidence, and protects your brand’s reputation. It’s not a chore; it’s a strategic advantage.
Writing Meaningful Unit Tests with Jest and RTL

Unit tests are the foundation of a solid testing strategy in React Native. Think of them as your first line of defense. They’re built to be fast, laser-focused, and completely isolated, zeroing in on the smallest bits of your application—individual components, functions, or hooks.
When you get them right, unit tests provide almost instant feedback. They give you the confidence to refactor a messy component or build out a new feature, all while knowing you haven’t accidentally broken something critical along the way.
For this job, we’ll rely on a powerful duo: Jest and React Native Testing Library (RTL). Jest is the undisputed king of JavaScript testing frameworks, giving us a test runner, a rich set of assertions, and fantastic mocking capabilities. RTL, on the other hand, provides a set of utilities specifically designed to help you test your components the same way a user would interact with them.
The philosophy behind RTL is brilliantly simple: test what the user sees and does, not the nitty-gritty implementation details. Instead of digging into a component’s internal state or checking its props, you find elements on the screen and interact with them. This makes your tests far more resilient. If you refactor how a component works internally but its behavior stays the same, your tests will (and should) continue to pass.
Setting Up Your First Component Test
Let’s dive into a real-world example. Imagine you have a simple CustomButton component. It takes an onPress prop and a title. We need to verify two things: does it render the right text, and does it actually call the onPress function when someone taps it?
Here’s how you could write that test:
import React from ‘react’; import { render, fireEvent } from ‘@testing-library/react-native’; import CustomButton from ’./CustomButton’;
describe(‘CustomButton’, () => { it(‘renders the correct title’, () => { const { getByText } = render(<CustomButton title=“Submit” onPress={() => {}} />); expect(getByText(‘Submit’)).toBeDefined(); });
it(‘calls the onPress handler when pressed’, () => {
const handlePress = jest.fn();
const { getByText } = render(
const buttonElement = getByText('Submit');
fireEvent.press(buttonElement);

expect(handlePress).toHaveBeenCalledTimes(1);
});
});
See what’s happening here? We use render from RTL to get our component onto a virtual screen. Then, getByText finds the button just like a user would—by looking for its title. Finally, fireEvent.press simulates a tap, and we check if our mock handlePress function was called exactly once. To get a deeper understanding of Jest’s powerful mocking and assertion functions, check out our guide to the Jest testing framework.
Testing Complex User Interactions
Good unit tests don’t just stop at checking if things render. They validate your business logic. Let’s think about a login form. It has an email field, a password field, and a “Login” button that’s disabled until both fields are valid.
Here’s how you’d test that flow:
- First, render the form and immediately check that the login button is disabled.
- Next, simulate a user typing a valid email into the email input using
fireEvent.changeText. - The button should still be disabled, right? So, assert that’s the case.
- Now, simulate typing a valid password into the password field.
- Finally, assert that the button is now enabled.
This test doesn’t care how you implemented the validation. Are you using component state? A third-party library like Formik? It doesn’t matter. The test only cares that the user-facing behavior is correct, which is exactly what we want.
Mocking API Requests and Native Modules
Your components don’t live on an island. They fetch data from APIs, talk to native device features, and interact with other parts of your app. In a unit test, we need to cut off these external dependencies to keep our tests focused and reliable. This is where mocking comes in.
Key Takeaway: Mocking is just replacing a real piece of code (like an API module) with a fake, controlled version for your test. This makes your tests lightning-fast, predictable, and independent of networks or device hardware.
For example, if your component fetches a user profile from an API, you can use Jest to “mock” that API module. Instead of making a real network request, the test will instantly get back a sample user object you defined. This makes it trivial to test all your component’s states—loading, success, and error—without any external factors getting in the way.
This kind of isolation is critical, especially for features that interact with native APIs. As pointed out in the State of React Native 2024 survey, APIs for the Camera, Notifications, and Permissions are not only widely used but also notoriously tricky to implement correctly. Mocking them allows you to ensure your UI logic is sound, which is a huge step toward cross-platform stability.
By focusing on user-centric interactions and being smart about mocking dependencies, you’ll build a unit test suite that actually provides value. It becomes living documentation for your components and a safety net that catches bugs before they ever reach your users.
Validating User Flows with Integration Testing

While unit tests are fantastic for confirming that your CustomButton component works perfectly in isolation, they can’t tell you what happens after the user taps it. Does tapping that button actually add a product to the global shopping cart state? That’s where integration testing comes in. It bridges the gap between individual components and the real, interconnected app.
Integration tests are all about making sure different parts of your app talk to each other correctly. They’re crucial for validating entire user flows that span multiple components, trigger navigation, and interact with global state management tools like Redux, Zustand, or React Context.
Think of it this way: unit tests check the individual bricks, but integration tests make sure those bricks form a strong, stable wall.
Simulating a Real User Journey
A classic e-commerce scenario I see all the time is testing the “add to cart” flow. This single action involves a surprising number of moving parts that all need to work in concert.
Let’s break down a typical user journey:
- A user is on a
ProductListScreenand taps on a product. - The app navigates them to a
ProductDetailScreenfor that specific item. - On the detail screen, the user taps the “Add to Cart” button.
- A Redux action is dispatched, updating the global state.
- The cart icon in the header now shows a badge with the number “1”.
Testing this entire sequence is well beyond the scope of a unit test. An integration test, however, is perfectly suited for the job. It makes sure the navigation works, the button fires the right event, the state updates correctly, and even unrelated components (like the header) react to that state change.
Setting Up a Test with Context Providers
The key to successful integration testing in React Native is creating a realistic rendering environment. Your components don’t exist in a vacuum; they often depend on “providers” that supply necessary context, like navigation functions from React Navigation or a global store from Redux.
When writing your test, you have to wrap your component with all the providers it would normally have in your live application.
Pro Tip: I highly recommend creating a custom
renderWithProvidershelper function. It wraps the standardrendermethod from React Native Testing Library and automatically includes yourNavigationContainer,ReduxProvider, and any other contexts. This keeps your test files much cleaner and follows the DRY (Don’t Repeat Yourself) principle.
For a detailed walkthrough on setting this up, our guide on the React Native Testing Library has some great, in-depth examples you can adapt.
Here’s a simplified look at how you might structure a test for that “add to cart” flow, assuming a stack with React Navigation and Redux.
import { render, fireEvent } from ‘@testing-library/react-native’; import { NavigationContainer } from ‘@react-navigation/native’; import { Provider } from ‘react-redux’; import AppNavigator from ’./AppNavigator’; // Your app’s navigator import createStore from ’./store’; // Your Redux store setup
it(‘adds an item to the cart and updates the header badge’, () => { const store = createStore(); // Create a fresh store for the test
const { getByText, getByTestId } = render(
// 1. Find and press a product on the list screen fireEvent.press(getByText(‘Cool Gadget’));
// 2. On the detail screen, find and press the “Add to Cart” button fireEvent.press(getByText(‘Add to Cart’));
// 3. Assert that the cart badge in the header now shows “1” expect(getByTestId(‘cart-badge’).props.children).toBe(1); });
This test mirrors a genuine user interaction by rendering the entire navigation stack and providing a real Redux store. By simulating presses and asserting the final UI state, you gain a ton of confidence that this critical user flow is working. This is how you catch bugs that unit tests would miss, like faulty reducer logic or broken navigation parameters, ensuring a much smoother user experience.
Choosing Your End-to-End Testing Framework
End-to-end (E2E) testing is where the rubber meets the road. It’s the final check, simulating a real user’s journey from start to finish in your fully assembled application. While unit and integration tests ensure the individual parts work correctly, E2E tests confirm that the entire system functions as a cohesive whole.
This is where you answer the most critical questions. Can a user actually sign up, add an item to their cart, and successfully check out? Does the login flow hold up on both a brand-new iPhone and an older Android device? These tests are incredibly powerful, but because they mimic a full user session, they’re also the most complex and time-consuming to run.
The chart below really puts the execution time into perspective.
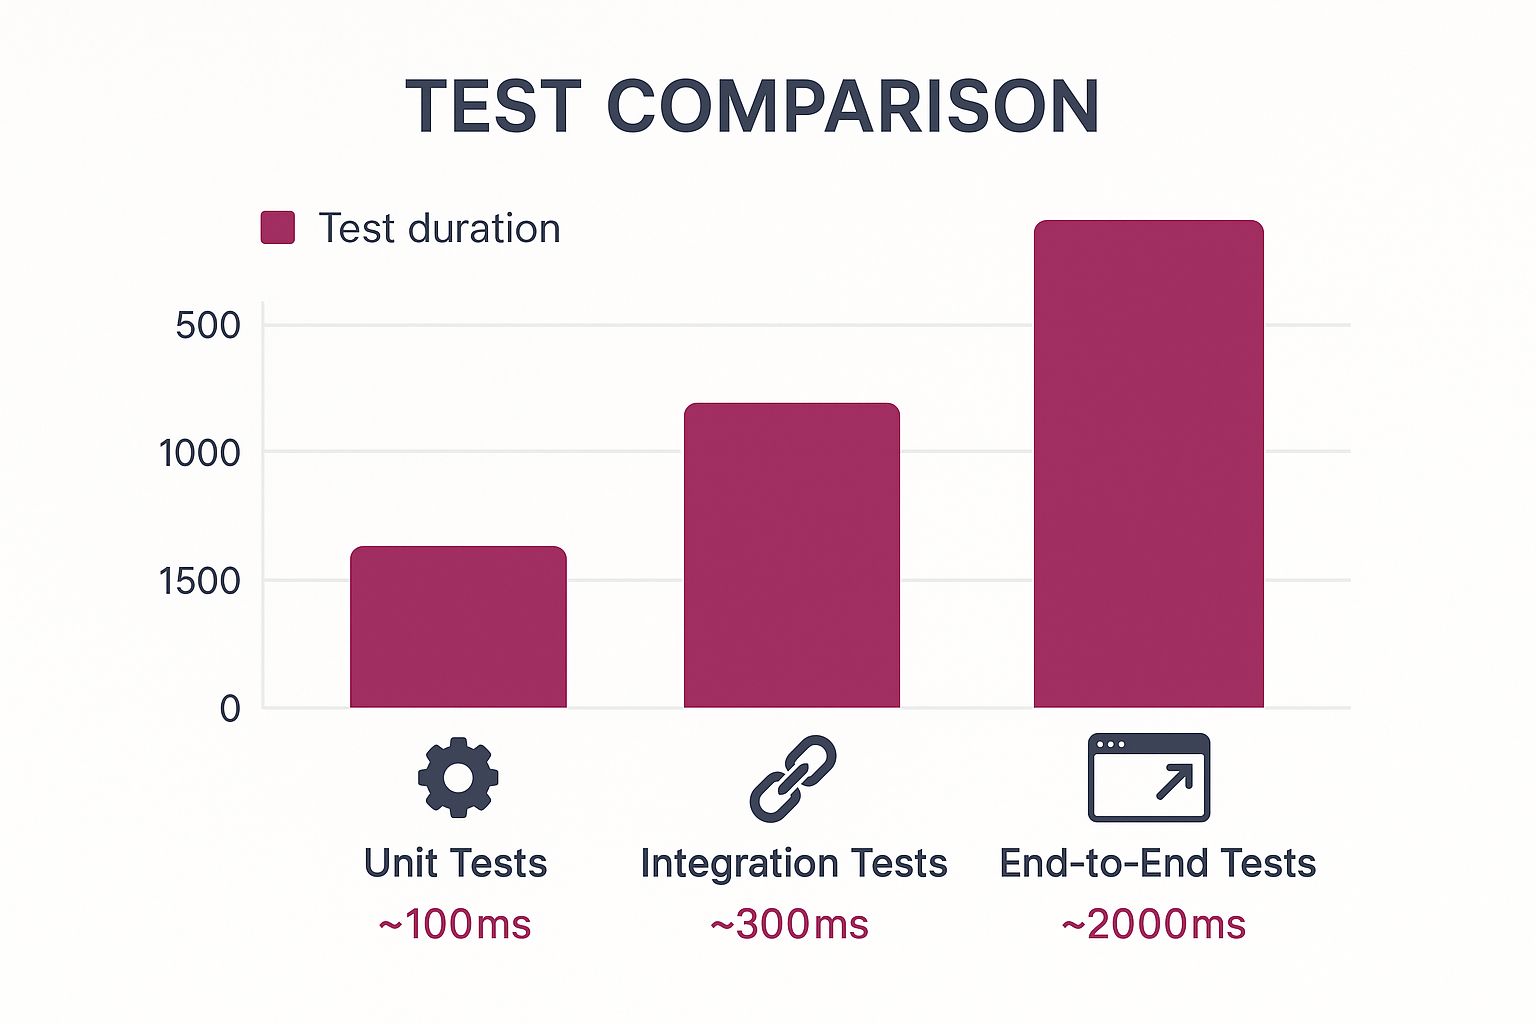
That jump in duration is why you should focus your E2E efforts on the most crucial, can’t-fail user paths in your app.
Detox: The Grey-Box Specialist
For most teams deep in the React Native ecosystem, Detox is the go-to choice. Built by the engineering team at Wix, it was designed from the ground up to solve the two biggest headaches of mobile E2E testing: flaky tests and slow execution.
Detox operates as a “grey-box” framework. Unlike “black-box” tools that are completely external, Detox instruments your app and runs within the same process. This gives it a massive advantage—it can monitor everything happening inside your app, from network requests to UI animations.
This internal awareness is Detox’s superpower. It automatically waits for your app to be idle before moving to the next step, effectively eliminating the main cause of flaky tests. You can finally stop peppering your code with arbitrary sleep() commands and just focus on writing clear, stable tests.
Appium: The Cross-Platform Powerhouse
On the other side, we have Appium, a long-standing veteran in the mobile automation world. Appium is a pure “black-box” tool, interacting with your app using the standard WebDriver protocol—the same technology that powers web browser automation. It sees your app just like a user does, with zero knowledge of its internal state.
Appium’s biggest selling point is its incredible versatility. It isn’t just for React Native; it can test native iOS, native Android, and hybrid apps. This makes it a fantastic option for companies that need a single testing solution across a diverse portfolio of mobile applications.
However, this black-box approach comes with a trade-off. Since Appium is external, it can’t automatically sync with asynchronous operations inside your app. This often means your team will need to manually add wait logic, which can lead to tests that are not only slower but also more brittle than their Detox counterparts.
Detox vs. Appium: A Practical Comparison
So, how do you choose? It really boils down to what your project and your team need right now. There’s no single “best” framework, just the right tool for your specific situation.
To help you decide, here’s a feature-by-feature breakdown comparing the two frameworks on the points that matter most to development teams.
| Feature | Detox | Appium |
|---|---|---|
| Testing Paradigm | Grey Box (in-app awareness) | Black Box (external interaction) |
| Primary Use Case | React Native apps | Native iOS/Android, Hybrid, and React Native apps |
| Synchronization | Automatic, waits for app idleness (less flaky) | Manual, requires explicit waits (can be more flaky) |
| Execution Speed | Generally faster due to in-app control and auto-sync | Can be slower due to network latency and manual waits |
| Setup Complexity | More involved initial setup, requires native project modifications | Simpler setup, less intrusive to the app code |
| Community & Ecosystem | Strong, dedicated React Native community | Larger, more diverse community covering all mobile platforms |
| Best For | Teams focused exclusively on React Native seeking stable, fast tests | Organizations needing one tool for multiple mobile app technologies |
Ultimately, the choice often hinges on whether you prioritize a streamlined, less flaky experience tailored for React Native (Detox) or need a versatile tool that can handle a wider range of app types (Appium).
Making the Right Choice for Your Team
For most teams building exclusively with React Native, Detox is the clear starting point. Its built-in synchronization saves countless hours debugging flaky tests, and its JavaScript-first API feels natural. If you’re looking for practical guidance, you can explore our in-depth tutorials on Detox E2E testing at https://codepushgo.com/blog/category/detox-e2e/.
However, Appium can be the smarter choice in a few key scenarios:
- You have a diverse app ecosystem. If your company supports native iOS, Android, and React Native apps, Appium lets you standardize on a single testing platform.
- Your team has existing WebDriver experience. If your QA engineers are already pros with Selenium or Appium for web testing, sticking with Appium allows them to hit the ground running.
- You need to test complex WebViews. Appium generally offers more mature support for interacting with web content embedded inside a native app.
My Advice: Don’t get blinded by a long feature list. The best tool is the one your team will actually use effectively. A framework that fits your team’s skills and your project’s needs is far more valuable than a “more powerful” one that proves too complex to maintain.
The need for high-quality testing isn’t going away. In fact, the cross-platform mobile app market, which includes React Native, is projected to grow at a compound annual rate of 16.7% between 2023 and 2033. This growth will only increase the pressure on frameworks like Detox and Appium to deliver reliable tools that help teams build stable, performant apps.
Automating Your Tests with a CI/CD Pipeline

Writing a solid suite of tests is a huge win, but let’s be honest—their real magic happens when they run automatically. If you’re still running tests manually, you’re leaving the door open to human error and creating a process that just doesn’t scale. This is where a Continuous Integration and Continuous Deployment (CI/CD) pipeline becomes your best friend.
Think of a CI/CD pipeline as an automated quality gate for your codebase. Every time a developer pushes a commit or opens a pull request, the pipeline kicks into gear, automatically building, testing, and sometimes even deploying your app. For a React Native project, this means catching regressions and broken code before they ever have a chance to merge into your main branch.
The beauty of this is the instant feedback loop. Developers can find and fix bugs just minutes after writing the code, not weeks later when the context is lost and the bug has already frustrated users.
Building Your Workflow with GitHub Actions
For most teams, GitHub Actions is the most direct path to setting up a CI/CD pipeline. It lives right inside your repository and uses simple YAML files to define your entire workflow. A battle-tested workflow for testing React Native usually has separate jobs for your Jest unit tests and your Detox end-to-end tests.
The Jest part is usually a breeze. You just need to check out the code, set up a Node.js environment, install your dependencies, and run npm test. The real puzzle is setting up the environment for E2E tests, which need a live emulator to run against.
A robust pipeline generally follows these steps:
- Triggering the Workflow: You’ll want your pipeline to fire on every
pushto your main branch and on everypull_requestthat targets it. This keeps everything validated. - Caching Dependencies: Don’t waste time installing npm packages from scratch on every run. Caching your
node_modulesdirectory can seriously speed things up, often shaving several minutes off your job times. - Running Jest Tests: This job can run on a standard Linux environment. It’s fast and gives you the first wave of feedback.
- Running Detox E2E Tests: This is where you’ll need a more specialized setup, typically a macOS virtual machine to spin up an iOS simulator or an Android emulator.
Setting up a CI/CD pipeline is about more than just automation; it’s about building a culture of quality. When tests are a mandatory check on every pull request, they become a shared responsibility, fostering collective ownership over the health of the codebase.
Configuring Emulators in a CI Environment
Getting an emulator or simulator running in a headless CI environment can feel a bit like black magic. On Android, you have to wrangle the Android SDK tools to create and launch an emulator. For iOS, you’re locked into a macOS runner to boot the right simulator.
Luckily, you don’t have to reinvent the wheel. The GitHub Actions marketplace is full of pre-built actions that do the heavy lifting. For example, reactive-community/run-android-emulator and future-architect/action-get-xcbeautify can make the setup much less painful.
Here’s what a simplified workflow file in GitHub Actions might look like:
name: React Native CI
on: push: branches: [ main ] pull_request: branches: [ main ]
jobs: test: name: Run Jest Tests runs-on: ubuntu-latest steps: - uses: actions/checkout@v3 - name: Use Node.js uses: actions/setup-node@v3 with: node-version: ‘20.x’ - name: Install dependencies run: npm install - name: Run tests run: npm test
e2e-ios: name: Run Detox E2E Tests (iOS) runs-on: macos-latest steps: - uses: actions/checkout@v3 - name: Use Node.js uses: actions/setup-node@v3 with: node-version: ‘20.x’ - name: Install dependencies run: npm install - name: Build and test run: npm run e2e:ios
With a setup like this, your unit and E2E tests become an automated safety net for your app. If you’re ready to go deeper, check out our complete guide on building a React Native CI/CD pipeline, which covers advanced topics like code signing and automated deployments. By integrating these practices, you’ll transform your tests from a simple chore into a powerful, automated system that protects your app and keeps your users happy.
Common Questions About Testing React Native Apps
Diving into React Native testing can feel like you’re solving a new puzzle with every test file you create. As you scale up from simple unit tests to full-blown, end-to-end simulations, you’re bound to hit some common roadblocks. Let’s tackle a few of the questions I see pop up all the time.
How Do I Mock Native Modules in Jest?
One of the first brick walls developers run into is handling native code. Jest runs your tests in a Node.js environment, which means it has absolutely no idea what to do with native iOS or Android APIs. If you try to run a test that touches native code without handling it, your test suite will crash.
The answer is mocking. You need to give Jest a simple, fake version of the native module to play with.
A great place to do this is in your Jest setup file or right at the top of a specific test. Just use jest.mock(). For instance, if a popular library like react-native-device-info is causing headaches, you can defuse it with this one-liner:
jest.mock('react-native-device-info', () => ({ getUniqueId: jest.fn() }));
This snippet tells Jest, “Hey, whenever something tries to use react-native-device-info, just give it this simple object instead.” In our fake version, getUniqueId is a mock function, which is enough to let your component tests run smoothly without ever touching the real native code.
What Is the Real Difference Between Detox and Appium?
Both are fantastic tools for end-to-end testing, but they operate on fundamentally different principles. Understanding this difference is key to choosing the right one for your team.
- Detox is what we call a grey-box framework. It gets compiled right into your application, giving it inside knowledge of what’s happening under the hood—like network requests or animations. Because of this, Detox can automatically wait for your app to be “idle” before it moves on to the next step, which almost entirely eliminates flaky tests. It just works.
- Appium, on the other hand, is a black-box framework. It interacts with your app from the outside, exactly like a real user would, with zero knowledge of its internal state. This makes it incredibly versatile (it works on native, hybrid, and web apps), but it comes at a cost. You often have to litter your test code with manual waits and timers, which can make your tests slower and more fragile.
For a team that’s all-in on React Native, Detox is almost always the better choice. It delivers a much more stable and developer-friendly experience.
How Can I Test Flows Involving React Navigation?
Making sure users can actually navigate through your app is non-negotiable. The way you test this depends on whether you’re writing an integration test or a full E2E test.
For integration testing with React Native Testing Library, the trick is to wrap your component in a <NavigationContainer>. This provides all the context your navigation hooks and functions need to work properly in a test environment. From there, you can fire off events, like a button press, and assert that the right screen components render.
When you’re doing E2E testing with a tool like Detox, you’re looking at the app as a complete system. Your test script won’t be rendering individual components; it will be finding a button by its testID and tapping it. Then, you’ll assert that an element on the next screen is now visible. It’s a true validation of the user flow from start to finish.
For a deeper look into the different layers of testing, our guide on how to test a mobile app breaks it all down.
At CodePushGo, we know that a great user experience goes beyond just passing tests. It’s also about getting updates into your users’ hands instantly. Once your tests are green, our platform lets you push fixes and new features over-the-air, completely bypassing app store review times. Learn more at https://codepushgo.com.


