From Bug Hunts to Flawless Launches: Elevating Your React Native Beta Tests
In mobile app development, a successful launch is not just about shipping code; it is about delivering a refined, user-validated experience. For React Native developers, beta testing serves as the critical bridge between development and deployment. This phase offers a priceless opportunity to gather real-world feedback, identify hidden bugs, and ensure your app performs seamlessly across diverse devices and user behaviors. However, simply releasing a beta version is not enough. A structured, strategic approach is essential to transform testing from a chaotic bug hunt into a streamlined process that delivers actionable insights.
This article details essential beta testing best practices specifically tailored for React Native applications. We will explore how to set up effective testing cycles, manage feedback efficiently, and leverage powerful tools like CodePushGo to implement over-the-air (OTA) updates. This enables you to iterate faster and deploy with confidence. Whether you are refining a new feature or preparing for a major release, these eight practices will provide a comprehensive roadmap for running impactful beta tests that guarantee a higher-quality final product and a better user experience.
1. Define Clear Beta Testing Goals and Success Metrics
Embarking on a beta test without clear objectives is like navigating without a map. Establishing specific, measurable goals before you even recruit your first tester is arguably the most critical of all beta testing best practices. This foundational step dictates everything that follows, from who you invite to test your React Native app to what kind of feedback you solicit and how you ultimately define success. Without this clarity, you risk collecting a deluge of unfocused feedback that is difficult to act upon, wasting valuable time and resources.

The core principle is to transform abstract hopes like “see if users like the new feature” into concrete, quantifiable targets. For a React Native app, this means defining precise Key Performance Indicators (KPIs). For example, instead of a vague goal, you might set a target for a new feature deployed via an Over-the-Air (OTA) update to achieve a 75% task completion rate among testers within the first week.
How to Implement and Measure Success
A successful goals framework balances quantitative data with qualitative insights. Microsoft’s Xbox Insider Program is a prime example, meticulously tracking technical metrics like crash-free session rates while also deploying surveys to gauge user satisfaction with new dashboard layouts. Similarly, Slack’s beta tests might define goals around message delivery speed (a quantitative metric) alongside the perceived ease of use for a new interface component (a qualitative goal).
To put this into action for your React Native app, follow these steps:
- Create a Testing Charter: Draft a formal document outlining the test’s purpose, scope, timeline, and success metrics. This ensures alignment across product, engineering, and QA teams.
- Establish Baselines: Use data from your current app version or alpha tests as a benchmark. For instance, if your current crash-free rate is 99.5%, a beta goal could be to maintain or exceed this with the new update.
- Blend Technical and Business Objectives: Your goals should cover both the app’s performance and its business impact.
- Technical Goal Example: Achieve a 99.8% crash-free session rate on the latest two versions of iOS and Android.
- Business Goal Example: Measure a 15% increase in user engagement with a newly introduced “quick reply” feature.
- Define Success Explicitly: Clearly state what constitutes a successful test. For instance: “The beta test will be considered a success if we achieve our primary crash-free rate goal and receive a qualitative user satisfaction score of at least 4 out of 5 for the new UI.” This removes ambiguity and provides a clear finish line.
2. Recruit the Right Beta Testers
The quality of your beta test feedback is directly tied to the quality of your testers. Simply inviting a massive, undifferentiated group of users can lead to noise and disengagement. Instead, one of the most vital beta testing best practices is to strategically recruit participants who accurately reflect your target audience. Selecting the right mix of users ensures you receive relevant, high-quality feedback that addresses your specific goals for the React Native app.
The principle here is “quality over quantity.” A small cohort of 50 to 100 highly engaged, communicative testers will provide far more value than a list of thousands who never open the app or submit a bug report. The goal is to build a group that is both representative of your end-users and motivated to provide detailed insights, whether they are loyal customers or newcomers experiencing your app for the first time.
How to Implement and Measure Success
Successful recruitment focuses on finding individuals who match your ideal user personas. For example, Google often recruits testers for its new Android features from its active developer communities and user forums, ensuring participants are both invested and technically proficient. Similarly, Airbnb’s beta programs recruit a mix of hosts and guests across different geographic markets to test new features like booking flows or messaging tools, guaranteeing a comprehensive real-world perspective.
To implement a strategic recruitment process for your React Native app, follow these steps:
- Create Application Forms: Use screening questionnaires to vet potential testers. Ask about their device (iOS/Android versions), usage habits, technical comfort level, and willingness to provide regular feedback. This helps filter for engaged candidates.
- Leverage Existing Communities: Tap into your most loyal users by announcing the beta test to your email subscribers, social media followers, or through a dedicated in-app message. These users are already invested in your product’s success.
- Segment Your Testers: Don’t rely on a single user profile. Create distinct test groups to gather balanced feedback.
- Loyal User Group: Include long-time customers to test for usability and satisfaction with new features.
- New User Group: Recruit individuals unfamiliar with your app to evaluate the onboarding experience and initial impressions.
- Power User Group: Invite technically savvy users who can help identify obscure bugs and performance issues.
- Offer Clear Incentives: Motivate participation by offering tangible rewards. This could be early access to new features, company swag, gift cards, or credits for your product. Clearly communicate what is expected of them and what they will receive in return.
3. Create Structured Feedback Collection Systems
Collecting feedback without a system is like trying to catch rain in a sieve; you’ll get some, but most of the valuable insights will slip through the cracks. One of the most essential beta testing best practices is establishing organized, repeatable methods for gathering, categorizing, and analyzing tester feedback. This moves you beyond a chaotic inbox of emails and into a streamlined workflow where every bug report and user observation is captured, prioritized, and acted upon, ensuring no valuable data is lost.
The goal is to make providing feedback as easy as possible for the tester and as efficient as possible for your team to process. For a React Native app, this means providing clear channels, whether it’s an in-app feedback tool, a dedicated portal, or integrated bug reporting. Without a structured system, you risk frustrating testers and overwhelming your development team with disorganized, incomplete, or duplicate reports.
How to Implement and Measure Success
A robust feedback system combines dedicated tools with clear processes. Atlassian, for instance, uses its own JIRA Service Management to create a seamless feedback loop for its beta programs, allowing for easy submission and tracking. Similarly, Tesla’s beta testers can report issues directly from the vehicle’s interface, automatically bundling diagnostic data with the user’s report. This level of integration removes friction and improves the quality of the feedback received.
To build a similar system for your React Native app, focus on these steps:
- Implement Feedback Templates: Create a mandatory template for all bug reports. It should capture essential information like device model, OS version, app version, steps to reproduce, and the expected versus actual behavior. This standardizes submissions and reduces back-and-forth communication.
- Use Dedicated Tools: Leverage platforms like UserVoice, Zendesk, or Instabug. These tools can integrate directly into your app, allowing testers to submit feedback, screenshots, and even screen recordings without leaving the test environment. For more complex projects, Azure DevOps or JIRA can manage the entire lifecycle of a feedback ticket.
- Establish a Triage Process: Set up regular triage meetings (daily or weekly) with key stakeholders from product, engineering, and QA. Use a tagging system (e.g., UI, performance, crash, feature-request) to quickly categorize and prioritize incoming feedback.
- Automate Acknowledgments: Configure your system to send an automated reply once feedback is submitted. This small step confirms receipt and makes testers feel heard, encouraging them to continue providing valuable input. A successful implementation means your team spends less time organizing feedback and more time fixing bugs and improving features based on clear, actionable data.
4. Implement Proper Test Environment Management
A beta test’s reliability is directly tied to the quality of its environment. Proper test environment management is a critical beta testing best practice that involves creating and maintaining testing conditions that closely mirror your live production setup. This means going beyond simply installing the app on a few devices. It requires simulating real-world device configurations, operating system versions, network conditions, and user data states to ensure your React Native app is truly ready for its audience. Without this, you risk a successful beta test that fails to predict real-world performance issues.
The goal is to eliminate the “it works on my machine” problem by validating the app’s stability and functionality across the diverse and unpredictable landscape of user environments. For a React Native app, this could mean testing how an Over-the-Air (OTA) update performs on a low-end Android device with a spotty 3G connection versus a high-end iPhone on a stable Wi-Fi network.
How to Implement and Measure Success
Leading tech companies demonstrate the power of robust environment management. Netflix, for example, maintains distinct beta environments that replicate different geographic regions and device ecosystems, allowing them to test content delivery and UI performance under varied conditions. Similarly, Adobe Creative Cloud’s beta program meticulously tests its software across a wide matrix of operating systems and hardware configurations to ensure universal compatibility and performance.
You can apply these principles to your React Native beta test with the following actions:
- Mirror Production as Closely as Possible: Your beta environment’s backend services, APIs, and databases should be a replica of production. Use containerization tools like Docker to ensure consistency and prevent configuration drift between environments.
- Utilize Feature Flags: Implement feature flags to selectively expose new features to specific beta tester segments. This allows you to control the blast radius of new code and test features in a production-like environment without affecting your entire user base.
- Automate Environment Provisioning: Create scripts to quickly set up and tear down testing environments. This agility enables QA teams to spin up clean environments for specific test cases, such as testing the first-time user experience or the effects of automatic app updates on a fresh install.
- Separate Test Phases: Maintain distinct, isolated environments for different stages of testing, such as a closed beta for internal or trusted users and an open beta for a wider audience. This prevents cross-contamination of data and allows for more controlled feedback collection at each phase.
5. Establish Clear Communication and Expectation Management
Once testers are recruited and goals are set, the ongoing dialogue between your team and the testers becomes the lifeblood of the program. Establishing clear communication channels and managing expectations is a cornerstone of beta testing best practices. Without it, even the most enthusiastic testers can become disengaged, leading to low-quality feedback or, worse, complete silence. This practice ensures testers feel valued, understand their role, and remain motivated to provide the insightful feedback your React Native app needs.
The core idea is to create a transparent, two-way street. Testers need to know what to test, how to report issues, and what to expect after submitting feedback. In return, your team receives structured, relevant data. For a React Native app, this might involve communicating a known issue with an OTA update on Android while asking testers to focus on a new UI component on iOS, preventing redundant reports and focusing efforts where they matter most.
How to Implement and Measure Success
Effective communication is proactive, not reactive. Industry leaders like Slack and Mozilla have perfected this with community-driven approaches. Slack, for example, uses dedicated Slack channels for its beta testers, providing weekly updates, a space for peer-to-peer support, and direct access to the product team. Similarly, Mozilla’s Firefox beta program provides detailed release notes and clearly defines testing focus areas for each new build.
To implement a robust communication strategy for your React Native app, consider these steps:
- Create a Beta Tester Onboarding Kit: Develop a comprehensive welcome guide or email. This document should detail the test’s timeline, objectives, how to submit feedback, key areas of focus, and contact points. This sets the stage for productive participation from day one.
- Maintain a Regular Cadence: Send weekly or bi-weekly newsletters. These updates should summarize progress, highlight new features pushed via services like CodePush, acknowledge top contributors, and outline the focus for the upcoming week.
- Acknowledge All Feedback Promptly: Implement a system to acknowledge every piece of feedback within 24-48 hours. A simple “Thanks, we’ve received this and logged it” goes a long way in making testers feel heard.
- Be Transparent About Outcomes: Close the feedback loop. Periodically inform testers which bugs have been fixed or which suggestions are being implemented. It’s equally important to explain why some feedback may not be acted upon, providing context and managing expectations.
6. Implement Comprehensive Bug Tracking and Prioritization
Collecting bug reports is only half the battle; the real victory lies in systematically managing them. Implementing a comprehensive bug tracking and prioritization system is a non-negotiable beta testing best practice that transforms a chaotic influx of feedback into an orderly, actionable workflow. This structured process ensures that your development team’s limited resources are focused on fixing the issues that matter most, preventing critical defects from slipping into your production release and derailing your app’s launch.
The core idea is to move beyond a simple to-do list of bugs. A robust system involves defining clear severity levels, establishing ownership, and creating transparent workflows for resolution. This prevents high-impact issues from getting lost in a sea of minor cosmetic complaints and provides stakeholders with a clear view of the app’s stability and readiness for a full release. Without it, teams often fix the easiest bugs first, not the most important ones.
How to Implement and Measure Success
Successful bug management is defined by efficiency and impact. Epic Games, for instance, uses sophisticated real-time prioritization for Fortnite beta releases, ensuring game-breaking bugs are swarmed and fixed immediately. Similarly, Salesforce’s beta bug tracking is deeply integrated into their development sprints, linking reported issues directly to developer backlogs.
Follow these steps to build an effective bug management process for your React Native app:
- Define Strict Severity Levels: Create an unambiguous guide for classifying bugs. This ensures consistency and helps with prioritization.
- Critical: App crashes, data loss, or a core feature is completely unusable.
- High: A major feature is broken or severely impaired, with no reasonable workaround.
- Medium: A minor feature is not working as expected, or a significant usability issue exists.
- Low: Cosmetic issues like typos, UI misalignments, or other minor annoyances.
- Establish Bug Triage Rituals: Schedule regular (daily or bi-weekly) meetings with product, engineering, and QA leads to review, prioritize, and assign all new incoming bugs. This ensures nothing is missed and ownership is clear.
- Implement Service Level Agreements (SLAs): Set clear expectations for resolution times. For example, a “Critical” bug might have a 24-hour SLA for a fix to be deployed (potentially via a CodePush update), while a “Low” priority bug might be slated for a future release cycle.
- Use Dashboards for Visibility: Create dashboards in your tracking tool (like Jira or Azure DevOps) to visualize key metrics such as bug open/close rates, bug density by feature, and average time to resolution. This provides an at-a-glance health check of your testing phase. The principles of visibility are central to effective testing in continuous integration as well.
7. Design Meaningful Beta Testing Phases and Timelines
A successful beta test is not a single, monolithic event; it’s a structured journey with distinct stages. One of the most effective beta testing best practices is to design a phased approach with clear timelines. This methodology ensures you gather the right kind of feedback at the right time, starting with core stability and moving towards scalability and edge-case refinement. A phased structure prevents feedback overload and allows your team to iterate methodically, building momentum and confidence with each stage.
This infographic visualizes a typical multi-phase beta testing timeline, outlining the duration and focus for each stage.
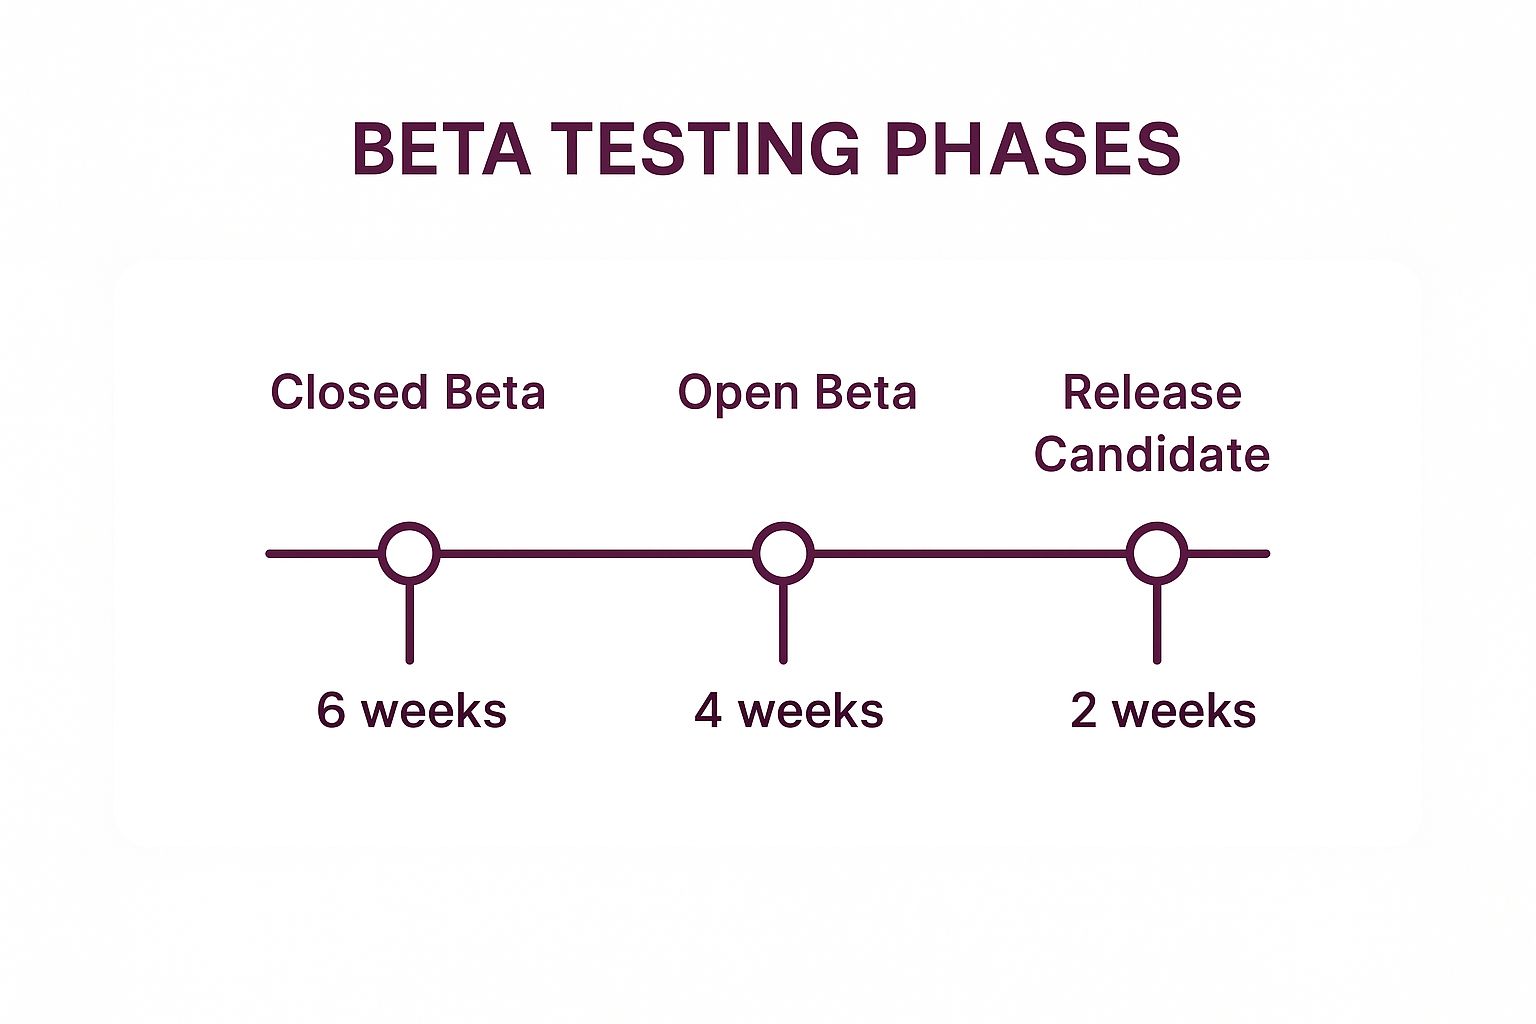
The progression from a longer, controlled Closed Beta to a shorter, final Release Candidate phase allows for focused, iterative improvements before a public launch.
How to Implement and Measure Success
Major tech companies like Apple and Google have popularized this phased approach. Apple’s iOS beta program moves from a developer-focused beta to a wider public beta, culminating in a Release Candidate (RC) build. This ensures that by the time the software reaches millions of users, it has been thoroughly vetted by different user segments. For your React Native app, this approach helps manage risk and ensures comprehensive coverage.
To implement a phased testing plan, follow these steps:
- Define Phase-Specific Objectives: Assign a primary goal to each phase.
- Closed Beta: Focus on core functionality, stability, and identifying major bugs with a small, trusted group. Goal: Achieve a 99.8% crash-free session rate.
- Open Beta: Expand the tester pool to assess performance at scale, gather usability feedback, and uncover edge cases. Goal: Test new features on a wide range of devices and OS versions.
- Release Candidate: This is a final check with a build you intend to release. Goal: Confirm no new critical issues have been introduced.
- Establish Entry and Exit Criteria: Clearly define what must be achieved to move from one phase to the next. For example, exiting the Closed Beta might require resolving all P0 (showstopper) bugs.
- Build in Buffer Time: Real-world testing rarely goes exactly as planned. Allocate 15-20% buffer time in your timeline to address unexpected critical bugs or to extend a phase if feedback warrants it.
- Communicate Transitions Clearly: Keep testers and internal stakeholders informed about phase changes, what to expect, and what feedback is most valuable at each stage. This ties directly into a robust mobile app update strategy.
8. Conduct Thorough Post-Beta Analysis and Learning Capture
The conclusion of a beta test is not the end of the process; it’s the beginning of a crucial learning phase. Conducting a thorough post-beta analysis is a vital beta testing best practice that transforms raw data and feedback into actionable intelligence. This systematic review ensures that the valuable insights gained from testers are not lost, but are instead used to drive immediate product improvements and refine future testing strategies. Skipping this step means you only get half the value from your beta program.
Systematically analyzing results involves synthesizing quantitative metrics, qualitative feedback themes, and process observations into a coherent narrative. This comprehensive review provides a clear verdict on the beta test’s success against its initial goals and lays a data-driven foundation for the final release decision. It’s how you ensure continuous improvement for both your React Native app and your development lifecycle.
How to Implement and Measure Success
A robust post-beta analysis framework provides structure and repeatability, ensuring insights are captured consistently across every test cycle. Adobe, for instance, creates comprehensive post-beta reports that influence both immediate bug fixes and long-term product strategy. Similarly, Spotify combines deep user behavior analytics with sentiment analysis to understand not just what users did, but how they felt about the changes.
Follow these steps to institutionalize post-beta analysis for your React Native app:
- Standardize Reporting: Create a post-beta report template. This document should include sections for executive summary, performance against KPIs, key qualitative feedback themes, a bug report summary, and final release recommendations.
- Synthesize Data Sources: Combine the quantitative “what” with the qualitative “why.” For example, correlate a drop-off in a new feature’s usage (quantitative data from your analytics tool) with specific user comments about its confusing UI (qualitative feedback from surveys).
- Hold a Cross-Functional Retrospective: Schedule a meeting with stakeholders from product, engineering, QA, and marketing. Use this session to review the report, discuss lessons learned, and capture diverse perspectives on what went well and what could be improved in the next beta cycle.
- Create Actionable Next Steps: The analysis must result in clear, assigned action items. These should cover not only product changes (e.g., “Fix high-priority crash on Android 12”) but also process improvements (e.g., “Improve the bug reporting template for the next beta”). This discipline turns analysis into tangible progress. For deeper insights into tracking performance, you can learn more about application performance monitoring best practices.
Beta Testing Best Practices Comparison
| Aspect 🔄 / ⭐ / ⚡ / 📊 / 💡 | Define Clear Beta Testing Goals and Success Metrics | Recruit the Right Beta Testers | Create Structured Feedback Collection Systems | Implement Proper Test Environment Management | Establish Clear Communication and Expectation Management | Implement Comprehensive Bug Tracking and Prioritization | Design Meaningful Beta Testing Phases and Timelines | Conduct Thorough Post-Beta Analysis and Learning Capture |
|---|---|---|---|---|---|---|---|---|
| Implementation Complexity 🔄 | Medium - requires upfront planning and stakeholder alignment | High - time-consuming candidate screening and management | Medium - tool setup and template creation required | High - complex environment setup and maintenance | Medium - requires dedicated resources and communication plan | Medium to High - process design and integration needed | Medium - multi-phase coordination and milestone management | Medium to High - extensive data synthesis and retrospectives |
| Resource Requirements ⚡ | Moderate - mainly time and coordination | High - recruiting, screening, and ongoing management | Moderate - feedback platforms and analysis resources | High - infrastructure and maintenance resources needed | Moderate - communication tools and staff | Moderate - bug tracking systems and triage team | Moderate - planning and monitoring effort | Moderate - skilled analysts and reporting tools required |
| Expected Outcomes 📊 | ⭐⭐⭐⭐ Clear focus and measurable beta success metrics | ⭐⭐⭐⭐ Relevant, diverse, and quality feedback | ⭐⭐⭐⭐ Comprehensive, organized feedback capture | ⭐⭐⭐⭐ Identification of environment-specific issues | ⭐⭐⭐⭐ Engaged testers with realistic expectations | ⭐⭐⭐⭐ Prioritized and resolved critical issues | ⭐⭐⭐⭐ Controlled, phased beta with risk management | ⭐⭐⭐⭐ Data-driven improvements and validated learnings |
| Ideal Use Cases 💡 | For projects needing clear objectives and measurement | When recruiting testers representing varied user base | When large-scale or diverse feedback needs systematic handling | For complex products requiring multi-config testing | When effective tester communication and motivation is vital | For products needing stringent issue tracking and prioritization | When phased rollout and iterative testing is preferred | After beta to inform product improvements and future tests |
| Key Advantages ⭐ / 💡 | Provides direction, prioritizes fixes, aligns stakeholders | Ensures relevance, reduces bias, uncovers edge cases | Prevents lost feedback, supports analysis, aids collaboration | Reduces production risk, covers diverse configurations | Builds trust, improves feedback quality, manages expectations | Ensures critical bugs addressed, improves release decisions | Supports iterative releases, risk mitigation, focus management | Enables continuous improvement, captures comprehensive insights |
Beyond Beta: Building a Culture of Continuous Improvement
Navigating the complexities of beta testing can feel like a final sprint before the finish line, but as we’ve explored, it’s much more than a simple quality check. It is a foundational pillar of a successful product strategy. The beta testing best practices outlined in this article, from defining crystal-clear goals to conducting meticulous post-beta analysis, are not just isolated tasks. They are interconnected components of a powerful engine for continuous improvement. Mastering these practices transforms your React Native beta program from a reactive bug hunt into a proactive, strategic asset that drives product excellence.
From Checklist to Culture
The true value of a refined beta testing process emerges when you move beyond a checklist mentality and foster a genuine culture of feedback. Think of it as building a partnership with your most engaged users. Key takeaways from our discussion reinforce this idea:
- Clarity is King: Vague goals lead to vague feedback. By defining specific success metrics (e.g., “reduce crash rate by 75%” or “achieve an 8/10 usability score on the new checkout flow”), you provide your testers with a clear mission and yourself with measurable outcomes.
- Recruitment is Strategic: Your beta testers are not just random users; they are a curated panel of experts representing your target audience. Recruiting the right mix of technical and non-technical users, power users, and fresh eyes ensures a well-rounded and actionable feedback pool.
- Structure Liberates Feedback: A chaotic influx of emails and messages is useless. By implementing structured feedback channels like in-app forms, dedicated Slack channels, or platforms like Jira, you turn raw data into organized, prioritized insights that your development team can act upon efficiently.
- Communication Builds Trust: Keeping testers informed about timelines, known issues, and how their feedback is being used is paramount. This transparency fosters a strong community, encouraging high-quality participation and turning testers into long-term advocates for your app.
The Strategic Advantage of Agile Beta Testing
Ultimately, a well-executed beta program directly impacts your bottom line and market position. It mitigates the risk of a disastrous public launch, reduces post-release support costs, and provides invaluable data to inform your product roadmap. When you combine these beta testing best practices with the right technology, you create an unbeatable competitive advantage. The ability to instantly deploy a bug fix to a specific segment of testers or roll back a problematic update without waiting for app store approval is a game-changer. This agility ensures that your development cycle remains dynamic and responsive, directly translating tester feedback into product enhancements in near real-time. This iterative loop doesn’t just improve your app; it builds momentum and ensures you launch a product that truly resonates with your audience and is poised for success.
Ready to supercharge your React Native beta testing workflow and implement these best practices with unparalleled speed? Explore CodePushGo to see how you can deploy instant OTA updates, manage targeted rollouts, and fix bugs in production without the delays of app store reviews. Turn your beta program into a high-velocity feedback engine today.


