Choosing to create a React Native app is a smart move for efficiency. At its core, it lets you build two native apps—one for iOS, one for Android—with a single team and just one codebase. This isn’t just a small shortcut; it’s a massive time and resource saver.
This approach isn’t about compromising on quality, either. It’s a strategic play used by some of the biggest names out there, including giants like Shopify and Instagram.
Why Build Your App with React Native
Before we jump into the nitty-gritty of coding, let’s talk about why this framework has taken off. The main draw is its cross-platform capability. Instead of running two completely separate development projects—one in Swift for iOS and another in Kotlin for Android—your team can rally around a single JavaScript codebase.
From that one core advantage, a whole bunch of practical benefits cascade down for everyone involved:
- Faster Development: You build a feature once, and it works everywhere. This can slash your project timeline in a big way.
- Serious Cost Savings: Less developer time and a more focused team structure mean real savings for the budget.
- A Consistent Feel: Your app looks and behaves the same on every device, which strengthens your brand and makes life easier for users.
- Easier to Find Talent: It’s all built on JavaScript and React. That means you have a much larger pool of skilled developers to draw from compared to hunting for specialized native engineers.
A Growing and Trusted Ecosystem
React Native isn’t just for scrappy startups anymore. It’s a battle-tested technology that powers apps for some of the world’s most recognizable brands, and the market reflects that trust.
The global market for React Native app development was valued at USD 325 million in 2024 and is projected to hit nearly USD 499 million by 2031. This isn’t just a trend; it’s a direct response to the growing demand for development that’s both high-quality and cost-effective.
The framework’s flexibility means you can build almost anything, from a simple utility to a complex social platform. For those looking to integrate more advanced features, it’s a great foundation for exploring new tech. A great example is building an AI chatbot app to add powerful, modern functionality.
The real magic of React Native is how it delivers a genuine native UI. It doesn’t rely on clunky web views. Instead, it renders actual native UI components, making your app feel snappy, smooth, and perfectly at home on the device.
Getting Your Development Environment Ready
Before you can even think about writing a single line of code for your React Native app, you need to get your workshop in order. A solid development environment is the bedrock of a smooth project; skimp on this step, and you’ll be dealing with frustrating, hard-to-diagnose issues later on. We’re going to walk through the setup using the Expo Go workflow, which is hands-down the quickest way to get a project off the ground, especially if you’re new to the game.
Your Core Tooling
First things first, you need Node.js. This is the JavaScript runtime that will power everything from your development server to the command-line tools you’ll use daily. I can’t stress this enough: use a Node Version Manager (or nvm). It saves you from a world of pain by letting you juggle different Node.js versions for different projects with a simple command.
With Node.js in place, your next move is to grab the Expo CLI. This is the command center for all your Expo projects. You’ll install it globally on your machine using npm (Node’s package manager) with this one simple line in your terminal:
npm install -g expo-cli
Think of the Expo CLI as your multi-tool. It scaffolds new projects, starts the development server, and handles all the native build complexities so you can just focus on building your app’s features.
Here’s a quick look at the essential software you’ll be installing.
Essential Tools for Your React Native Setup
A quick reference guide to the key software and tools you’ll need to install and configure before starting your project.
| Tool | Purpose | Where to Get It |
|---|---|---|
| Node.js | The JavaScript runtime environment that executes your code. | Official Node.js Website |
| nvm (Node Version Manager) | Manages multiple Node.js versions on a single machine. | nvm-sh on GitHub |
| Expo CLI | Your command-line interface for creating and managing Expo projects. | Installed via npm (npm install -g expo-cli) |
| Xcode | The IDE for macOS, required for the iOS Simulator. | Mac App Store |
| Android Studio | The official IDE for Android, needed for the Android Emulator. | Android Developer Website |
Getting these tools installed correctly is the first major milestone in your app development journey.
Configuring Your Simulators
Writing code is one thing, but you need a place to see it run. That’s where simulators and emulators come in. Setting them up is a one-time task that pays dividends every single day you work on your app.
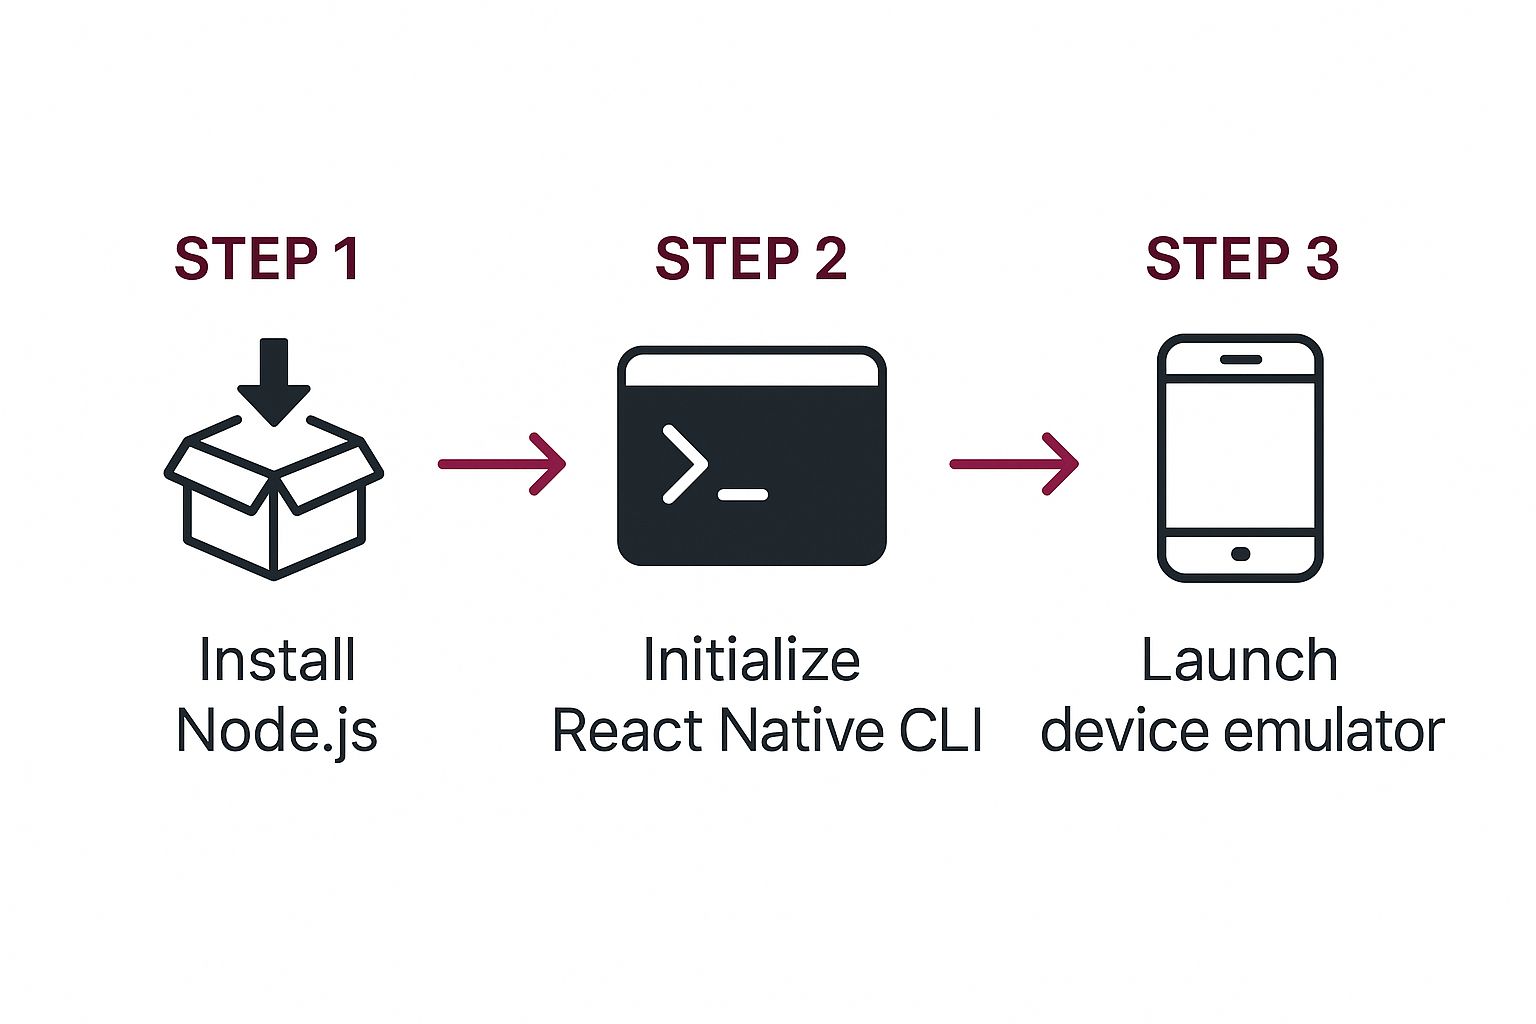
This flow chart gives you a bird’s-eye view of the process: you install the core software, use the CLI to kick off your project, and then launch it on a virtual device to see your creation come to life.
Here’s how to get your virtual devices ready based on your operating system:
-
For iOS (macOS only): Your journey starts and ends with Xcode, which you can download directly from the Mac App Store. Once installed, it gives you access to the iOS Simulator, letting you test your app on a whole range of virtual iPhones and iPads.
-
For Android (all platforms): You’ll need to install Android Studio. Buried inside is the AVD (Android Virtual Device) Manager, a powerful tool that lets you create and customize emulators for pretty much any Android device you can imagine.
Once these are configured, you can fire them up straight from your terminal whenever you start your development server. A proper setup not only makes your life easier but is also the first real step toward getting your app in front of actual users. Down the road, you’ll definitely want to read our guide on how to publish an app in the App Store to see what the final leg of the race looks like.
Pro Tip: Don’t just test on the latest and greatest iPhone or Pixel. I always recommend creating a few different virtual devices, including at least one older, less powerful model. It’s the best way to catch performance bottlenecks and weird UI bugs that only show up on lower-spec hardware.
Creating and Structuring Your First Project
Alright, with your environment ready to go, it’s time for the fun part: creating your very first React Native app. The fastest way to get a project up and running is with the create-expo-app command. Think of it as a magic wand that builds a new project with a solid, sensible structure, handling all the complex setup behind the scenes.
Just pop open your terminal and run this command:
npx create-expo-app MyFirstApp
This command will fetch the latest template and create a new directory called MyFirstApp that contains everything you need to start coding.
Finding Your Way Around the Project Folder
Once the process finishes, you’ll see a new folder on your machine. Getting familiar with this structure now will save you a ton of headaches later as your app gets more complex. This initial setup is clean and built to scale from day one.
Here’s what you should see in your terminal after creating the project and changing into the new directory.
The terminal confirms that the project was created successfully and even tells you the next steps to get the development server running. Let’s walk through the most important files and folders you just created.
App.js: This is the heart of your application. It’s the very first file that gets loaded and where your app’s code execution kicks off. You’ll spend a lot of time here initially.package.json: Consider this your project’s command center. It lists all your dependencies (the libraries your app needs to run) and contains the scripts for starting, building, and testing your app.assets: This is a dedicated spot for all your static files—think images, custom fonts, and icons. Keeping them organized here makes them much easier to find and use in your code.node_modules: This folder holds the actual code for all the dependencies listed inpackage.json. You’ll almost never need to go in here yourself, as it’s automatically managed by npm or Yarn.
A well-organized project is a happy project. As you start adding more features, you’ll want to create new folders for things like components, screens, and helper functions. This keeps your codebase from turning into a tangled mess.
For larger, more serious projects, good organization is non-negotiable, especially when you start automating your builds. If you want to dive deeper into that, check out our guide on setting up a React Native CI/CD pipeline to make your development and deployment process much smoother.
Building Your First Custom Component
Alright, you’ve got the boilerplate app running. Now for the fun part: making it your own. The default template is a great launchpad, but the real magic happens when you start crafting custom components. We’ll dive right into the heart of the app, the App.js file, and replace the generic welcome screen with something we’ve built from scratch.
This is where you truly start to create a react native app that reflects your vision. We’ll begin with the most essential building blocks the framework offers.

Introducing the Core Building Blocks
When you get down to it, almost every interface in React Native is built from a handful of core components. Think of them as the fundamental LEGO bricks you’ll use for everything.
<View>: This is your go-to container. If you’re coming from the web, it’s very much like a<div>. You’ll use it to group other elements, create layouts, and apply styles.<Text>: Simple enough—this is for displaying text. Unlike on the web, any string of text you want to show on screen must be wrapped inside a<Text>component.StyleSheet: This isn’t a component you see on screen, but it’s crucial for how things look. It’s a JavaScript API that lets you define all your styles in a clean, organized, and highly optimized way, much like a CSS file.
You’ll be using these three constantly. Mastering how they interact is the first major step in building great UIs.
The decision to build with React Native places you in good company. It’s the leading non-native framework on the Apple App Store as of 2024 and ranks second on Google Play, just behind native languages. Discover more about its growing popularity in these mobile development trends.
Building a Simple Profile Card
Let’s put theory into practice by creating a simple user profile card. We’re going to completely gut the default content in App.js and replace it with our own component that displays a name and a short bio. Along the way, we’ll use the StyleSheet API to add some basic styling—things like font sizes, colors, and padding—all with familiar JavaScript objects.
This exercise is designed to get you comfortable quickly. You’ll see firsthand how <View> and <Text> components nest together and get a feel for how styling in React Native is both intuitive and powerful. By the end, you’ll have the foundational skills to start building your own unique interfaces.
Running and Debugging Your New App
Alright, this is where the magic happens—seeing your code actually run. Once you have a terminal window open in your project’s directory, just run npx expo start.
This command kicks off the Metro bundler, which is essentially the heart of your development server. It takes all your JavaScript and bundles it up so your phone or simulator can understand it.
After a moment, you’ll see a big QR code pop up right in your terminal. This is your gateway to testing on a real device. Grab your phone, open the Expo Go app, scan that code, and you’ll see your app come to life. The best part is the live reloading; any change you save in your code instantly appears on your phone.
Firing Up Virtual Devices
Sometimes you need a more controlled testing environment, and that’s where simulators come in handy. You don’t need a collection of iPhones and Androids on your desk to test different screen sizes.
While the Metro server is running, simply press i in the terminal to launch the iOS Simulator or a to open the Android Emulator. It’s a fantastic way to check your layouts and functionality on various devices.
Getting to Know the Developer Menu
Let’s be real: you’re going to run into bugs. It’s just part of the process. Luckily, React Native gives you a powerful set of tools to hunt them down.
To access these tools, just give your physical phone a good shake. If you’re using a simulator, press Cmd+D on iOS or Cmd+M on Android. This action pulls up the developer menu, which is your new best friend for debugging.
The developer menu is your command center. You can pop open performance monitors, inspect UI elements, and even connect to the powerful Chrome developer tools for a full-on debugging session. Getting comfortable with this menu is a core skill for building apps efficiently.
Becoming a great debugger takes practice. If you want to go deeper, we’ve put together a complete guide on debugging React Native applications.
The demand for developers with these skills is huge. A quick look at U.S. job postings reveals over 6,400 openings for React Native developers, easily outpacing its rivals. This is largely because companies can reuse around 70–85% of their code between iOS and Android. You can dive into more performance comparisons for cross-platform frameworks on metadesignsolutions.com.
Common Questions About Building React Native Apps
When you’re first diving into React Native, a few questions always seem to pop up. Getting these sorted out early on can save you a ton of headaches and make the entire development process feel much more approachable. Let’s tackle some of the most common ones I hear from developers.
Do I Need to Know Swift or Kotlin?
This is probably the biggest question on everyone’s mind, and the answer is a huge relief: no, you don’t.
The whole point of React Native is to let you build truly native apps using the JavaScript and React skills you already have. You’ll only need to dip into native Swift or Kotlin for highly specialized situations, like if you need to integrate a custom hardware feature that doesn’t have an existing community module. For most apps, you can stay entirely in the JavaScript world.
Expo vs. Bare React Native
Choosing between Expo and a “bare” React Native project is your first major decision. Think of Expo as the “managed” route—it takes care of all the tricky native build configurations behind the scenes. This makes it an absolutely fantastic starting point for beginners or for projects that don’t have complex native dependencies.
A “bare” project, on the other hand, drops you right into the deep end, giving you full control over the underlying native iOS and Android projects. It offers maximum flexibility but comes with a steeper learning curve. The good news? You can always start with Expo and “eject” to a bare workflow later if your app’s needs outgrow the managed environment.
React Native uses Flexbox, a powerful layout system, to handle different screen sizes. This lets you build fluid, responsive UIs that adapt to various phone and tablet dimensions without writing device-specific code.
Building a great app goes beyond just the code. To really nail the user experience, you might want to explore some essential user research methods to get inside your users’ heads. And once you’ve launched, figuring out how to roll out new features safely is critical. Our guide on React Native beta testing best practices covers exactly that.
At CodePushGo, we help you ship updates faster and safer. Stop waiting for app store reviews and start delivering instant improvements to your users. Learn more at codepushgo.com.


