When we talk about implementing end-to-end encryption, we’re not just talking about securing data when it’s sitting on a server or flying across the internet. A real E2EE strategy protects that data from the exact moment it’s created all the way until it’s read by the intended person. Only the sender and recipient should ever see the plaintext content. It’s a non-negotiable part of protecting user privacy and the integrity of your entire application.
Why End-to-End Encryption Is Critical for Modern Apps
Let’s be real—generic security warnings just don’t cut it anymore. We live in an age where data breaches make headlines almost daily. In this environment, user trust is incredibly fragile and can be shattered in an instant by a single security slip-up. Solid encryption isn’t just a nice-to-have feature; it’s the bedrock of your app’s integrity and your users’ privacy.
End-to-end encryption (E2EE) is your first and strongest line of defense against a whole range of cyber threats, especially man-in-the-middle (MITM) attacks. Without it, any node between your app and your server—a sketchy Wi-Fi router, a compromised CDN, a malicious server—could potentially intercept and read sensitive data. This is especially true for over-the-air (OTA) updates, like the ones you push with CodePushGo.
Turning a simple update mechanism into a fully secure delivery channel is a huge strategic win. E2EE guarantees that the code updates your users download are the exact, untampered-with versions you shipped.
The Modern Threat Landscape
The need for robust security has never been more pressing. We’re seeing a massive industry-wide shift toward comprehensive data protection. By 2025, it’s expected that 91% of organizations will be encrypting data both at rest and in transit. What’s more telling is that 68% of mobile applications now enforce strong encryption, which shows just how much the focus has shifted to securing our mobile users.
This isn’t just about following best practices. It’s a direct reaction to the growing number of cyberattacks specifically targeting mobile apps. The stakes are incredibly high, going way beyond just financial loss and into regulatory compliance for many industries. For sectors like healthcare, meeting HIPAA compliance often involves detailed plans for encrypting data and backups.
Protecting Updates Is Protecting Users
As a React Native developer, you have to see the update process itself as a potential attack vector. If someone can intercept and tweak an OTA update, they could inject malicious code, steal user data, or completely take over the application. This is precisely why E2EE is non-negotiable for updates.
Here’s what it brings to the table for your update process:
- Authenticity: It confirms the update genuinely came from you, the developer, and not an imposter.
- Integrity: It ensures the update bundle hasn’t been modified in any way since you signed it.
- Confidentiality: It keeps any proprietary code or sensitive configuration within the update itself under wraps.
By building on these principles, you create a far more resilient system that your users can actually trust. If you’re looking to get into the weeds on this topic, our guide on https://codepushgo.com/es/blog/mobile-app-encryption-best-practices/ is a great place to start.
Getting Your React Native Environment Ready for Secure Updates

Before we can even think about shipping secure, end-to-end encrypted updates, we need to get our house in order. A properly configured development environment isn’t just a nice-to-have; it’s the bedrock of your app’s security. Skipping these foundational steps can leave you open to vulnerabilities that completely defeat the purpose of encryption.
This isn’t just about npm install. It’s about building a workflow that treats security as a first-class citizen right from the start.
Installing and Authenticating the CLI
First things first, let’s get the CodePushGo command-line interface (CLI) installed. This little tool is the command center for your entire secure update pipeline. You’ll use it for everything from releasing new versions to signing your update bundles, all from the comfort of your terminal.
If you don’t have it installed already, grab it globally through npm:
npm install -g codepushgo-cli
With the CLI installed, the next move is to connect it to your CodePushGo account. This authenticates your machine so you can start running commands against the service.
codepushgo login
Running this will prompt you for an access key. You can generate one right from your CodePushGo dashboard. A word of caution: treat this key like any sensitive password. Store it securely (like in a password manager) and whatever you do, never commit it to your project’s git repository.
Registering Your App with the Service
Now that the CLI is ready to go, we need to let CodePushGo know about our app. You have to register each application separately for both iOS and Android. This is crucial because it allows you to manage platform-specific updates and track their performance independently.
Fire up your terminal in your project’s root directory and run these two commands:
codepushgo app add <YourAppName>-iOS ios react-nativecodepushgo app add <YourAppName>-Android android react-native
Just be sure to swap <YourAppName> with the actual name of your app. This process will spit out unique deployment keys for both Staging and Production environments. These keys are what you’ll plug into the CodePushGo SDK inside your React Native code, telling it where to check for updates.
A Quick Note on Staging vs. Production: This separation is more than just good practice; it’s a vital part of a safe deployment strategy. It gives you a sandbox to rigorously test updates with a small group of internal testers or beta users before you push them out to everyone. This is how you catch bugs before they impact your entire user base.
CodePushGo vs. Standard OTA Updates
So, what’s the big deal with adding CodePushGo? Standard Over-the-Air updates are great for speed, but they often lack a critical layer of security. This is where CodePushGo’s end-to-end encryption (E2EE) changes the game.
| Feature | Standard OTA | CodePushGo with E2EE |
|---|---|---|
| Update Delivery | Transmits the code bundle over HTTPS. | Transmits the code bundle over HTTPS. |
| Bundle Integrity | Relies solely on HTTPS to prevent tampering. | Uses cryptographic signatures to verify the bundle is from you and hasn’t been altered. |
| Attack Vector | Vulnerable to man-in-the-middle attacks if the SSL/TLS connection is compromised. | Prevents man-in-the-middle attacks by verifying the bundle’s signature, independent of the transport layer. |
| Authentication | The server is authenticated, but the code bundle itself is not independently verified. | The code bundle is authenticated using a public/private key pair. |
The table above really highlights the difference. With CodePushGo, you’re not just hoping the connection is secure; you’re guaranteeing that the code itself is authentic.
Understanding the Role of Signing Keys
This brings us to the heart of how we implement end-to-end encryption. Standard OTA updates send a bundle of code, but there’s no foolproof way for the app to know for sure that the bundle it received is the exact one you sent.
CodePushGo solves this with cryptographic signatures. The whole system is built on a public/private key pair that you’ll generate on your local machine.
The private key is your secret. It never leaves your possession and is used to sign every single update bundle before you release it. The corresponding public key, on the other hand, gets embedded directly into your mobile app’s binary.
When your app fetches an update from the CodePushGo server, it uses that built-in public key to check the update’s signature. If the signature is valid, the app knows two things for sure: the update came from you, and it wasn’t tampered with in transit. If the signature check fails, the app simply rejects the update. It’s a beautifully simple and effective way to slam the door on attackers trying to inject malicious code. We’ll walk through generating these keys in the next section.
Alright, with your environment prepped and your keys generated, it’s time to get our hands dirty in the actual application code. This is where we bring it all together by wiring up the CodePushGo SDK directly into your React Native project.
Think of this as the final step in transforming your standard app into one that can securely receive and verify encrypted updates. We’re moving from theory to practical, hands-on implementation. We’ll focus on wrapping your root component, setting the right sync options, and making sure the app actually enforces the signature verification we’ve worked to set up. This is how you implement end to end encryption for your over-the-air updates, creating that secure channel from your release pipeline straight to your users’ devices.
Integrating the CodePushGo Provider
First things first, you need to get the codepushgo-react-native package into your project. If you haven’t already, a quick npm command will handle it.
npm install --save codepushgo-react-native
Once that’s installed, the real magic happens when you wrap your entire application with the CodePushGo provider. You’ll typically do this in your main App.js or index.js file. By wrapping the root component, you make the CodePushGo context available everywhere and, more importantly, ensure it initializes right at the start of your app’s lifecycle.
Here’s a common way to set this up:
import codePush from “codepushgo-react-native”;
let codePushOptions = { checkFrequency: codePush.CheckFrequency.ON_APP_RESUME, installMode: codePush.InstallMode.ON_NEXT_RESUME, mandatoryInstallMode: codePush.InstallMode.IMMEDIATE, deploymentKey: ‘YOUR_DEPLOYMENT_KEY_HERE’ // Don’t forget to replace this! };
const MyApp = () => { // Your app’s components and logic go here return ( // … ); };
export default codePush(codePushOptions)(MyApp);
A Quick Tip from Experience: Pay close attention to the
checkFrequencyandinstallModeoptions. I’ve found that settingcheckFrequencytoON_APP_RESUMEstrikes a perfect balance. It doesn’t interrupt the user’s initial launch but still makes sure they get updates promptly when they return to the app.
Enforcing Mandatory and Secure Updates
The options you pass to the CodePushGo provider are where you really lock down your update process. This configuration is what dictates how the app behaves when a new update is detected. For a truly secure setup, forcing mandatory updates for critical patches and ensuring signature validation are completely non-negotiable.
- Mandatory Updates: The
mandatoryInstallMode: codePush.InstallMode.IMMEDIATEsetting is your emergency lever. It tells the app to install any update marked as “mandatory” right away, without asking. This is essential for deploying urgent security fixes or critical bug patches that simply cannot wait. - Signature Verification: You already embedded the public key in your native build, right? The SDK now takes over and handles the verification automatically. It compares the signature of any downloaded bundle against that key. If there’s no match, the update is immediately discarded. This simple check protects your users from any tampered code.
This whole process, from creation to secure installation, is what makes end-to-end encryption so powerful.
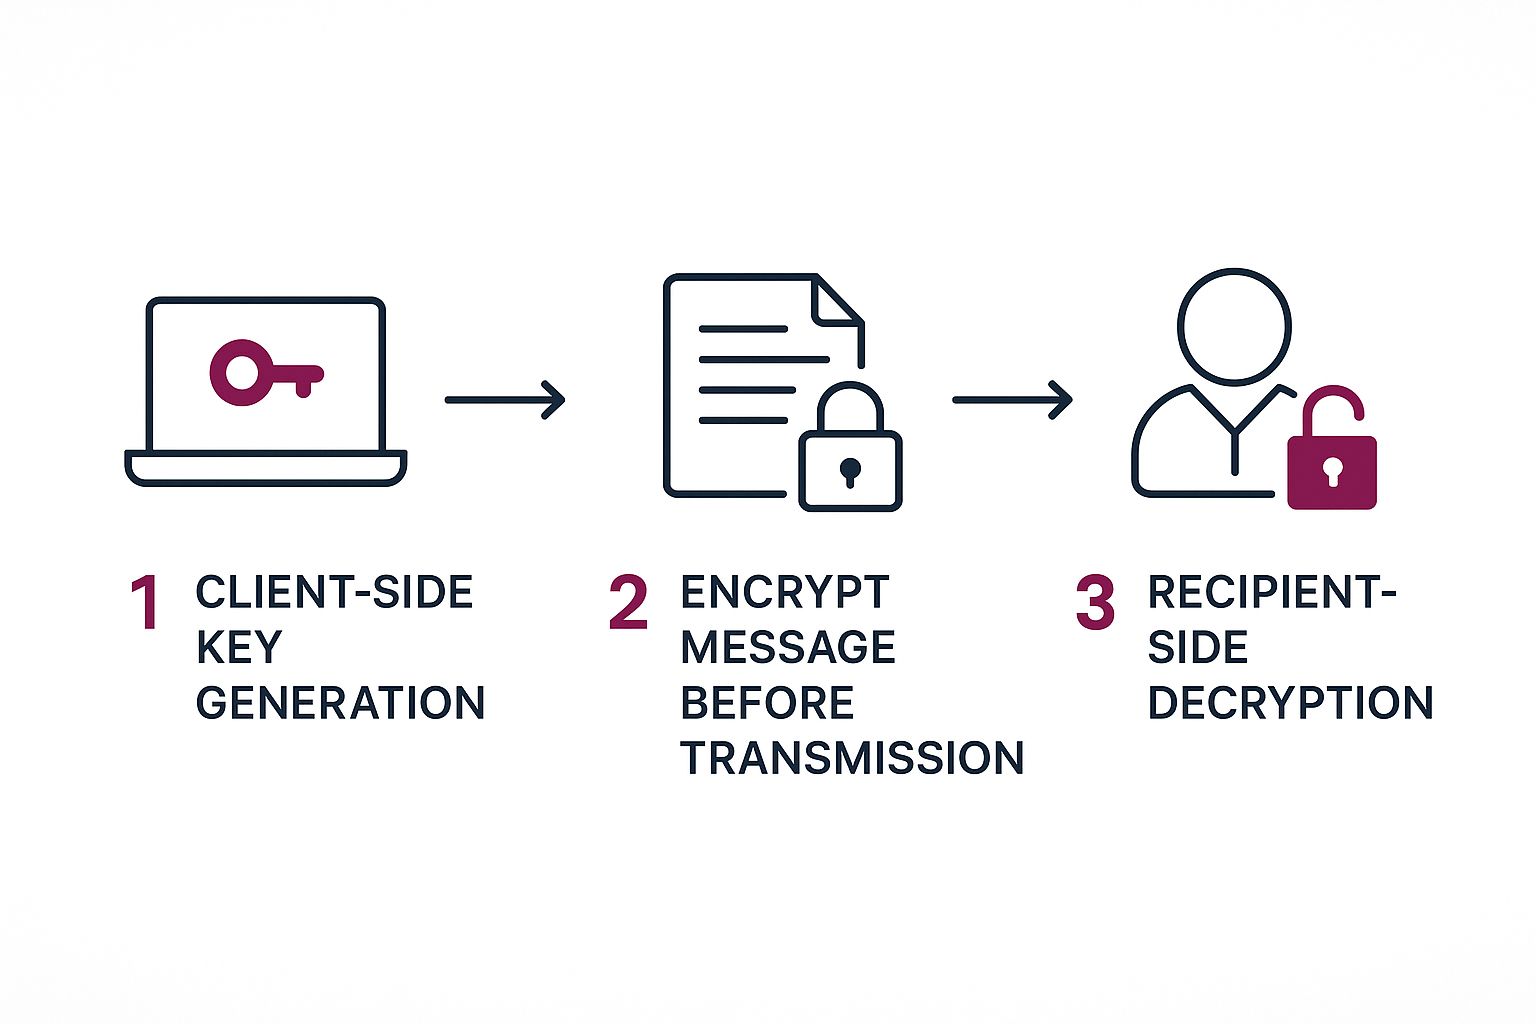
As you can see, that final client-side verification step is the gatekeeper that makes the entire system trustworthy.
Crafting a Smooth User Experience for Updates
Security is crucial, but it shouldn’t create a clunky user experience. While immediate mandatory updates are great for emergencies, you need to handle standard, non-critical updates more gracefully. A common and effective approach is to check for an update and, if one is available, prompt the user with a clean, non-intrusive UI.
Consider designing a custom modal that explains a new version is ready. Give users the choice to install it now or be reminded later. This respects their workflow while still encouraging them to stay up-to-date. It’s a small detail, but this kind of thoughtful UI design is what separates a good app from a great one.
For those looking to dive deeper, exploring different strategies for deploying a React Native app can offer even more insights into fine-tuning this process. When you manage the update lifecycle properly, you ensure your app is both secure and a pleasure to use.
How to Generate and Manage Your Signing Keys
Any encryption system is only as strong as its key management. When you set up end-to-end encryption, the entire system’s integrity hinges on one thing: protecting the private key you use to sign your app updates. If that key gets compromised, an attacker can sign malicious code and push it straight to your users, sidestepping every security measure you’ve put in place.
This isn’t some far-off theoretical risk. I’ve seen developers make the devastating mistake of committing private keys directly into a Git repository. It might seem like a quick shortcut, but it creates a permanent, public vulnerability, even if you try to remove the key later. Automated bots are constantly scanning public repos for exactly this kind of exposed secret. Don’t let it be yours.
Creating Your Key Pair
Thankfully, generating the keys is a straightforward process. CodePushGo uses standard RSA cryptography, which you can manage with OpenSSL, a tool that’s likely already on your development machine.
To create a new 2048-bit RSA private key, just open your terminal and run this command:
openssl genrsa -out private.pem 2048
This command creates a file named private.pem. This file is your secret. Treat it like the master key to your entire application, because that’s exactly what it is.
Next, you’ll need to extract the corresponding public key from that private key. The public key is what you’ll embed inside your React Native app. It’s perfectly safe to share and is used by the client to verify that any update it receives was actually signed by you.
openssl rsa -in private.pem -pubout -out public.pem
This second command produces public.pem, the key you’ll package with your app. Now you have the foundation for a secure update mechanism.
The Single Most Important Step: Securing Your Private Key
So, you have your private.pem file. Where do you put it? The golden rule is simple: never, ever store it in your project’s codebase. You absolutely must use a secure storage solution designed for secrets management.
Here are a few battle-tested practices I recommend:
- Secure Vaults: Services like HashiCorp Vault or AWS Secrets Manager are built for this exact scenario. They let your CI/CD pipeline fetch the key programmatically during a build, without ever exposing it in source files or logs.
- Hardware Security Modules (HSMs): For the highest level of security, an HSM is a physical device that protects and manages your keys. The private key never leaves the HSM; instead, your code tells the hardware to perform the signing operation directly.
- Encrypted Environment Variables: A common and effective approach for many teams is to store the private key as a secure, encrypted environment variable within your CI/CD platform.
The demand for this level of security is skyrocketing across the industry. Just look at the market for end-to-end email encryption, which is projected to grow at a CAGR of about 30.5% between 2024 and 2034, all driven by the rise in cyber threats. You can read more on this trend in the end-to-end email encryption market report.
Storing your private key securely isn’t an optional step; it is the absolute core of your E2EE strategy. A breach here invalidates the entire system, making it crucial to get this right from day one.
The final piece of the puzzle is integrating this secure key retrieval into your automation pipeline. For a deeper dive, our article on continuous integration for React Native provides practical steps for setting up a secure and efficient workflow. By adopting these practices, you’ll build a resilient process that protects both your app’s integrity and your users’ trust.
Deploying and Verifying Your First Encrypted Update

Alright, you’ve handled the key management and configured your app. Now for the moment of truth. This is where we put our setup to the test by releasing our first signed update and seeing the secure pipeline in action. It’s the step that proves every part of our end-to-end encryption setup works, guaranteeing your users only get code you’ve personally authorized.
The initial deployment is surprisingly simple with the CodePushGo CLI. You’ll bundle your React Native app like you always do, but with one crucial difference. The release command now includes a flag that points to your private key. This cryptographically signs the bundle right before it gets uploaded to the CodePushGo servers.
Pushing Your Signed Bundle
Let’s walk through releasing an update to your Staging deployment. The command we’ll use ties everything together: the app, the update’s contents, and, most importantly, the private key for signing.
codepushgo release-react <YourAppName> ./bundles --private-key ./keys/private.pem
That one command handles the bundling, signing, and uploading. After you push it, you can jump over to your CodePushGo dashboard to see its status and watch as users download and install the new, secure version.
As you get into the rhythm of deploying, remember that strong code review best practices are non-negotiable. They’re your first line of defense in maintaining the integrity and security of your updates.
Verifying a Successful Encrypted Update
So, how do you know it actually worked? The most straightforward method is to check the client-side logs on a test device.
Once the device downloads and installs the update, the CodePushGo SDK will print log entries. You’re looking for a confirmation that the signature check passed. If you see a failure message instead, that’s your red flag. It usually points to a mismatch between the public key baked into your app and the private key you just used for signing.
A successful signature verification is your definitive proof of concept. It confirms the entire E2EE chain is working, from the private key on your machine to the public key embedded in the app, providing a verifiable guarantee of your update’s authenticity and integrity.
Getting this right isn’t just a technical win; it has massive financial implications. The average cost of a data breach in 2024 hovered around USD 4.9 million. That’s a staggering figure. When you add compliance-related costs, which average about USD 7.6 million, the value of a rock-solid, secure update system becomes crystal clear.
A dependable deployment and verification process is a cornerstone of any good https://codepushgo.com/es/blog/mobile-app-update-strategy/. It builds confidence with your users and, just as importantly, with your own development team, proving your security measures are truly effective.
Your Top Encryption Questions, Answered
Jumping into encryption always sparks a few key questions. It’s natural to wonder about performance hits, how to handle keys across different platforms, and—most importantly—what to do when something goes wrong. Let’s walk through the common concerns that pop up when you’re ready to implement end-to-end encryption for your React Native updates.
First, does encryption slow things down? It’s the number one question I hear. The truth is, the performance impact is so small your users will never notice. Modern phones are built for this stuff; the cryptographic operations are incredibly fast and add just a few milliseconds to the update process. A tiny trade-off for rock-solid code integrity.
Another frequent query is about managing keys for both iOS and Android. Thankfully, you can (and should!) use the same signing key pair for both platforms. CodePushGo secures the JavaScript bundle itself, which is platform-agnostic. This really simplifies your workflow and keeps your security model clean and consistent.
Planning for the Worst-Case Scenario
Okay, but what happens if the unthinkable occurs and you lose your private key? This is the situation you absolutely must prepare for. If that key is gone, you’ve lost the ability to release CodePushGo updates that your installed app base will trust. Any new update signed with a new key will simply be rejected.
The only way forward is to release a completely new version of your app to the App Store and Google Play. That new binary will have to include the new public key. It’s a major disruption, which highlights just how critical it is to back up your private key securely from day one.
Having a solid recovery plan isn’t just a suggestion—it’s essential. Your strategy should follow established incident response best practices to keep any potential downtime and user friction to an absolute minimum.
If you want to go deeper into the principles that underpin secure communications, this ultimate guide to encryption methods is a fantastic resource. Really understanding these concepts makes building and maintaining a secure pipeline so much smoother.
Ready to secure your React Native updates with a solution built for speed and security? With CodePushGo, you can implement end-to-end encryption, roll back releases instantly, and gain real-time analytics on your deployments. https://codepushgo.com

