A Practical Guide to React Native Testing

A practical guide to mastering React Native testing. Learn to set up Jest, RNTL, and Detox to build stable, high-quality mobile applications.

Martin Donadieu

Martin Donadieu

A Practical Guide to React Native Testing

Testing a React Native app isn’t just about squashing bugs; it’s a multi-layered strategy that confirms every piece of your app works, from the smallest function to a complete user journey. A truly solid approach combines unit, integration, and end-to-end (E2E) tests to build an application that’s reliable, stable, and ready for your users.

Why Bother With a Serious Testing Strategy?

Let’s be real: robust testing is the bedrock of modern app development. It’s not just a nice-to-have, it’s about building confidence in your codebase. That confidence translates directly into shipping features faster and delivering a rock-solid user experience. For any project aiming for long-term success and easy maintenance, a structured testing approach is non-negotiable.

The whole point of React Native is its cross-platform nature, but that also brings unique challenges. A single line of JavaScript can behave one way on iOS and another on Android, all thanks to subtle differences in the native modules underneath. Without a good test suite, these platform-specific quirks are notorious for slipping into production, causing crashes and tanking your app store ratings.

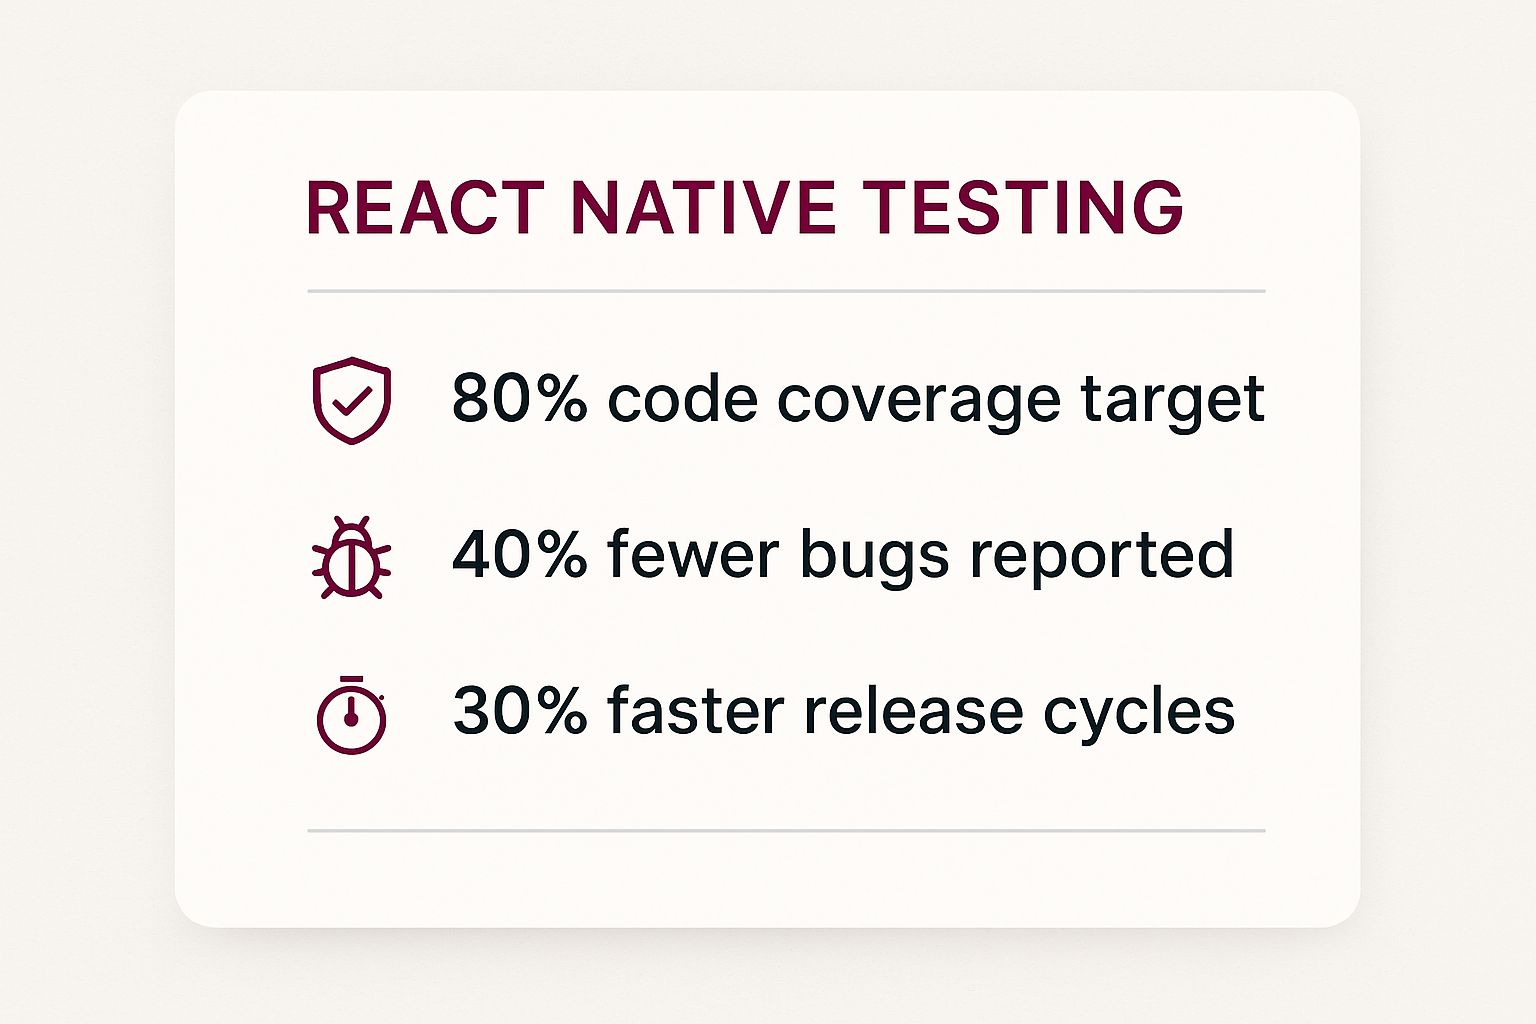
Investing in testing is how you proactively defend your app against these problems. The data speaks for itself.

Image

These numbers aren’t just vanity metrics; they show a clear line connecting effective testing with higher code quality and faster delivery.

Understanding the Testing Pyramid

So, how do you structure this effort? The most effective model I’ve seen in practice is the “Testing Pyramid.” It’s a simple but powerful concept for balancing your testing strategy across three distinct layers.

  • Unit Tests: These are the foundation. You’ll write a ton of them because they’re fast, simple, and cheap to create. They check individual functions or components in total isolation, making sure a single piece of logic does exactly what you expect.
  • Integration Tests: The middle of the pyramid is where you verify that different parts of your app play nicely together. Does tapping a button actually update the state in another component? This is where you find out.
  • End-to-End (E2E) Tests: At the very top, you have a small number of high-impact E2E tests. These are the big ones. They simulate a real user’s entire workflow, like navigating through a full checkout process, to confirm the whole system works as a cohesive unit.

The magic of the pyramid is its balance. You catch most bugs early with lightning-fast unit tests, reserving the slower, more complex E2E tests for only the most critical user flows. This efficiency is the key to a testing workflow that doesn’t slow you down.

Let’s break that down into a quick-glance table.

The React Native Testing Pyramid At a Glance

The testing pyramid provides a clear framework for allocating your testing efforts. Unit tests form a wide base for granular checks, integration tests ensure components work together, and a few end-to-end tests validate the entire user experience.

Testing LayerPrimary GoalCommon ToolsExecution Speed
Unit TestsVerify individual functions or components in isolation.Jest, React Native Testing LibraryFastest
Integration TestsCheck interactions between multiple components or modules.Jest, React Native Testing LibraryMedium
End-to-End (E2E) TestsSimulate real user workflows across the entire app.Detox, MaestroSlowest

This layered approach ensures you have comprehensive coverage without bogging down your development pipeline with slow, brittle tests.

Given that React Native holds about 32% of the cross-platform mobile development market share, the need for dependable testing is massive. This popularity has fueled an incredible community, with around 800,000 mobile-specific packages on npm, many of which are dedicated to testing. If you want to dive deeper into the development side, our guide on building apps with React Native is a great place to start.

Setting Up Your Testing Environment

Before you write a single line of test code, you need a solid foundation. A well-configured testing environment is the difference between catching bugs early and pulling your hair out over flaky, unpredictable tests. This is where we lay the groundwork, ensuring every test runs smoothly and consistently.

Image

The good news? If you started your project with the React Native CLI, you’re already halfway there. Jest comes pre-configured right out of the box, which is a massive head start. It’s the go-to test runner for JavaScript projects for a reason—it’s fast, powerful, and comes packed with features like mocking and code coverage reports. Your package.json should already have all the Jest dependencies you need.

Integrating React Native Testing Library

Jest is the engine, but you still need a way to drive your components. That’s where React Native Testing Library (RNTL) comes in. It’s a brilliant, lightweight utility that lets you write tests from the user’s perspective, focusing on what they see and do, not on the nitty-gritty implementation details.

Getting it into your project is simple. Just run one of these commands:

  • npm: npm install --save-dev @testing-library/react-native
  • Yarn: yarn add --dev @testing-library/react-native

This one simple step is absolutely essential for writing component tests that are actually useful and don’t break every time you refactor a component.

Fine-Tuning Your Jest Configuration

Your project already has a jest.config.js file, but we need to tweak it slightly to make RNTL feel at home. The key is to tell Jest to run a setup file before it executes your tests. This file will handle all our pre-test configuration.

First, create a new file in your project’s root called jest.setup.js.

Next, pop open your jest.config.js and point to this new file:

module.exports = { preset: ‘react-native’, setupFilesAfterEnv: [’./jest.setup.js’], // … any other configurations you have }; Now, inside jest.setup.js, you can import RNTL’s extend-expect matchers. This gives you access to more intuitive assertions like .toBeVisible() or .toHaveTextContent(), which make your tests way more readable. Trust me, you’ll thank yourself for this later.

Handling Native Module Mocks

Sooner or later, you’ll hit a common roadblock: native modules. Jest runs in a Node.js environment on your machine, not on an actual device. It has no idea what to do with native iOS or Android code. If your component imports a third-party library that relies on native code, your tests will crash.

Key Takeaway: The solution is mocking. You have to create a simple JavaScript stand-in for the native module. This lets Jest run the test without getting tripped up on code it can’t execute. This isn’t a workaround; it’s a fundamental part of React Native testing.

For instance, almost every app uses @react-native-async-storage/async-storage. To get it working in your tests, you’ll need to mock it. The perfect place for this is right inside your jest.setup.js file.

// jest.setup.js

import ‘@testing-library/react-native/extend-expect’;

jest.mock(‘@react-native-async-storage/async-storage’, () => require(‘@react-native-async-storage/async-storage/jest/async-storage-mock’) );

With this setup, you now have a robust environment ready for whatever tests you throw at it. As you build out your test suite, it’s also smart to think about how you’ll ship updates. A strong testing strategy goes hand-in-hand with a reliable update process. If you’re curious about modern update methods, you can learn more by checking out our guide on what an OTA update is in our detailed guide.

Getting Your Hands Dirty: Writing Unit and Component Tests

Alright, with your environment all set up, it’s time to roll up our sleeves and get into the real work: writing unit and component tests. I always tell developers that these tests are your first and best line of defense. They’re designed to be lightning-fast, laser-focused, and incredibly good at catching bugs in the small, isolated pieces of your app.

Think of it like this: you’re building a house brick by brick. Unit tests check the quality of each individual brick before it even goes into the wall.

Image

We’ll kick things off with the most basic type: a pure unit test for a simple utility function. These tests are all about logic—no UI involved. They just confirm that for a given input, a function produces the expected output. Because they’re so fast and simple, they’re the perfect way to lock down your business logic.

Testing a Simple Utility Function

Let’s say you have a small helper function somewhere in your project that formats a number into a currency string. It seems trivial, but if it messes up, it could cause some serious headaches across your entire app.

Here’s how you’d use Jest to make sure it’s rock-solid:

// utils/formatCurrency.js export const formatCurrency = (amount) => { return $${amount.toFixed(2)}; };

// tests/utils/formatCurrency.test.js import { formatCurrency } from ’../formatCurrency’;

describe(‘formatCurrency’, () => { it(‘correctly formats a whole number’, () => { expect(formatCurrency(50)).toBe(‘$50.00’); });

it(‘correctly formats a decimal number’, () => { expect(formatCurrency(24.99)).toBe(‘$24.99’); }); });

See how clean that is? The describe block acts as a container for related tests, and each it block lays out a specific case we want to check. We use expect along with a “matcher” like .toBe() to assert that the function’s output is exactly what we need it to be.

If you’re looking for a deeper dive into these fundamentals, we’ve got a comprehensive guide on just that. Check it out here: https://codepushgo.com/blog/react-native-unit-testing/

Testing a Custom Button Component

Now, let’s level up to testing a React component using the React Native Testing Library (RNTL). The whole philosophy behind RNTL is to test components the way a user actually interacts with them. Forget about internal state or implementation details. What really matters is what the user sees and does.

So, for a custom Button component, what do we care about? Two main things:

  1. Does it render the label text we give it?
  2. When a user taps it, does it actually call our onPress function?

Here’s what that test looks like in practice:

// components/Button.js import React from ‘react’; import { TouchableOpacity, Text } from ‘react-native’;

export const Button = ({ onPress, label }) => ( {label} );

// tests/components/Button.test.js import React from ‘react’; import { render, fireEvent } from ‘@testing-library/react-native’; import { Button } from ’../Button’;

describe('

}); });

Key Takeaway: Notice the flow here. We render the component, find the button by its visible text using getByText, and then simulate a user tap with fireEvent.press. The jest.fn() is a nifty trick—it creates a “spy” function that lets us check if our onPress handler was called.

This is where the real power of React Native’s cross-platform nature comes into play. With many projects seeing a code reuse rate between 60% and 80%, you’re drastically reducing the number of platform-specific tests you need to write.

This high code-sharing percentage directly translates to lower testing costs and faster development cycles, which is a massive win for any team. By focusing your tests on shared components like this button, you’re ensuring quality on both iOS and Android with a single test suite.

Verifying User Flows with Integration Tests

So, your unit tests are all passing. Great. Every component works perfectly on its own. But what happens when they all have to work together? That’s the million-dollar question, and it’s where integration testing steps in.

Integration tests are all about the handoffs. They check the connections between different parts of your app—the components, hooks, and services—to catch the bugs that only surface when everything starts communicating.

Think about a login screen. A unit test can tell you the email input works, and another can confirm the password field masks the characters. But that doesn’t prove a user can actually log in. Only an integration test can verify that after a user types their credentials and hits “Login,” your app successfully calls the API and sends them to the home screen.

Image

This is where you’ll find those tricky bugs, like a component passing the wrong prop to its child or a state update that fails to trigger a re-render down the tree. These are the kinds of issues that unit tests, by their very nature, are completely blind to.

Mocking API Calls for Realistic Scenarios

To reliably test a flow like a login sequence, you absolutely cannot depend on a live backend. Real networks are slow, servers go down, and data changes. It’s a recipe for flaky, unreliable tests.

The solution? Mock your API requests. This lets you create a controlled, predictable environment where you can dictate the exact server response for any scenario you need to test—success, failure, weird edge cases, you name it.

You’ve got a couple of solid options for this:

  • jest.mock: This is a powerful, built-in Jest function that lets you completely swap out a module with a fake version. It’s perfect for replacing your entire API service with a mock that returns whatever data you tell it to.
  • MSW (Mock Service Worker): An incredible library that intercepts network requests on a deeper level. It’s a bit more work to set up initially, but it gives you a more robust and reusable solution that you can even share between your test suite, your local dev environment, and even tools like Storybook.

When you’re building these mocks, getting the details right is crucial for your tests to be meaningful. This means understanding the nuances of API request methods like PUT and PATCH so your mocked server behaves just like the real one would.

A Practical Login Flow Test

Let’s walk through a real-world example: testing a login screen. We want to confirm that when a user fills out the form and taps “Login,” they see a loading state, and once our mock API returns a success response, a “Login successful!” message appears.

import React from ‘react’; import { render, fireEvent, waitFor } from ‘@testing-library/react-native’; import LoginScreen from ’../LoginScreen’; import * as api from ’../../services/api’; // Our API service module

// Mock the entire API module jest.mock(’../../services/api’);

describe('', () => { it(‘shows a success message after a successful login’, async () => { // Tell our mock to resolve with a success object api.login.mockResolvedValue({ success: true });

const { getByPlaceholderText, getByText } = render(<LoginScreen />);
// Simulate user input
fireEvent.changeText(getByPlaceholderText('Email'), '[email protected]');
fireEvent.changeText(getByPlaceholderText('Password'), 'password123');
fireEvent.press(getByText('Login'));
// Wait for the UI to update after the mock API call resolves
await waitFor(() => {
expect(getByText('Login successful!')).toBeVisible();
});

}); });

Expert Tip: Get very familiar with the waitFor utility from React Native Testing Library. It will become your best friend. It patiently waits for your assertions to pass, which is absolutely essential for dealing with asynchronous actions like API calls and the state updates that follow. If you don’t use it, your test will likely finish before the success message even has a chance to render.

Automating Real User Behavior with Detox

Unit and integration tests are fantastic for checking your code’s logic and making sure components talk to each other correctly. But they can’t answer the one question that truly matters: does the app actually work for a real person? This is where end-to-end (E2E) testing, and a brilliant tool called Detox, enters the picture.

Detox is what’s known as a “gray box” testing framework. This means it has inside knowledge of your app’s state, allowing it to sync perfectly with what’s happening on screen. It smartly waits for the UI to be idle before moving on to the next step, which eliminates the flaky, inconsistent results that plague so many other E2E tools. Say goodbye to peppering your tests with random sleep() commands just to make them pass.

Setting Up Your First E2E Test

Getting Detox up and running does take a bit of initial effort. You’ll need to install its dependencies, tweak your project’s build settings to create a specific “test” version of your app, and get your simulators or emulators configured. While it might seem like a lot at first, the payoff is a rock-solid testing environment you can count on.

Once you’re set up, you can start scripting out tests that walk through your app’s most critical user journeys. A classic first test is always the user signup flow. Your Detox script would automate the whole thing, just like a user would.

It looks something like this:

  • Launch the App: Detox boots up a fresh install of your app.
  • Navigate and Interact: Using test IDs you’ve assigned, the script finds the email and password fields and simulates someone typing in their credentials.
  • Perform Actions: Next, it finds the “Sign Up” button and simulates a tap.
  • Assert the Outcome: Finally, the test checks if the right thing happened. Did a “Welcome!” message appear? Did the app navigate to the main dashboard? This final check is the moment of truth.

This kind of React Native testing gives you incredible confidence that you aren’t accidentally breaking your most important features with new code.

The Power of Automation

The real magic of Detox happens when you plug it into your automation pipeline. By running these E2E tests in your CI/CD environment with every pull request, you create an automated safety net that catches regressions before they ever make it to your users.

While Detox is laser-focused on automating user behavior, understanding broader task automation principles can help you streamline your entire development process. And if you’re looking to go deeper on platform-specific automation, we have a whole guide on how to automate Android testing.

Before we move on, it’s helpful to see how the two most common testing libraries in the React Native world stack up against each other.

React Native Testing Library vs Detox

AspectReact Native Testing LibraryDetox
Testing LevelUnit & IntegrationEnd-to-End (E2E)
EnvironmentRuns in a simulated DOM (Node.js)Runs on a real device or simulator/emulator
Use CaseTesting individual components or small component groups in isolation.Testing full user flows and interactions within the complete application.
Key FeatureQueries elements based on accessibility and user-facing text.Simulates real user taps, swipes, and text input. It’s “gray box.”
SpeedVery fast, as it doesn’t render a full UI.Slower, as it builds, installs, and runs the entire app.

Both tools are essential for a comprehensive testing strategy. You’ll use React Native Testing Library for the bulk of your component-level checks and bring in Detox to validate the critical user paths that tie everything together.

Common Questions About React Native Testing

As you get deeper into testing your React Native apps, a few questions always seem to come up. Let’s tackle them head-on, so you can spend less time guessing and more time building solid, reliable apps.

How Much Code Coverage Is Enough?

This is the big one. It’s tempting to chase that perfect 100% code coverage score, but from my experience, it’s often a case of diminishing returns. You end up writing brittle tests for simple, hard-to-break code just to move the needle.

A much more realistic and effective target is around 80% coverage. This sweet spot ensures you’re rigorously testing the heart of your application—the critical business logic, the complex components with lots of state, and the core user journeys—without getting bogged down.

Will All These Tests Slow Down My CI/CD Pipeline?

It’s a valid concern. Nobody wants a pipeline that takes an hour to run. The key is to build a smart, balanced test suite.

Your test suite should be a development accelerator, not a brake. The trick is to lean heavily on fast, isolated unit tests for the bulk of your code. Save the slower, more comprehensive end-to-end tests for your absolute must-work user flows, like the login or checkout process.

This tiered approach keeps your feedback loop tight and your pipeline efficient.

How Do I Handle Platform-Specific Code?

React Native’s cross-platform nature is great, but you’ll inevitably have some code that’s just for iOS or just for Android. How do you test it?

The cleanest way is to use React Native’s built-in file naming convention. By creating files like MyComponent.ios.js and MyComponent.android.js, you can isolate platform-specific logic. Jest can then be configured to pick the right file for the platform you’re targeting, allowing you to write specific, focused tests for each one.

For a higher-level view of mobile testing strategies that apply beyond the React Native world, our comprehensive guide on how to test a mobile app is a great resource.

What About Testing Native Device Features?

Testing things like push notifications, in-app purchases, or camera access can be a real headache. Simulators and emulators are great, but they don’t always replicate real-world conditions perfectly.

While tools like Detox run on actual emulators and get you most of the way there, some features just demand real hardware. For anything involving app store interactions or unique hardware behavior, there’s simply no substitute for running tests on a physical device. It’s the only way to be 100% confident that your app will work as expected when it’s in your users’ hands.


At CodePushGo, we help you ship updates fearlessly. Our platform streamlines over-the-air updates, allowing you to deploy fixes and features instantly, bypassing app store delays. Find out more at https://codepushgo.com.

Instant Updates for React Native Apps

Push updates, fixes, and features instantly to your React Native apps without app store delays. Experience seamless integration, end-to-end encryption, and real-time updates with CodePushGo.

Latest from news

CodePushGo gives you the best insights you need to create a truly professional mobile app.

A Guide to Agile Mobile App Development
agile mobile app development,mobile app development,agile methodology,react native agile,ci/cd pipeline
June 25, 2025

A Guide to Agile Mobile App Development

Best Alternatives to Jenkins for Modern CI/CD Workflows
alternatives to jenkins,ci/cd tools,devops tools,github actions,gitlab ci
October 02, 2025

Best Alternatives to Jenkins for Modern CI/CD Workflows

Analytics for React Native: Your Complete Success Guide
analytics for react native,react native analytics,mobile app analytics,react native performance,app development insights
June 13, 2025

Analytics for React Native: Your Complete Success Guide

See all from our blog