
Let’s be honest, we’ve all been tempted to just hardcode an API key or a server URL directly into our Expo app. It seems quick and easy at the moment, but it’s a practice that’s fraught with risk. Using Expo environment variables is the professional way to handle this. It cleanly separates your configuration from your code, which is crucial for keeping sensitive data out of public repositories.
Ultimately, this approach makes your app more secure, easier to scale, and far less of a headache to manage as you move from development to staging and finally to production.
Why Bother With Environment Variables?
If you’ve ever had that sinking feeling after accidentally pushing a production API key to a public GitHub repo, you already know the answer. It’s a gut-wrenching, all-hands-on-deck kind of mistake that’s surprisingly common. That scenario alone perfectly illustrates why hardcoding sensitive details is a terrible idea.
But this isn’t just about avoiding security nightmares; it’s about building a flexible and maintainable development workflow from the ground up.
Keep Your Secrets, Secret
The number one reason to use environment variables is, without a doubt, security. When things like API keys, auth tokens, or database credentials are baked into your source code, they get etched into your version control history forever. Anyone with access to the repository—even if they’re looking at old commits—can find them.
A key part of managing this is understanding that protecting these integrations is non-negotiable. It’s always a good idea to stay current on essential API security best practices.
By isolating secrets in a
.envfile and immediately adding that file to your.gitignore, you guarantee that your credentials never leave your local machine or your secure build server. This simple step is your first and most effective line of defense.
Juggling Development, Staging, and Production
Any serious app project involves more than one environment, and each needs its own configuration.
- Development: This is your local setup, probably pointing to a localhost server or a mock API for testing.
- Staging: A nearly identical copy of production where you run QA and final checks before a release.
- Production: The real deal. This is the live app your users interact with, connected to all the live services.
Trying to manage these different setups without environment variables is a recipe for disaster. You end up commenting out blocks of code or maintaining separate, messy branches—both of which are clumsy and prone to human error.
The framework you choose can also influence your project structure; diving into an Expo vs React Native comparison can offer some valuable context here. With environment variables, you simply define your configurations for each stage, and your build process handles the rest. It makes deployments predictable and stress-free.
Alright, let’s get your Expo app set up with environment variables. It’s a lot simpler than you might think and a crucial step for managing things like API keys and different environment URLs.
Your First Expo Environment Variable Setup
The whole system revolves around a little file you’ve probably seen in other projects: .env. This is just a plain text file that you’ll create right at the root of your project directory. It’s where you’ll stash all your configuration details for local development.
Go ahead and create a new file named .env at the top level of your project. Inside, you’ll define your variables as simple key-value pairs. For instance, if you need to set an API endpoint for your development environment, it would look something like this:
EXPO_PUBLIC_API_URL="https://api.dev.yourapp.com"
Easy, right? This keeps your configuration separate from your code, which is exactly what we want.
The EXPO_PUBLIC_ Prefix Is Non-Negotiable
Did you notice the EXPO_PUBLIC_ part? That prefix is the most important takeaway here. It’s not just a friendly suggestion; it’s a hard requirement from Expo for any variable you need to access on the client-side of your app.
Think of it as a safety lock. By forcing you to add this prefix, Expo makes sure you’re consciously deciding which variables are safe to be bundled into your app’s public-facing JavaScript code. If you forget it, the variable will simply be undefined in your app, which is a classic “gotcha” that trips up a lot of developers.
For a broader look at getting a project off the ground, our guide on how to create a React Native app covers the foundational steps that lead up to this point.
This prefixing strategy is a smart way to prevent accidentally leaking a secret API key or other sensitive credentials to your users. You have to be explicit about what’s public.
Accessing Your Variables in Code
So, how do you actually use these variables? Once you’ve defined them in your .env file and they have the correct prefix, Expo’s build process works its magic. It automatically picks them up and injects them into your app’s environment.
You can then access them anywhere in your code through the global process.env object. For example:
const myApiUrl = process.env.EXPO_PUBLIC_API_URL;
Quick Tip: If you’ve just added or changed a variable in your
.envfile, you’ll need to restart your development server. The variables are loaded at build time, so a quickCtrl+Candnpx expo startwill ensure the new values are picked up.
To make this a bit clearer, here’s a quick reference for when and how to name your variables.
Public vs Secret Variable Naming Conventions
| Variable Type | Naming Convention | Client-Side Access | Example Use Case |
|---|---|---|---|
| Public Variable | Starts with EXPO_PUBLIC_ | Yes | API URLs, public keys for services like Stripe or Firebase, feature flag identifiers. |
| Secret Variable | No prefix | No | Private API keys, database credentials, server-side secrets. Never exposed to the app. |
This distinction is fundamental. Anything your app’s user interface needs to know about gets the EXPO_PUBLIC_ prefix. Anything that should remain secure on a server does not.
Putting Your Variables to Work Across the App
Alright, you’ve set up your expo environment variables, but that’s only half the battle. Now, let’s actually use them. The beauty of this setup is that once a variable is defined in your .env file, it becomes available everywhere in your app via the global process.env object.
This means you can call on these variables from any React component, a utility function, or an API service file. It’s a clean way to keep your configuration consistent. Define your API endpoint once, and every part of your app will point to the right server, whether you’re coding on your local machine or pushing to production.
The image above gives you a clear picture of how this works. We’re grabbing the EXPO_PUBLIC_API_URL right inside a React component. This single line makes the component instantly adaptable to different environments without a single hardcoded value in sight.
A Real-World Fetch Example
Let’s look at a common scenario: a service file that handles all your data fetching. Instead of hardcoding the base URL for every API call—which is a recipe for disaster—you can just pull it from your environment variables.
Here’s what a simple api.js file might look like:
// services/api.js const API_URL = process.env.EXPO_PUBLIC_API_URL;
export const fetchPosts = async () => {
try {
const response = await fetch(${API_URL}/posts);
if (!response.ok) {
throw new Error(‘Network response was not ok’);
}
return await response.json();
} catch (error) {
console.error(“Failed to fetch posts:”, error);
return []; // Return empty array on failure
}
};
This keeps your API logic tidy and completely separate from your environment-specific details. Now you can import and use the fetchPosts function anywhere, knowing it will always hit the correct endpoint. If you’re interested in more patterns like this, our guide on building apps with React Native is a great next step.
Been there, done that: A super common trip-up is forgetting to restart the development server after changing an environment variable. These values are loaded at build time, so if you add a new one or change an existing one, you need to kill your server and run
npx expo startagain for the change to register.
Managing Staging and Production Environments
In the real world, no professional app has just one “state.” A solid development workflow absolutely depends on keeping your local setup, your testing (staging), and your live (production) environments completely separate. This isn’t just a nice-to-have; it’s a critical practice for catching bugs early and ensuring deployments go off without a hitch.
The great news is that Expo handles this beautifully right out of the box. Instead of juggling one messy .env file, you can create specific files for each environment, like .env.development and .env.production. Expo is smart enough to know which one to grab based on the build profile you’re using. This lets you keep your configurations clean and separate without writing a bunch of if/else statements in your code.
This whole process is about creating a secure, predictable flow: you create the environment file, use the variables in your app, and—most importantly—make sure that file never gets committed to your git repository.
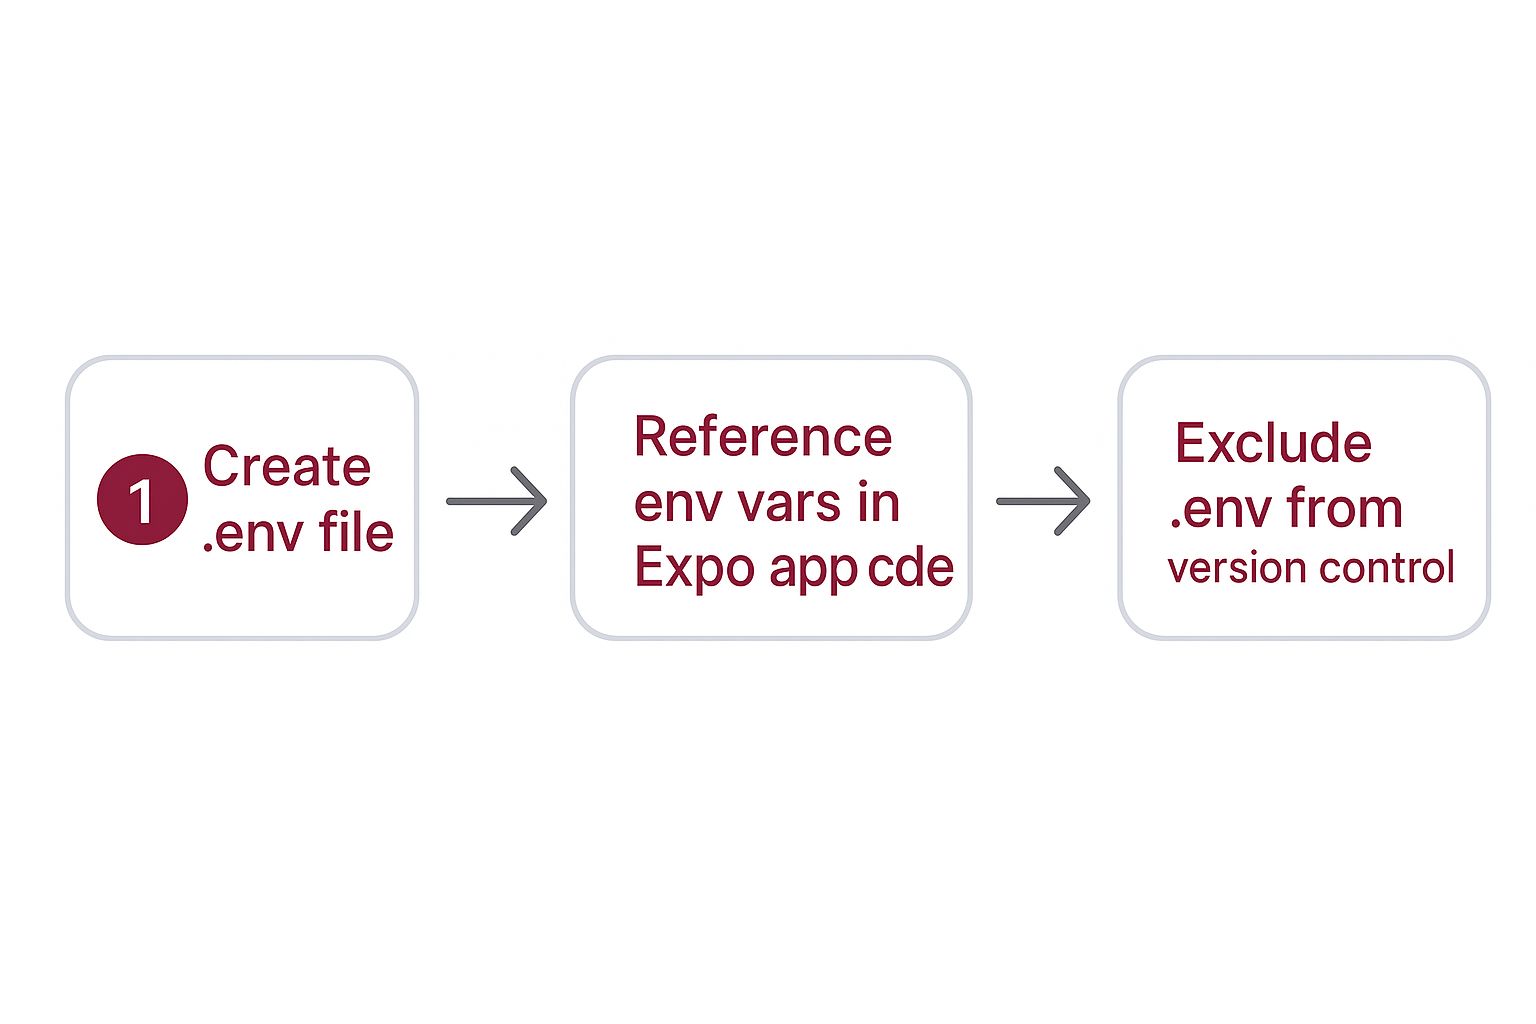
Following this workflow is your best defense against accidentally leaking sensitive keys or shipping an app that points to the wrong backend.
A Practical Example
Let’s walk through a common scenario. While you’re coding locally, you’re probably hitting a mock server or a dev backend on your machine. So, your .env.development file might look like this:
EXPO_PUBLIC_API_URL="http://localhost:8080/api"
But when you’re ready to ship the app to your users, you need it to talk to your live, production-grade backend. For that, your .env.production file will hold a different value for the very same variable:
EXPO_PUBLIC_API_URL="https://api.myapp.com/v1"
Here’s where the magic happens. When you run npx expo start, Expo automatically uses your development environment. But when it’s time to build for the app stores with a command like eas build --profile production, Expo seamlessly swaps in the variables from .env.production. Your code, which just calls process.env.EXPO_PUBLIC_API_URL, doesn’t need to change at all.
This automatic switch is a game-changer for your deployment pipeline. It practically eliminates the risk of shipping an app that points to a test server—a mistake I’ve seen happen more than a few times.
This automated, multi-environment approach is a cornerstone of modern app development. To see how this fits into the bigger picture of automation, check out this excellent CI/CD pipeline tutorial. By adopting these practices, you’re not just organizing variables; you’re building a more professional, reliable, and scalable application from the ground up.
Diving Deeper: Advanced Tips and Common Pitfalls

Once you’ve got the basics down, it’s time to dig into the nuances of Expo environment variables. Understanding how they actually work under the hood—and where the common tripwires are—is what separates a functional app from a truly solid and secure one.
The most critical mistake I see developers make is mishandling their .env files.
Your .env file is for secrets, and it should never, ever be committed to version control. As soon as you create it, your very next step should be adding .env* to your .gitignore file. This simple line prevents you from accidentally leaking API keys and other sensitive credentials, which is a massive security blind spot. When you’re handling sensitive data, applying strong SaaS risk management principles is non-negotiable.
Keep Your Team in Sync with .env.example
So, how do you keep your team aligned without passing around secret keys? The answer is a .env.example file.
Think of it as a template. You list out all the environment variables the app needs to run, but you fill them with placeholder or empty values. When a new developer joins the project, they can just copy this file, rename it to .env, and fill in their own local credentials.
This little trick saves a ton of time and confusion, ensuring everyone has the right setup to get the app running without any guesswork.
The most important thing to remember is that Expo injects your environment variables directly into the JavaScript bundle when you build the app. They are not dynamic; they can’t be fetched from a server at runtime.
This has a huge implication that catches a lot of people off guard: you can’t change an environment variable with an over-the-air (OTA) update. If you need to update an API endpoint or toggle a feature flag that lives in process.env, you have to generate a completely new build and resubmit it to the app stores.
For more dynamic configurations, you might need a different approach, which is why many developers look into solutions like those covered in articles about React Native live updates.
Finally, keep an eye on size. Expo has limits on the length of your variable values—it’s 32 KiB for secret variables and 4 KiB for public ones. This is usually plenty, but it’s a good reminder to keep your configurations tidy.
Got Questions? We’ve Got Answers
If you’re just getting started with environment variables in Expo, you probably have a few questions. Let’s walk through some of the most common ones that developers run into—getting these right will save you a ton of headaches later on.
https://www.youtube.com/embed/uMX7pLKf3YE
Can I Change Environment Variables with an OTA Update?
The short answer is no. This is one of the most important things to remember about expo environment variables: they are baked into your app’s JavaScript bundle at the moment you build it. They are, for all intents and purposes, static constants once the build process is finished.
So, what does this mean in practice? If you have an API key or an endpoint URL in your environment variables and you need to change it, an Over-the-Air (OTA) update won’t help. You’ll have to create a completely new build of your app and go through the usual app store submission process.
If you need to change values on the fly without a full app release, you’ll need to think beyond environment variables. A common approach is to fetch these configuration settings from your own API or use a dedicated feature flagging service.
Need to ship updates that don’t require a full app store resubmission? CodePushGo makes it easy to send bug fixes and new features directly to your users’ devices, ensuring a seamless experience. Instantly deploy changes with our powerful OTA update platform.


